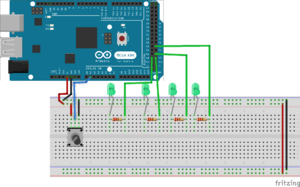
Potentiometer as LED control + Arduino
Now that we have a button working, as well as an indication for our user on the interface that the system is on, we will use those LEDs to indicate the power level of the heat pad. For the sake of this tutorial, as well as to emulate the process we went through during our project, we will forgo the heat pad and simply focus on using a potentiometer (essentially a dial) to light up a series of LEDs.
Materials: Arduino board, four LEDs and 220Ω resistors (the quantity is really up to you), potentiometer (we used these), wires
Step 1: Hook up the circuit elements as shown. Technically, either end of the three-pin potentiometer (the middle one runs to the Arduino) can be positive or negative, it will just affect which way your potentiometer “turns.” In other words, it will dictate whether turning the potentiometer clockwise or counterclockwise lights up the LEDs.
Step 2: The code! You may download it from here. Several similarities can be drawn from the code for the button, such as:
- Initializing the LEDs and potentiometer (this time to an analog pin) with the “const int” function
- In the void setup, declaring the LEDs as “Outputs” and the potentiometer as an “Input”
- Reading the position of the input, in this case, the potentiometer
The only differences we see in this code are:
- Using the analogRead() function instead digitalRead() to read the position of the potentiometer
- The usage of the map() function
- Potentiometers read from a scale of 0-1023, with 1023 being fully “on.” However, when delivering variable current to many resistor-based devices (such as our heating pads), they typically use pulse-width modulation, or PWM, and these are read on a 0-255, with 255 being fully “on.”
- This is precisely where the map() function comes into play. It takes whatever position the potentiometer is on the 0-1023 and simply “maps,’ or translates, it into the conventional 0-255 scale.
And there you go - you now have a series of LEDs controlled by a nice little dial! Here is a video of it in action, posted in Week 10 of our weekly logs
