Attiny85 Programming + Arduino
Contents
Overview
The Attiny85 is an AVR Microcontroller created by Atmel. The chip is in a much smaller form factor but provides many of the capabilities of the Arduino UNO such as PWM, Analog Input, Digital Output. The device is useful when all the pinouts of an Arduino are overkill and form factor is an important component of the design. The only major drawback with chip is that it oes not have a bootloader. To upload and program the chip cannot then upload code directly using the Arduino IDE. Instead a serial programmer must be used as an intermediary to communicate with and program the Attiny85.. There are two ways of doing this, both of which are covered in the document. The first is to use an Arduino UNO as an in serial programmer (ISP) and the second is to but the AVR programmer which takes advantage of your computers serial port directly. With a serial connection established the chip can be programmed using an Attiny85 library developed for the Arduino platform. Once installation is complete I recommend testing programming the Attiny85 with a simple blink program. If you are using the AVR programmer PIN0 is connected to an LED on the device itself. If you are using the Arduino you have to build a simple LED circuit.
Library Installation
This section describes the manner in which to install the Attiny85 library for the Arduino IDE.
- install the Arudino IDE version 1.6 or greater
- Open the application and click the Arduino Tab
- under Arduino click Preferences and put the following URL in Board Manager URL's
- click OK and create a new sketch
- under the Tab tools there should now appear options for Board, Processor, and Clock
- Select the following options
- Board: ATtiny
- Processor: ATtiny85
- Clock 8MHz (internal)
- Installation of the library is now complete
Serial Communication
Arduino UNO Setup
- obtain the use of an Arduino UNO
- in the Tools tab of the Arduino IDE select Programmer and choose the ArduinoISP option
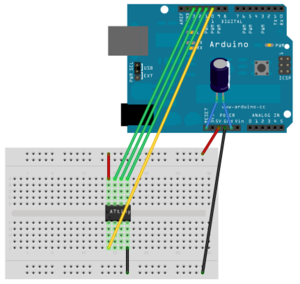
- create the circuit shown the picture below
- using the previously installed library you should now be able to program the Attiny85 by simply uploading your code to the UNO
- test a blink program and uploading a blink program and then moving the chip into a simple LED circuit
AVR Programmer SetUp
If there are extensive issues with compiling code using an UNO we reccomend using the AVR programmer that can be foundhere. The AVR programmer is reliable and provides pinouts so that the chip can be tested while in the socket of the device.
- Open the Arduino IDE
- select the Tools Tab and from Programmer select the USBTinyISP
- place chip into the holder of the AVR Programmer
- you can now compile and upload code to the Attiny85 using the AVR Programmer
- upload a blink program to PIN0 and an LED on the AVR programmer should flash

