Android API Calls With Retrofit
Contents
Overview
This tutorial will guide you through the process of calling an API using an android library called Retrofit. This tutorial assume that the user has basic proficiency in Java but not Android app. This tutorial will be limited to performing the API call and will not take you through the finer points of Android design or string parsing.
Materials/Prerequisites
- Latest version of Android Studio
Process
Prepping the App
To start:
- Create New Project with a Blank activity. Set the targeted API level to 21.
First we want to add the libraries we will be using to our android app. You will need to go to the app's build.gradle file. This can be found under the Gradle Scripts Directory. Note that there are two build.gradle files. One if for your application and one is for your project. The app build.gradle will have the Android compilesdkversion near the top. Add the following lines under dependencies to add the proper libraries. You may get a prompt to sync your project after adding these. Go ahead and do so.
  implementation 'com.squareup.retrofit2:retrofit:2.5.0'
  implementation 'com.squareup.retrofit2:converter-gson:2.5.0'
  implementation 'com.squareup.okhttp3:logging-interceptor:3.12.1'
We'll be using the internet so we also need to declare this in our app manifest. Navigate to the manifest directory and open the AndroidManifest.xml file. Above the application tag you wan to add this line
<uses-permission android:name="android.permission.INTERNET" />
Now if your api is using cleartext traffic (any url that is Http instead of Https) then you also want to add the filling line to the application tag.
android:usesCleartextTraffic="true"
Now your app is ready to interact with the internet.
Setting up the XML and MainActivity
Next you want to navigate to the activity_main.xml file. Here we want to add the views that the user will interact with. For the purposes of this app just add a textview and a button with ids. You can use the code below.
<?xml version="1.0" encoding="utf-8"?>
  <android.support.constraint.ConstraintLayout xmlns:android="http://schemas.android.com/apk/res/android"
      xmlns:app="http://schemas.android.com/apk/res-auto"
      xmlns:tools="http://schemas.android.com/tools"
      android:layout_width="match_parent"
      android:layout_height="match_parent"
      tools:context=".MainActivity">
      <TextView
          android:id="@+id/textview1"
          android:layout_width="wrap_content"
          android:layout_height="wrap_content"
          android:text="Hello World!"
          app:layout_constraintTop_toTopOf="parent"
          app:layout_constraintLeft_toLeftOf="parent"
          app:layout_constraintRight_toRightOf="parent"
          app:layout_constraintBottom_toTopOf="@+id/button1" />
      <Button
          android:id="@+id/button1"
          android:layout_width="wrap_content"
          android:layout_height="wrap_content"
          android:layout_marginBottom="280dp"
          android:text="Refresh"
          app:layout_constraintBottom_toBottomOf="parent"
          app:layout_constraintEnd_toEndOf="parent"
          app:layout_constraintHorizontal_bias="0.498"
          app:layout_constraintLeft_toLeftOf="parent"
          app:layout_constraintRight_toRightOf="parent"
          app:layout_constraintStart_toStartOf="parent" />
  </android.support.constraint.ConstraintLayout>
We will use the button to fire off our API calls and we will use the textview to display the information we receive from the api call.
Next let's navigate to our MainActivity Java class. In this class we need to initialize a TextView, a Button variable, and a String url variable. In the on create attach the xml elements to our variables using findViewByID. We will also create a method known as getInfo and pass the textview into it. Using this method we will later perform the API call and we will edit the text to display the information we receive from the API call.
@Override
    protected void onCreate(Bundle savedInstanceState) {
        super.onCreate(savedInstanceState);
        setContentView(R.layout.activity_main);

        mTextView=findViewById(R.id.textview1);
        mButton = findViewById(R.id.button1);

        mButton.setOnClickListener(new View.OnClickListener() {
            @Override
            public void onClick(View v) {
                getInfo(mTextView);
            }
        });
    }
Creating the Retrofit class
Now lets finally get into how to use RetroFit. We will create a RetrofitClientInstance class that will return an instance of Retrofit. We will pass our app context and our string into the method. The following code can be pretty much be copy and pasted. It will create an instance of RetroFIt using the url we passed in and it will print the Http Logs to the android studio console log.
    private static final String TAG = "RetrofitClientInstance";
    private static Retrofit sRetrofit;

    public static Retrofit getRetrofitInstance(Context context, String url){

        Log.d(TAG, "getRetrofitInstance: HTTPClient");

        HttpLoggingInterceptor interceptor = new HttpLoggingInterceptor();
        interceptor.setLevel(HttpLoggingInterceptor.Level.BODY);
        OkHttpClient client = new OkHttpClient.Builder().addInterceptor(interceptor).build();

        if(sRetrofit == null){
            sRetrofit = new retrofit2.Retrofit.Builder()
                    .baseUrl(url)
                    .client(client)
                    .addConverterFactory(GsonConverterFactory.create())
                    .build();
        }

        return sRetrofit;

    }
Creating Retrofit Interface
Next we will create an interface for RetroFit. Create an interface class and call it GetDataService. You can take a look at this guide for more information about exactly how the syntax works. Every method you add to this interface will be able to be called by your retrofit instance. It will make calls to the url you passed into your retroFit instance. Within the method, the top line will specify the type of request (GET or POST) and the sub url to target. The second line of the method will specify the structure of the response and also allow you to specify exactly what to send in your request.
We will be using the Quotes on Design API. This API is nice because we will not need to use any tokens. We can focus on just the query and response. Our query has two fields we need to fill filter[orderby] and filter[posts_per_page]. So we will create a getQuote method that returns a list of Quote objects and takes in a hash map of queries.
@GET("wp-json/posts")
Call<List<Quote>> getQuote(@QueryMap Map<String, String> query);
You should be getting an error because there is no quote class. Let's create that now. Perusing through the site we can see that all API calls will return a json object that includes an ID, title, content, and link. Our java class will need all of these. To make it easier, you can take an example json from the api call and paste it into a json to pojo generator like here. This is the class.
public class Quote {
    private float ID;
    private String title;
    private String content;
    private String link;


    // Getter Methods

    public Quote(){}

    public Quote(float ID, String title, String content, String link) {
        this.ID = ID;
        this.title = title;
        this.content = content;
        this.link = link;
    }

    public float getID() {
        return ID;
    }

    public String getTitle() {
        return title;
    }

    public String getContent() {
        return content;
    }

    public String getLink() {
        return link;
    }

    // Setter Methods

    public void setID(float ID) {
        this.ID = ID;
    }

    public void setTitle(String title) {
        this.title = title;
    }

    public void setContent(String content) {
        this.content = content;
    }

    public void setLink(String link) {
        this.link = link;
    }
}
Putting it altogether
Now we've finally got everything together. Let's head back to the MainActivity class. and fill in the getInfo method. You can copy and paste the code below. The code will make an API call and overwrite the textview with a quote:
Log.d(TAG, "getInfo: Started getInfo");

        //create the query map
        Map<String, String> data = new HashMap<>();
        data.put("filter[orderby]", "rand");
        data.put("filter[posts_per_page]", "1");

        //create the retrofit instance and use our getQuote method
        GetDataService service = RetrofitClientInstance.getRetrofitInstance(this, url).create(GetDataService.class);
        Call<List<Quote>> call = service.getQuote(data);

        //call the enqueue method to get the results of our call
        call.enqueue(new Callback<List<Quote>>() {
            @Override
            public void onResponse(Call<List<Quote>> call, Response<List<Quote>> response) {
                Log.d(TAG, "onResponse: Success");
                //parse through our resulting list of quotes and change the text in our text view
                for(Quote i: response.body()){
                    t.setText(i.getContent());
                }

            }

            @Override
            public void onFailure(Call<List<Quote>> call, Throwable t) {
                //report the failure to the log and add a toast message explaining that you failed miserably
                Log.d(TAG, "onFailure: " + t.toString());
                Toast.makeText(MainActivity.this, "Getting Quote Failed", Toast.LENGTH_SHORT).show();
            }
        });
Finishing
Now that everything is added, connect your app to an emulator or your android phone. Press the button and the text on the textview should change. If it doesn't, it's your fault.
You're Welcome.
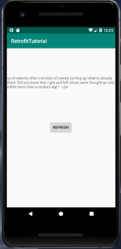
How it should look
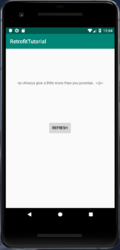
Another Quote


Authors
Bradford Orr, Spring 2019
Group Links
Social Network Matchmaking Project Page
Social Network Matchmaking Log Page