Difference between revisions of "Attiny85 Programming + Arduino"
| Line 14: | Line 14: | ||
::*Processor: ATtiny85 | ::*Processor: ATtiny85 | ||
::*Clock 8MHz (internal) | ::*Clock 8MHz (internal) | ||
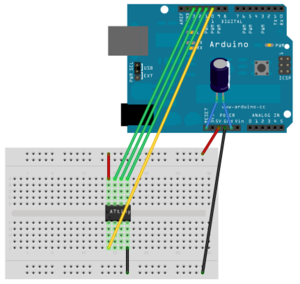
| − | [[File:Screen-shot-2011-06-06-at-1.46.39-PM.png|300px|thumb|-circuit diagram to program the Attiny85]] | + | [[File:Screen-shot-2011-06-06-at-1.46.39-PM.png| 300px | thumb| -circuit diagram to program the Attiny85]] |
=Serial Communication Setup= | =Serial Communication Setup= | ||
Revision as of 05:04, 8 December 2017
Description
The Attiny85 is an AVR Microcontroller created by Atmel. It is has many of the capabilities of the Arduino UNO but in a much smaller form factor. The device is useful if all the pinouts of an Arduino are overkill. However the device does not have a bootloader like the Arduino and so must be programmed through serial communication. There are two ways of doing this, both of which are covered in the document. The first is to use an Arduino UNO as serial programmer to the chip and the second is to but the AVR programmer specifically designed for this purpose. With a serial connection established the chip can be programmed using an Attiny85 library developed for the Arduino platform.
Library Installation
This section describes the manner in which to install the Attiny85 library for the Arduino IDE.
- install the Arudino IDE version 1.6 or greater
- Open the application and click the Tab Arrduino
- under Arduino click Preferences and put the following URL in Board Manager URL's
- click OK and create a new sketch
- under the Tab tools there should now appear options for Board, Processor, and Clock
- Select the following options
- Board: ATtiny
- Processor: ATtiny85
- Clock 8MHz (internal)
Serial Communication Setup
Arudino UNO Setup
- obtain the use of an Arduino UNO
- in the Tools tab of the Arduino IDE select Programmer and choose the ArduinoISP option (ISP stands for In System programmer)
- create the circuit shown the picture below
