Background
We’ve been using HTML+CSS and JavaScript for the UIs for our work thus far. Creating a Mobile app usually requires learning appropriate programming languages (Java/Kotlin for Android, Objective-C/Swift for iOS, and C# for Windows Phone) as well as APIs, development tools, etc. Learning native development for mobile platforms (and the issues regarding mobile app design) requires an entire course itself, but fortunately we can leverage the skills and tools we already know to deploy UIs as Hybrid Apps.
Objectives
The objectives of today’s Studio are:
- Develop and test Mobile-ready UIs
- NOTE Due to the iOS app being pulled in the last year, those with access to only iOS devices will only be able to test their work in a web browser. That being said, it’s still possible to deploy completed work as a native app.
1. Studio Setup
1.1. Find a Group & Pick Roll Assignments
Please take your role seriously. When you get your role, review the responsibilities and make sure you follow through on them.
Role Reminders
- Common Roles
- Participate in discussion and work
- Review & revise the final report for the studio
- Manager
- GitHub: Create group (following the naming convention) & Verify that everyone else joins it
- Time management: Ensure the group is making progress, is on-task, and asks for help when stuck
- Human Resources: Ensures civil conduct of all members
- Submission management: Ensure the group completes and submits all parts of the studio on-time
- Hardware / Wiring Review: Review any circuitry for safe operation
- Recorder
- Record who will be taking on each role (complete
process/Roles.md) - Compose answers to questions in
README.md - Record details of the studio session (complete
process/SessionNotes.md):- Notes on the session (what was said, order of work, etc.)
- Summarize important findings or techniques
- Summarize outstanding questions or issues
- Record who will be taking on each role (complete
- Spokesperson
- Enter the group’s answers for the questions in
process/Debrief.md - Report out the results of the Studio at checkout
- Coordinate and schedule out-of-class meetings if necessary.
- Organize parts for circuits
- Enter the group’s answers for the questions in
- Technician
- Create project code
- Assemble any circuits
- Enter/modify code
Special Circumstances: Groups of three
Groups of three will be allowed if:
- You plan to work with someone who is absent and all members of the group agree to work as a group of three for this studio.
- There aren’t enough people present to form groups of four.
In groups of three the Manager must also take on the responsibilities of the Spokesperson.
1.2. Studio Distribution
As in the previous studios, all group members will need to be in a GitHub group (and repository)
- The group’s Manager should create the repository. The GitHub group name should include the surnames of all group members.
- All other members should join the group.
The link for this studio is: https://classroom.github.com/g/6RlpNN_9
Today the Recorder, Technician, and the Spokesperson will want to be able to work with the repository (i.e., it should be on at least two computers). The Technician will be working with the Photon (C++).
1.3. Recorder
The Recorder should update process/Roles.md to record everyone’s roles for this studio (use full names). In addition, the Recorder should take notes about the interaction of the overall session. Be sure to pull/merge/commit/push at the end of the day!
1.4. Spokesperson
Today you will be doing the bulk of recording answers to questions. Read the questions in process/Debrief.md to the group and the group should come to a consensus for each. Be sure to enter the responses. Be sure to pull/merge/commit/push at the end of the day!
1.5. Technician
The Technician will be programming the Photon and the UI. Consequently their computer will need to be logged into the account for the Photon being used for testing. (Particle Desktop will need to be logged in)
You will be managing the code for today’s studio. DO NOT open it in Particle Dev. Instead create new projects within the repo folder. Be sure to pull/merge/commit/push at the end of the day!
2. Studio: Hybrid Apps
Adobe’s PhoneGap apps are intended to close the gap between phone development and desktop/web development. They create a project structure and allow you to include HTML+CSS and JavaScript for an application that can be submitted to App stores.
2.1. Basic Light App Structure
The Studio repository already contains both firmware and a complete Cordova app:
lightHardwareis the completed Lamp application (from Studio 8)lightUIis a completed Cordova App
2.2 Hardware setup and test
Prepare your RGB LED (resistors/wiring) and button.
The Technician should load the lightHardware project in Particle Desktop. Review the source code and modify it to support your setup (RGB LED pins, button pin)
Program your Photon and test your work using the Particle Console. Verify that you understand how to call functions and how the light behaves.
2.3 App setup and Review
Review the lightUI folder and sub-folders. Try to identify the basic components and files included.
Complete README.md Q1
Review the primary .html file.
Complete README.md Q2.1-2.2
Update the JavaScript so that it will use your Access Token and Device ID.
Review the primary .js files.
Complete README.md Q3
2.4 App Testing via Cordova and Desktop Browsers
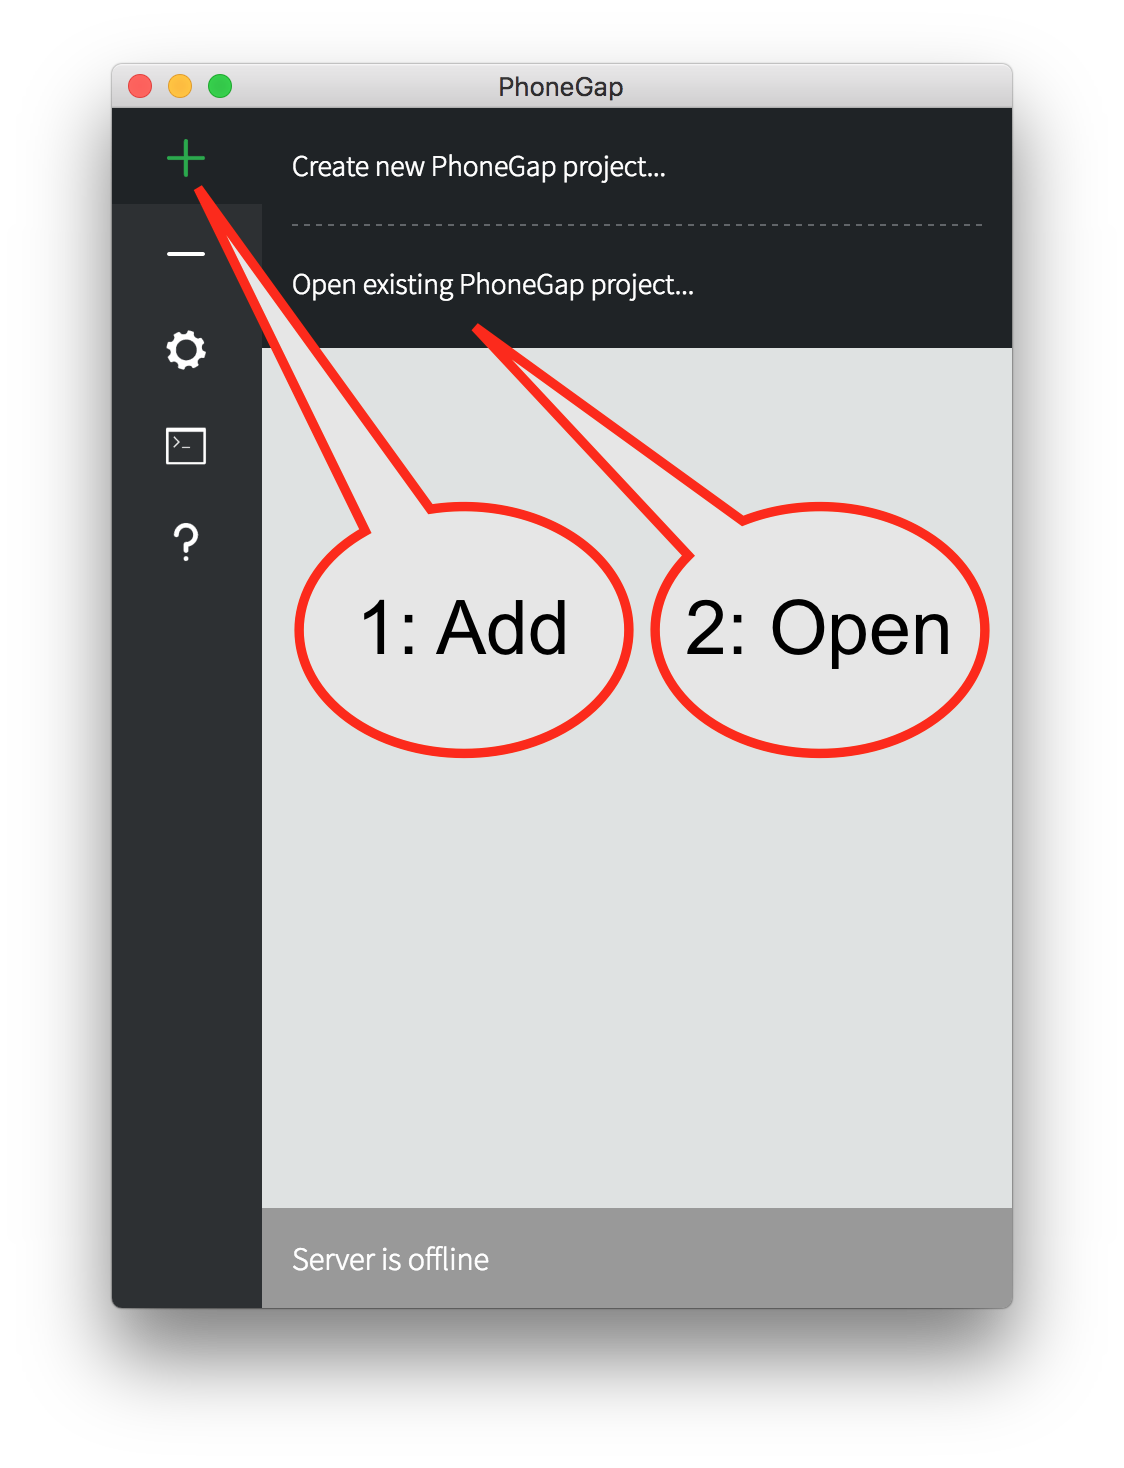
Open the PhoneGap Desktop App and add the project to it:
- Select the
+from the side menu - Select
Open existing PhontGap project...

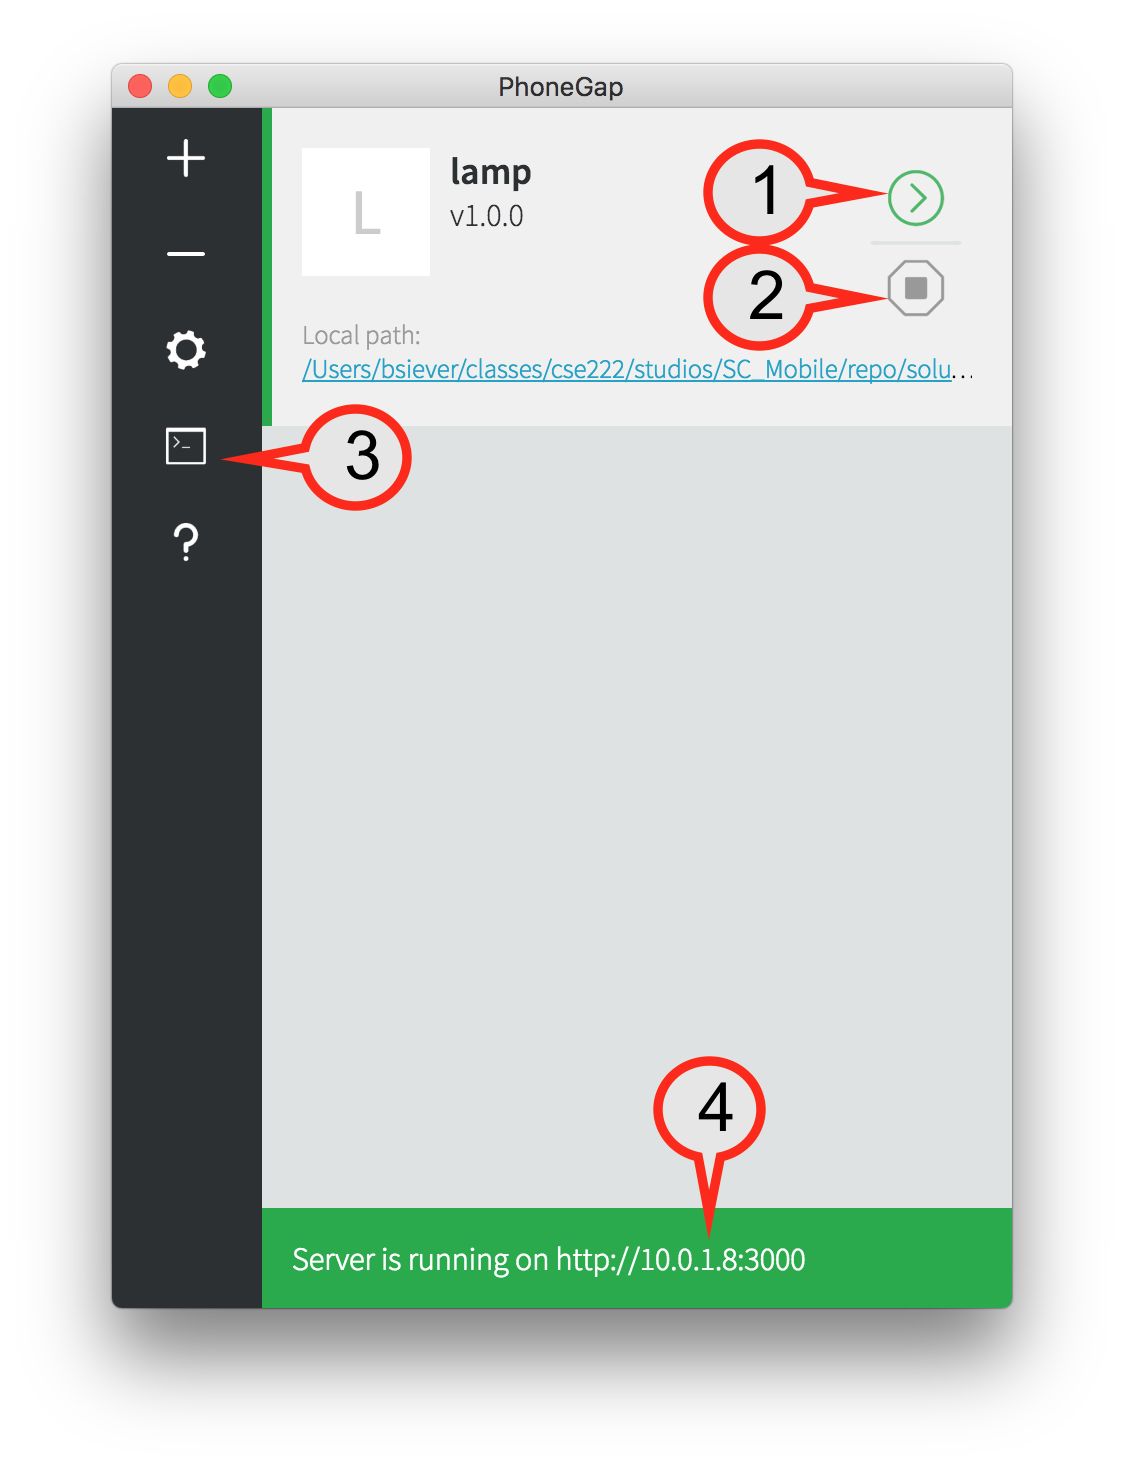
There are a few features of the UI to be aware of:

- The
>indicates the app currently being “served” by PhoneGap. Currently there is only one app in the list. PhoneGap can “load” multiple apps (the area that sayslightis actually a list of apps PhoneGap knows about), but it will only serve one at a time. If you load multiple apps be sure you know which is currently active. (The-on the left menu can be used to remove apps) - The “stop sign” will stop serving apps.
- The
Consoletab shows events. If you are using the PhoneGap App on a mobile device, theconsole.log()messages as well as Cordova-specific error messages will be shown here. If you are working in a browserconsole.log()messages will be shown both here and in your browser’s Console pane. Clicking on this icon toggles the log open/closed. - This is the URL that your application is on. Clicking on it will open it in your browser. If you use the PhoneGap mobile app, you will need this URL to access your application (and both the desktop running PhoneGap Desktop and your mobile device will need to be on the same network. On campus be sure that both are using the same Wi-Fi network! (NOT one on
wustl-guestand another onwustl-2.0))
Open the app in your browser by clicking on the URL listed in PhoneGap Desktop. It should work as it did at the completion of Studio 8. If not, review and fix any errors in the console.
After developing a UI, it can be tested via your desktop browser. This has some distinct advantages:
- The “develop-test-revise” cycle is short because no time is wasted in long recompilation and deployment to a device.
- Powerful developer tools available in desktop browsers can be used to verify things work and debug errors. (I.e., the console, JavaScript debugger, inspecting elements HTML/CSS, etc.)
- Verification of responsive design is particularly important, since few developers have access to a large fleet of different devices (and even if they do, the time taken to test work on each may be prohibitive)
The PhoneGap Desktop app will automatically push out changes as they occur. Open the primary HTML file and make a small change, like changing one of the labels. For example, change the button that says Set Color to say Change Color. You may notice that your webpage automatically reloads.
2.5 App Testing via PhoneGap
Unfortunately PhoneGap for iOS was removed from the App Store in the past few days. If you either happened to get it prior to removal or have access to the PhoneGap App on another platform, proceed to test your work via the mobile app.
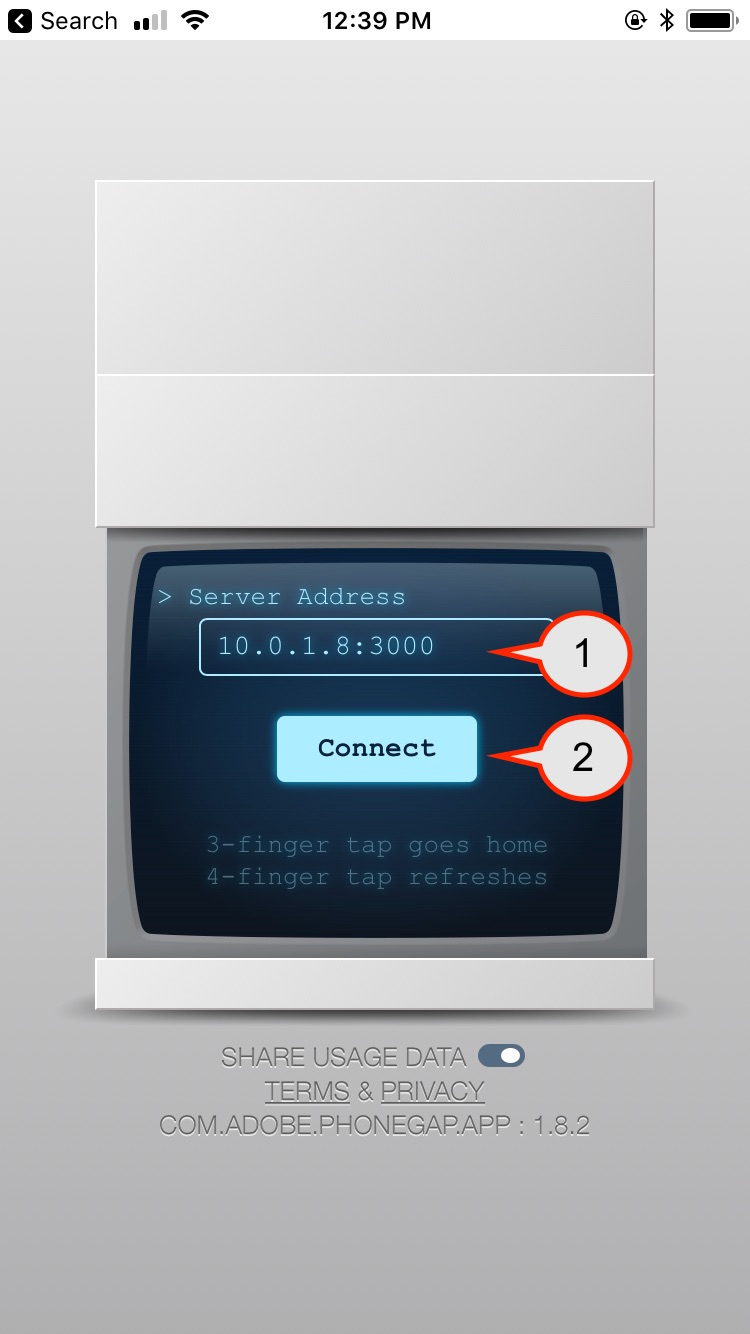
Open the PhoneGap Mobile App:
- Verify that both the Phone and Desktop are on the same network. If so, enter the URL and port being shown on the Server.
- Select
Connect, which will download the current version of the app and launch it on the mobile device. (Note the two options listed below the Connect button which may be useful for refreshing your work)
As with the desktop app, changes should automatically be pushed to your device as they are made.
3. In-Class Checkout
Commit your work to GitHub:
- The Spokesperson should complete changes, save them, commit them locally, then push to GitHub using GitHub desktop.
- The Recorder should save any changes, commit them locally, use GitHub desktop to Pull and merge any changes to the repo, and finally Commit/Push the additions back to GitHub.
- The Technician will be using the cloud-based IDE today, but code will still need to be merged into the repo locally.
- Verify your commits from the Recorder, an Spokesperson, and Technician are on GitHub.
- Show a TA your progress
4. Post-Class Checkout
Complete any unfinished work and commit it to your repo by 11:59pm Sunday, April 15th.