Demo
Pay close attention to the Demo today. The product being shown will be the basis for this studio.
Objectives
The objectives of today’s Studio are:
- Get to know some of your classmates.
- Work through the Studio process.
- Refine your understanding of User Interface (UI) development.
- Refine your understanding of HTML.
- Refine your understanding of techniques/tools used when developing HTML.
1. Studio Setup
The following steps will be common in most studio sessions.
1.1. Find a Group
Today’s studio will require groups of four. If you don’t already have someone to work with, introduce yourself to those near you.
Special Circumstances: Groups of three
Groups of three will be allowed if:
- You plan to work with someone who is absent and all members of the group agree to work as a group of three for this studio.
- There aren’t enough people present to form groups of four.
In groups of three the Manager must also take on the responsibilities of the Spokesperson.
1.2. Role Assignment
TAs will hand out sheets of paper assigning each member of the group a role. Roles will be assigned randomly today and will change with each Studio session. Each role has some specific responsibilities for the work, but everyone is expected to contribute to discussions and exploration of concepts.
When you get your role, read it over and make sure you are aware of your responsibilities.
1.3. Studio Distribution
As in the last studio, all group members will need to be in a GitHub group (and repository)
- The group’s Manager should create the repository. The GitHub group name should include the surnames of all group members.
- All other members should join the group.
The link for this studio is: https://classroom.github.com/g/rExE8NVA
Today both the Recorder and Technician will want to be able to work with the repository (i.e., it should be on at least two computers). The Technician will be working with HTML. Chrome and Firefox have developer tools that are slightly better than Safari’s for today’s Studio, so the Technician should probably have access to Chrome/Firefox.
1.4. Recorder
The recorder should update process/Roles.md to record everyone’s roles for this studio. In addition, the Recorder should take notes about the interaction of the overall session.
1.4. Prep Debrief
The group should review the questions in process/Debrief.md, come to a consensus for each, and the Technician should enter the summary for each question.
2. Studio: UI Design and Revision
Today’s studio will complete the design of a UI and use HTML to complete and refine a prototype of it.
2.1 Example Application
Today’s studio will design and implement the UI for a Wi-Fi controlled RGB light. I.e., we’ll replace the Bluetooth light demoed in class with a Wi-Fi version!
2.2 UI Prototype Concepts and Techniques
Planning is one of the most important steps of all aspects of software development, including UI design and development. There are a variety of tools and approaches that can be used to help plan software and UIs. Today we will look at three:
- User Stories: “…a user story is an informal, natural language description of one or more features of a software system. User stories are often written from the perspective of an end user or user of a system” — Wikipedia: User Story
- Use case (or Usage Scenario): “…a list of actions or event steps typically defining the interactions…to achieve a goal.” — Wikipedia: Use Case
- Paper Prototyping: “…a process that helps developers to create software that meets the user’s expectations and needs” — Wikipedia: Paper Prototyping
The following is a brief, informal example. Is uses “User” as a proper noun referring to a specific user of a UI:
- A User Story: User can change the color of the light to any possible combination of R/G/B.
- A Corresponding Use Case:
- Description: Changing the light from all red to all green
- Pre: Red slider is at 100%, Green slider is at 0%, Blue slider is at 0%, and the light is all Red
- Steps:
- User Adjusts the Red slider to 0%
- User Adjusts Green slider to 100%
- User Hits
Select Colorbutton
- Post: The color of the light is Green
- The paper prototype would be a drawing of a UI that captures all the needed information and controls. TAs will handout an example paper prototype.
- A Corresponding Use Case:
Complete README.md Q1.1-1.2, Q2.1-2.3, and Q3
2.3 Another Screen: Simple UIs
If you examine the screens of any phone apps that you either enjoy using or find easy to use, you’ll probably notice that screens typically only serve one function and there simple, obvious ways to navigate between different screens of content.
Assume that the User is very energy conscious. They will want the light to automatically turn off after it has been on too long, but they will want to ability enable or disable this feature (sometimes they want the light to just stay on) and the ability to select the time used (from 15min to 24hrs).
Complete README.md Q4
2.4 Paper to E-prototype
The Technician should perform the actions in this section, but all group members should assist.
The studio contains mainLightUI.html, which is based on the original paper prototype. Open it in your web browser (Firefox or Chrome) (via File > Open File... and browsing to the file).
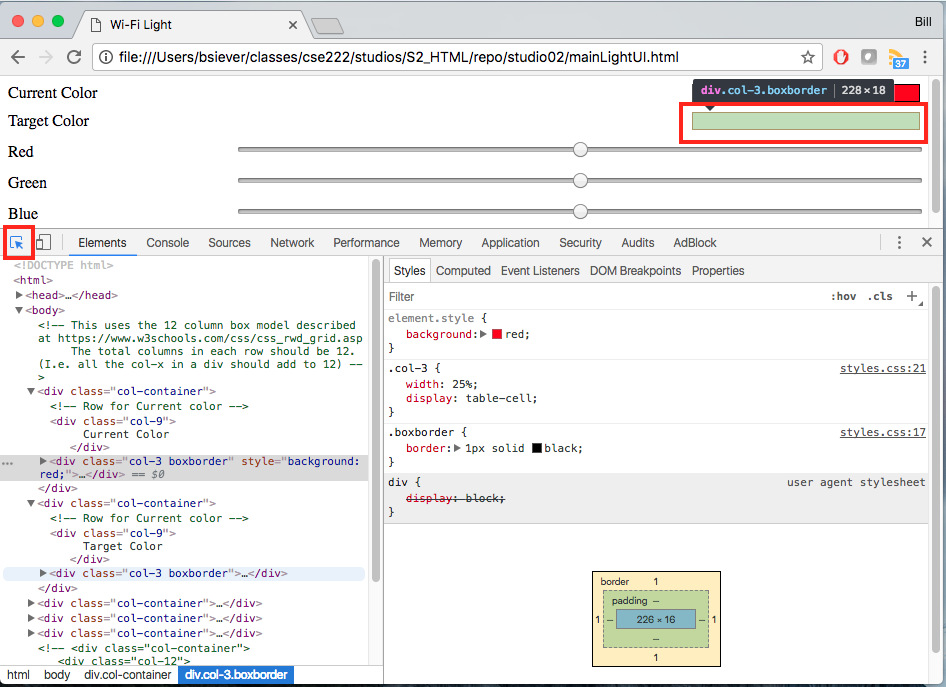
Open the browser’s developer tools and inspect elements (View > Developer > Developer Tools) and adjust the window so matches the following

Select the Select an Element icon (highlighted on the left of the toolbar in the picture) and then move around the page content area to select an element on the page. After clicking on an element on the page, like the <div> shown in the picutre, you can see the Styles applied via the Styles tab as well as the CSS rules that they are from. In addition, you can click on the Computer tab and see all styles that may have been applied after combining all styles that apply to the element.
The developer tools can be a valuable tool when you are trying to understand how styles are impacting the display of your work.
Complete README.md Q5.1-5.2
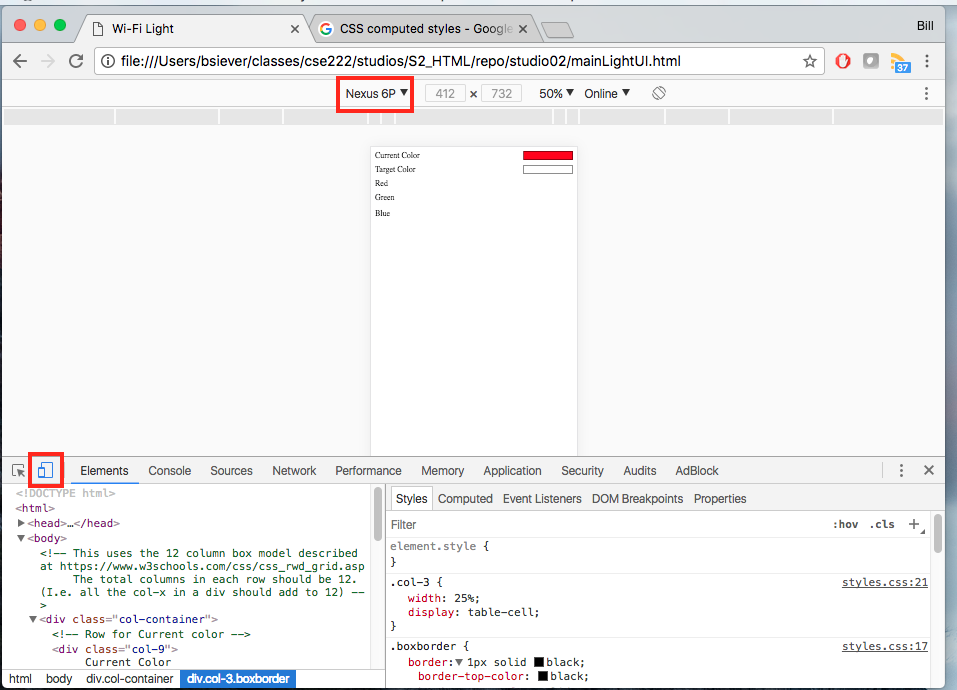
Notice the Toggle Device Toolbar button and the device selection menu:

Examine your the page in a variety of device formats.
2.5 Fixing the Prototype
Complete README.md Q6.1
Often errors and inconsistencies in HTML can be difficult to detect and debug. A HTML validator, like W3’s Markup Validation Service can be a valuable tool for finding and fixing errors.
Run the page through the validator and use the resulting output to try to correct any errors.
There is at least one error that the validator won’t catch. Find and fix it as well.
Complete README.md Q6.2
2.6 Finishing the Prototype
Update the prototype to reflect the updated paper prototype. You may need to update HTML and CSS it include anything that they omitted originally as well as any additions you made.
3. In-Class Checkout
Commit your work to GitHub:
- The Recorder should complete changes, save them, commit them locally, then push to GitHub using GitHub desktop.
- The Technician should save any changes, commit them locally, use GitHub desktop to Pull and merge any changes to the repo, and finally Commit/Push the additions back to GitHub.
- Verify your commits on GitHub
- Show a TA your progress
4. Post-Class Checkout
Complete any unfinished work and commit it to your repo by 11:59pm Sunday, Sept. 9th.