Background
During the last studio we started to work with Embedded systems. Although not an Arduino, the Photon’s API follows most of the same conventions of the Arduino that you used in CSE132. Today we will continue to explore the Photon’s API and work with some concepts and features that will be vital to the RGB light and the next assignment.
Objectives
The objectives of today’s Studio are:
- Review basic properties of Photon behavior.
- Review output-related issues.
- Review the use of buttons.
- Work with
Timerobjects and more event-driven programming. - Develop some code necessary to fade an RGB light from one color to another.
1. Studio Setup
1.1. Find a Group & Get Roll Assignments
As usual, today’s studio will require groups of four. Decide who in your group will take on each role: Manager, Technician, Spokesperson, Recorder (they should be different roles from the previous two studios)
Please take your role seriously. When you get your role, review the responsibilities and make sure you follow through on them.
Role Reminders
- Common Roles
- Participate in discussion and work
- Review & revise the final report for the studio
- Manager
- GitHub: Create group (following the naming convention) & Verify that everyone else joins it
- Time management: Ensure the group is making progress, is on-task, and asks for help when stuck
- Human Resources: Ensures civil conduct of all members
- Submission management: Ensure the group completes and submits all parts of the studio on-time
- Hardware / Wiring Review: Review any circuitry for safe operation
- Recorder
- Record who will be taking on each role (complete
process/Roles.md) - Compose answers to questions in
README.md - Record details of the studio session (complete
process/SessionNotes.md):- Notes on the session (what was said, order of work, etc.)
- Summarize important findings or techniques
- Summarize outstanding questions or issues
- Record who will be taking on each role (complete
- Spokesperson
- Enter the group’s answers for the questions in
process/Debrief.md - Report out the results of the Studio at checkout
- Coordinate and schedule out-of-class meetings if necessary.
- Organize parts for circuits
- Enter the group’s answers for the questions in
- Technician
- Create project code
- Assemble any circuits
- Enter/modify code
Special Circumstances: Groups of three
Groups of three will be allowed if:
- You plan to work with someone who is absent and all members of the group agree to work as a group of three for this studio.
- There aren’t enough people present to form groups of four.
In groups of three the Manager must also take on the responsibilities of the Spokesperson.
1.2. Studio Distribution
As in the previous studios, all group members will need to be in a GitHub group (and repository)
- The group’s Manager should create the repository. The GitHub group name should include the surnames of all group members.
- All other members should join the group.
The link for this studio is: https://classroom.github.com/g/4FobFiAQ
Today the Recorder, Technician, and the Spokesperson will want to be able to work with the repository (i.e., it should be on at least two computers). The Technician will be working with the Photon (C++).
1.3. Recorder
The Recorder should update process/Roles.md to record everyone’s roles for this studio (use full names). In addition, the Recorder should take notes about the interaction of the overall session. Be sure to pull/merge/commit/push at the end of the day!
1.4. Spokesperson
Today you will be doing the bulk of recording answers to questions. Read the questions in process/Debrief.md to the group and the group should come to a consensus for each. Be sure to enter the responses. Be sure to pull/merge/commit/push at the end of the day!
1.5. Technician
You will be managing the code for today’s studio. Download the repository, but don’t open it in Particle Dev. Instead open Particle Dev, close any open windows/projects. Create each mini-project listed below in the designated folder within the repository directory. Be sure to pull/merge/commit/push at the end of the day!
2. Studio: Hardware Setup & LEDs
Your RGB LED should already be wired to your Photon. The sections below refer to a series of experiments using pin D1. If your RGB LED is currently using D1, you can use D4 instead. Be sure to change everything consistently.
2.1 General Advice
- Always be sure to unplug your board before making any wiring changes. This avoids an accidental misconnection that could damage the board.
- Always double check your wiring. Once you apply power the board could be damaged almost instantly.
- Always reprogram the board with an empty sketch when changing how I/O pins are used. Remember that the Photon is always running code. If a program uses a pin as an output and you re-wire it to an input that is connected to ground, it could cause a short circuit when the program executes. This can cause enough current to flow to destroy the pin’s circuitry (or the board itself).
2.2. Input Insanity
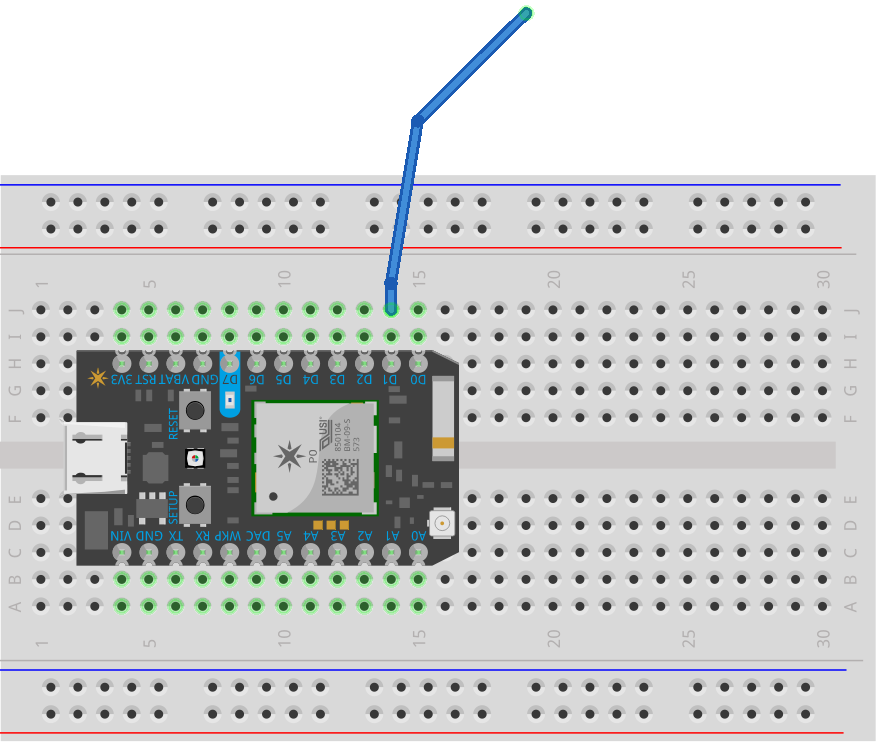
Wire your Photon as follows:

Notice that one end of the wire is connected to D1, but the other end isn’t connected to anything.
Technician: Create a new project called inputTest within your studio folder. Use the Particle IDE to create the sketch within your repo folder. The IDE should have just the sketch and it’s subfolders open, not the entire repository! Close and remove all other projects from the IDE except inputTest. The Particle IDE doesn’t work correctly when multiple projects are open! Put the following code in it:
void setup() {
  Serial.begin(9600);
  pinMode(D1, INPUT);
}

void loop() {
  Serial.println(digitalRead(D1));
}
Run the code and open the serial monitor (Particle > Show serial monitor or use the Arduino IDE’s Serial Monitor). Watch the output (you may need to scroll to the bottom) as you complete the following questions.
Complete README.md Q1.1-1.3
2.3. Input Sanity
The previous circuit is an example of a “floating input”. That is, it’s not distinctly connected to a known voltage (like GND or 3V3 on the Photon). A common solution for “floating inputs” is to use something called a “Pull” resistor. If the “pull” resistor is connected to GND, it will pull the input down to ground unless something “stronger” (i.e., significantly lower resistance) pulls it away. A pull resistor connected to ground is referred to as a pull-down, because it pulls the voltage down and a pull resistor connected to a higher voltage, like 3V3, is referred to as a pull-up.
Change the pin mode from INPUT to INPUT_PULLDOWN, update the code, and test the behavior again.
Complete README.md Q2.1-2.3

Complete README.md Q3.1-3.2
2.4. Safe Mode Practice
The Photon relies on internet connectivity to be programmed. If it can’t stay connected to the internet, it can’t be reprogrammed. Often errors in programs, like infinite loops or long delays, cause the Photon to lose its connection. It’s possible to start the Photon in “Safe Mode”, which prevents it from running any of your code. Consequently, if there’s an error in your code that is preventing the Photon from holding a connection, Safe Mode can usually be used to reprogram it.
Review the details of Safe Mode together and have each member of your group practice re-starting the Photon in Safe Mode.
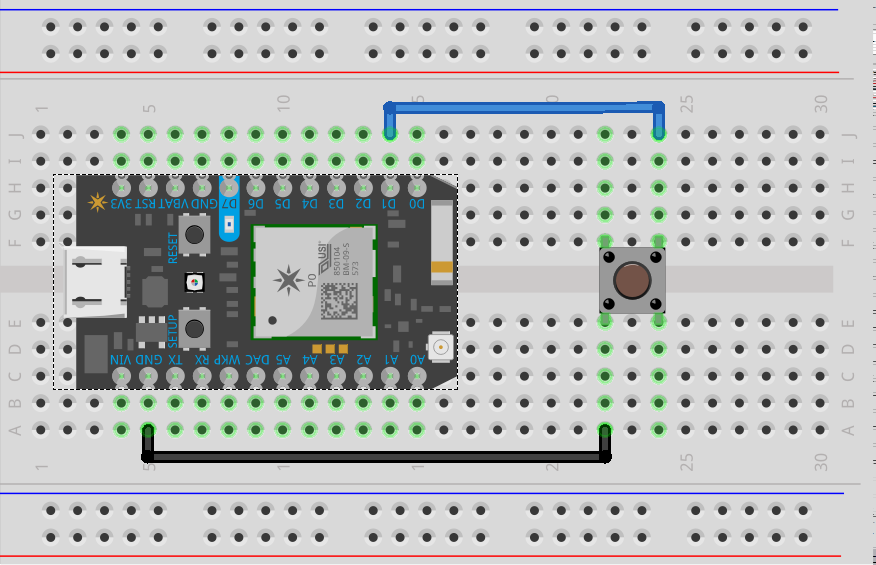
2.5. Button Badness
Update the button sketch so that it waits until the button is pressed:
const int buttonPin = D1;
void setup() {
  Serial.begin(9600);
  pinMode(buttonPin, INPUT_PULLUP);
}

int count = 0;
void loop() {
  Serial.println("Waiting for press ");
  while(digitalRead(buttonPin)==1);
  count++;
  Serial.print("Pressed ");
  Serial.print(count);
  Serial.println(" times");
}
Note that this is exactly the sort of blocking behavior that may cause the Photon to lose internet connectivity!
Test the above. After you observe the behavior, update the code so that it uses an if-statement rather than a while-loop. Before testing it: Complete README.md Q4.1
void loop() {
  if(digitalRead(buttonPin)==0) {
    count++;
    Serial.print("Pressed ");
    Serial.print(count);
    Serial.println(" times");
  }
}
Test it and Complete README.md Q4.2
2.6. Time for Time
Technician create a new sketch called timeTests (Close all sketches and remove them from the Particle IDE / close the project. Create a new folder as a sub-folder of the repo. The Particle IDE does not work correctly if multiple projects are open)
Review the various “Time Functions”. Use them to print the following once a second:
- the current time as a string.
- the current time in “Unix time” format (sometimes also called “epoch time”)
2.7 Time for Timers
Technician create a new sketch called timers. (Close all sketches and remove them from the Particle IDE / close the project. Create a new folder as a sub-folder of the repo. The Particle IDE does not work correctly if multiple projects are open)
Particle’s Software Timers work a lot like JavaScript setInterval().
Timers are C++ objects, whereassetInterval()is a method of thewindowobject.- Both allow programmers to supply a function (i.e., a callback) and a duration. The function will be called repeatedly at approximately the specified duration.
Variations on timers are a great way to avoid blocking code. Practice using timers to:
- One to print the word “second” once a second
- One to print the word “half” every 500ms
2.8 Timers and RGB values
One nice feature of many RGB lights is the ability to gently transition between colors (so as to avoid harsh transitions).
Technician create a new sketch called rgbFade (Use the Particle IDE to create the sketch within your repo folder. The IDE should have just the sketch and it’s subfolders open, not the entire repository!)
Create a function with the definition:
void rgbFade(int startR, int startG, int startB, int endR, int endG, int endB) {
  // TODO
}
When called, it should cause the color to fade from the start color to the end color over the course of 5s.
- You should use timers, not delta timing or delay timing.
- It should update the color every 0.1s (but this should be easy to change via changing a single constant in code).
- The RGB specified should be normal RGB values. That is, (255,0,0) should be pure red. When working with common anode RGB LEDs, it may be best to use a helper function, like:
void rgbWrite(int pin, int value) { analogWrite(pin, 255-value); } - Using
Serial.read()can make testing easier. Consider variations on the following:void loop() { char c = Serial.read(); switch(c) { case 'a': rgbFade(0,0,0, 255,0,0); break; case 'b': rgbFade(0,255,255, 0,0,0); break; } }
Hints & Spoilers
- It’s easiest to think of this as a linear interpolation problem.
- This requires keeping track of when the process started and how long it is (the “run” needed to compute a slope).
- The initial values and ending values.
- Multiple timers may be helpful:
- One to stop the entire process when done.
- One to do the periodic updates.
3. In-Class Checkout
Commit your work to GitHub:
- The Spokesperson should complete changes, save them, commit them locally, then push to GitHub using GitHub desktop.
- The Recorder should save any changes, commit them locally, use GitHub desktop to Pull and merge any changes to the repo, and finally Commit/Push the additions back to GitHub.
- The Technician should save any changes, commit them locally, use GitHub desktop to Pull and merge any changes to the repo, and finally Commit/Push the additions back to GitHub.
- Verify your commits from the Recorder, Spokesperson, and Technician are on GitHub.
- Show a TA your progress
4. Post-Class Checkout
Complete any unfinished work and commit it to your repo by 11:59pm Sunday, Oct. 6th.