Background
It’s time to bring the last several studios together:
- Studio 4 (JavaScript 2) had you create a UI for a light and model the light itself via a JavaScript object.
- The JavaScript light model supported a listener, so as the light as changed it would update the UI.
- Studio 6 (Embedded 2) had you create functions that could control an RGB LED and fade its color.
- Studio 7 (Cloud 1) had you implement Particle cloud functions that could control the RGB LED via the internet.
To summarize:
- You’ve learned JavaScript and created a UI
- You’ve created an internet-enabled device
Today’s studio focuses on connecting the two pieces together.
Objectives
The objectives of today’s Studio are:
- Use a JavaScript API to interact with Particle Devices
- Further refine your understanding of typical “events” and their interaction with aspects of IoT products
1. Studio Setup
1.1. Find a Group & Get Roll Assignments
Please take your role seriously. When you get your role, review the responsibilities and make sure you follow through on them.
Role Reminders
- Common Roles
- Participate in discussion and work
- Review & revise the final report for the studio
- Manager
- GitHub: Create group (following the naming convention) & Verify that everyone else joins it
- Time management: Ensure the group is making progress, is on-task, and asks for help when stuck
- Human Resources: Ensures civil conduct of all members
- Submission management: Ensure the group completes and submits all parts of the studio on-time
- Hardware / Wiring Review: Review any circuitry for safe operation
- Recorder
- Record who will be taking on each role (complete
process/Roles.md) - Compose answers to questions in
README.md - Record details of the studio session (complete
process/SessionNotes.md):- Notes on the session (what was said, order of work, etc.)
- Summarize important findings or techniques
- Summarize outstanding questions or issues
- Record who will be taking on each role (complete
- Spokesperson
- Enter the group’s answers for the questions in
process/Debrief.md - Report out the results of the Studio at checkout
- Coordinate and schedule out-of-class meetings if necessary.
- Organize parts for circuits
- Enter the group’s answers for the questions in
- Technician
- Create project code
- Assemble any circuits
- Enter/modify code
Special Circumstances: Groups of three
Groups of three will be allowed if:
- You plan to work with someone who is absent and all members of the group agree to work as a group of three for this studio.
- There aren’t enough people present to form groups of four.
In groups of three the Manager must also take on the responsibilities of the Spokesperson.
1.2. Studio Distribution
As in the previous studios, all group members will need to be in a GitHub group (and repository)
- The group’s Manager should create the repository. The GitHub group name should include the surnames of all group members.
- All other members should join the group.
The link for this studio is: https://classroom.github.com/g/_EBKMzPP
Today the Recorder, Technician, and the Spokesperson will want to be able to work with the repository (i.e., it should be on at least two computers). The Technician will be working with the Photon (C++).
1.3. Recorder
The Recorder should update process/Roles.md to record everyone’s roles for this studio (use full names). In addition, the Recorder should take notes about the interaction of the overall session. Be sure to pull/merge/commit/push at the end of the day!
1.4. Spokesperson
Today you will be doing the bulk of recording answers to questions. Read the questions in process/Debrief.md to the group and the group should come to a consensus for each. Be sure to enter the responses. Be sure to pull/merge/commit/push at the end of the day!
1.5. Technician
The Technician will be programming the Photon and the UI. Consequently their computer will need to be logged into the account for the Photon being used for testing. (Particle Desktop will need to be logged in)
You will be managing the code for today’s studio. Download the repository and open it in Particle Dev. Be sure to pull/merge/commit/push at the end of the day!
2. Studio: Hardware Setup: LEDs, buttons, concepts, and code
- Hardware: Your RGB LED and a button should both be connected to your Photon.
- Concepts: You should understand basic details of button bounce and timers.
- Code: You should have completed the last studio (cloud-based fade).
2.1. Basic Light: Refinement
- Add your Cloud-connecetd light code to
cloudConnectedLamp.ino - Refine your fade so it only updates 1x per second (1000ms between updates; a total of 5 updates for the fade).
- At the end of today’s studio the “state” will continually be posted to the UI and Particle only supports one update per second.
- Verify that your RGB fade works via a cloud function.
2.2. Publishing State to a Stream
- Add the following function to your code and adjust it as needed:
// TODO: Add the following as a global variable const String topic = "cse222Lights/thisLamp/color"; int publishState() { // Goal: Publish a valid JSON string containing the state of the light: // Ex: "{"powered":true, "r":255, "g":255, "b":255}" // Note that each property has double quotes! // TODO: Adjust variables to match your light's state variables // (NOTE: Be careful building the string. C++ String operations often behave in // counterintuitive ways when working with string literals (like "hi")) String data = "{"; if(power) { data += "\"powered\":true"; } else { data += "\"powered\":false"; } data += ", "; data += "\"r\":"; data += currentR; data += ", "; data += "\"g\":"; data += currentG; data += ", "; data += "\"b\":"; data += currentB; data += "}"; Serial.println("Publishing:"); Serial.println(data); Particle.publish(topic, data, 60, PRIVATE); return 0; } - Update other code to ensure that the function is called whenever state changes.
- When the physical power button is pressed
- When power is changed via the cloud function
- When color is fading.
- Open a browser to https://console.particle.io.
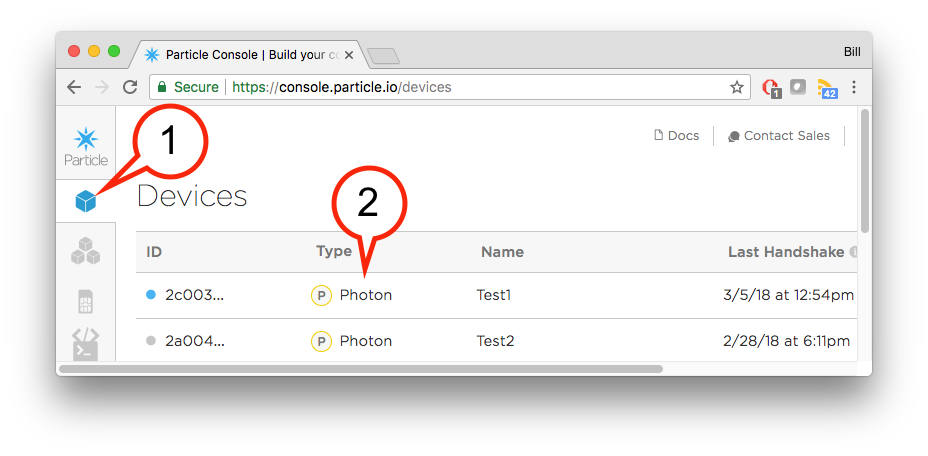
- Click on the “My Devices” tab, then on the word “Photon” for your test Photon

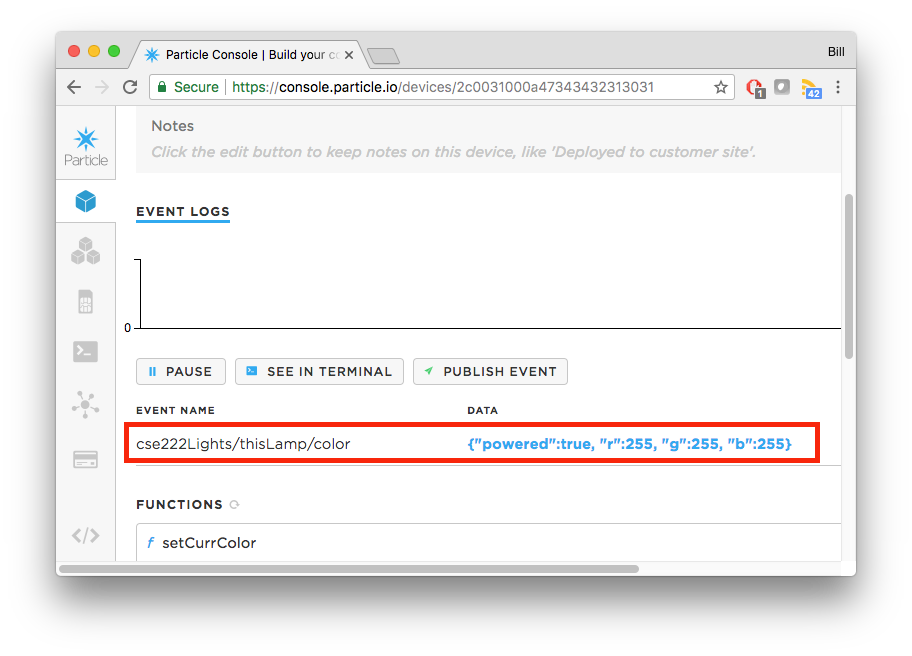
- Scroll down the page an examine the “Events Log”. If you’ve configured things correctly, this should show you the “state” being published. Try pressing the physical button on the Photon to see if it updates.

- Be sure the format and data look as expected.
- Try the cloud-based functions to see if they cause updates as expected. If not, adjust your code.
- Click on the “My Devices” tab, then on the word “Photon” for your test Photon
Complete README.md Q1
2.3. Getting State on Demand
Often times it’s necessary to “get” the initial state of a device without waiting for an event. For example, your User Interface will need to get the devices state when the UI first starts. Update your Photon code with a cloud function that will force the state to be published (by just calling the publishState() function above).
Huge Hint
The callback used for Particle.function() needs to have parameter (a String), but the parameter doesn’t have to be used if calling the function itself is sufficient. You may update the code above to include a parameter and then pass an empty string when calling it explicitly:
int publishState(String arg) {
  ...
}
...

void someFunction() {
  ...
  publishState("");
}

...
void setup() {
  ...
  Particle.function("publishState",publishState);
}
There are other valid approaches too.
2.4. Updating UI / Light Model
The provided UI in ui/ has been simplified to remove the time based features.
- Review the provided
ui/mainLightUI.js. It provides code for the UI and has a few notes (search forNOTE) where changes were made to the code from Studio 4/4B. - Review the code for
ui/light.js. It is based on thelightobject from Studio 4, but now represents an actual light.
Note the TODO at the top of light.js. It specifies two variable values need to be provided:
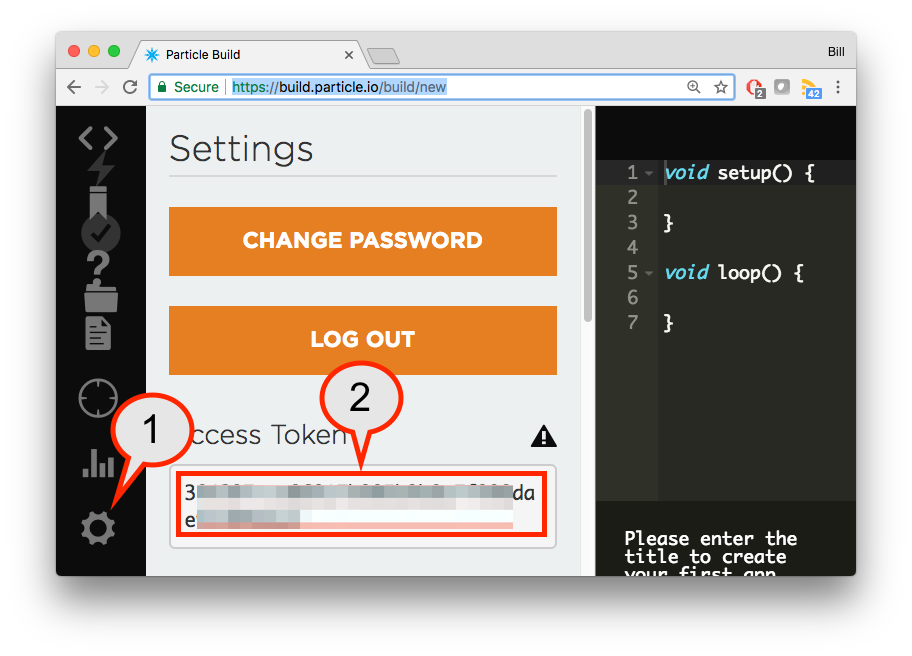
myParticleAccessToken: This represents an OAuth access token. Anything that has this token can access features associated with your account. We will temporarily hardcode this (This is a bad practice and shouldn’t be done in real apps. The token will eventually expire and anyone with the token will be able to access the devices/services that the token has access to!)- Open a browser to https://build.particle.io/
- Click on the “Settings” tab and then copy the access token.
- Paste it in as the string.

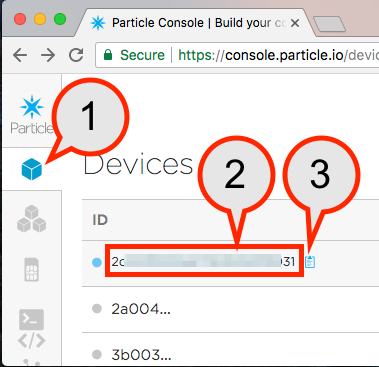
myDeviceId: This is the unique ID of a device your code will interact with.- Open a browser to https://console.particle.io/devices
- Open the “Devices” tab, click on the specific device you are using to reveal it’s ID. There’s a button that can be used to copy it to automatically.

- Past it in as the string.
2.5. Finishing the light behavior
Parts of the light have been completed for you:
setPowered()provides an example of calling a Particle function.setup()will subscribe to the event stream for your.
Complete README.md Q2
You still need to complete the items marked TODO. When done:
- The UI’s switch should always be synchronized with the light.
- Hitting on/off in the UI should change the light.
- Hitting the physical button on the light should update the UI
- When reloaded, the page should be in-sync with the light’s state
- The UI’s ‘SET COLOR’ button should cause the light to fade to the current color described by the three sliders. The light should fade to the
Target Colorover 5s and theCurrent Colorshould be shown updating (5x).
Complete README.md Q3
3. In-Class Checkout
Commit your work to GitHub:
- The Spokesperson should complete changes, save them, commit them locally, then push to GitHub using GitHub desktop.
- The Recorder should save any changes, commit them locally, use GitHub desktop to Pull and merge any changes to the repo, and finally Commit/Push the additions back to GitHub.
- The Technician should save any changes, commit them locally, use GitHub desktop to Pull and merge any changes to the repo, and finally Commit/Push the additions back to GitHub.
- Verify your commits from the Recorder, Spokesperson, and Technician are on GitHub.
- Show a TA your progress
4. Post-Class Checkout
Complete any unfinished work and commit it to your repo by 11:59pm Sunday, Oct. 27th.