
Select Shape![]() Shell
Shell![]() Remove Face from the main menu bar to create a shell feature from the faces of a solid feature. You add a remove-face shell feature by selecting the faces to remove from the part; ABAQUS/CAE converts any remaining faces to shells. You must remove at least one face from a solid feature of the part.
Remove Face from the main menu bar to create a shell feature from the faces of a solid feature. You add a remove-face shell feature by selecting the faces to remove from the part; ABAQUS/CAE converts any remaining faces to shells. You must remove at least one face from a solid feature of the part.
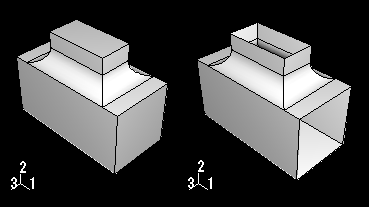
The Remove Face tool is an easy way to create shells with curved edges, as shown in the following figure. The curved edges of the solid were created by filleting the edges using the round tool.
Tip: You should use the remove-face tool only to create features that could not be created using the other Shape tools. For example, you should not create a solid cylinder and then remove the faces at each end to create a cylindrical shell. You should create the cylindrical shell directly using the extruded or revolved shell tools.
To add a remove-face shell feature:
From the main menu bar, select Shape![]() Shell
Shell![]() Remove Face.
Remove Face.
ABAQUS/CAE displays prompts in the prompt area to guide you through the procedure.
Tip:
You can also add a remove-face shell feature using the ![]() tool, located with the shell tools in the Part module toolbox. For a diagram of the tools in the Part module toolbox, see “Using the Part module toolbox,” Section 11.17.
tool, located with the shell tools in the Part module toolbox. For a diagram of the tools in the Part module toolbox, see “Using the Part module toolbox,” Section 11.17.
Select one or more faces to remove from a solid feature. [Shift]+Click additional faces to add them to your selection and [Ctrl]+Click a selected face to unselect it. Click mouse button 2 to indicate you have finished selecting faces to remove. You must remove at least one face from a solid feature of the part.
ABAQUS/CAE removes the selected faces and converts all remaining faces to shells.
Tip:
Use the Previous button (![]() ) to undo one or more steps; use the cancel button (
) to undo one or more steps; use the cancel button (![]() ) to abort the creation of the shell from solid.
) to abort the creation of the shell from solid.
