Difference between revisions of "Project2: Triangulation with sbRIO robots"
From ESE497 Wiki
Jump to navigationJump to search| (27 intermediate revisions by the same user not shown) | |||
| Line 1: | Line 1: | ||
| − | *'''Download''' [[media:RoboticSensing.zip|RoboticSensing.zip]] and extract to your Home Directory. Run RoboticSensing\MicSourceLocator.lvproj. | + | <mediaplayer width=640 height=480>FILE:Chady.flv</mediaplayer><mediaplayer width=640 height=480>FILE:RaphaelAndZach.flv</mediaplayer> |
| + | *'''Download''' [[media:RoboticSensing.FL14.zip|RoboticSensing.zip]] and extract to your Home Directory if you haven't already. Run RoboticSensing\MicSourceLocator.lvproj. | ||
[[File:MicSourceLocatorProject.JPG|MicSourceLocator Project]] | [[File:MicSourceLocatorProject.JPG|MicSourceLocator Project]] | ||
| − | *''' | + | *'''Description''' of [[Description of RoboticSensing.lvproj| RoboticSensing.lvproj]] |
| − | + | * Make sure you run your code from a mapped network drive | |
| − | **''' | + | * Run Sample Code: |
| − | **'''Compute''' angle of arrival on Robot platform using your FindCCPeak.vi and ComputeAngle.vi | + | ** There is a toggle switch on the robot for charging the battery or running programs on the robot. Switch it to the RUN position. When you are finished with the robot, return it to the cabinet, plug in the charger and switch the toggle switch to CHARGE. |
| − | ** | + | ** Turn on the Master power switch and the Motor switch on one of the sbRIO robots. Wait 20 seconds and right click on Robot0 and select Properties and enter the IP labeled on the robot. |
| − | *''' | + | ** Open My Computer -> MicSourceLocator-Robots.vi. Run this VI. This VI will work with either 1 or 2 robots. |
| − | **''' | + | ** Open Robot0 -> RobotMicSourceLocator.vi. Run this VI. |
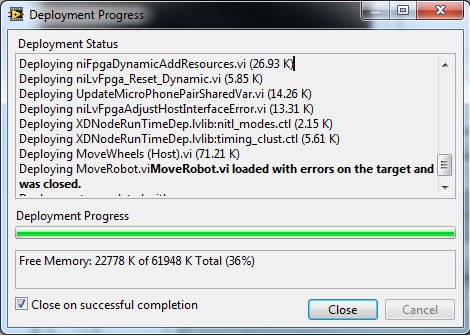
| − | * | + | *** [[File:DeploymentError.jpg|Deployment Error]] |
| − | ** | + | *** If you get the above deployment error, the click '''Close''' and then click on '''Tools -> Advanced -> Clear Compiled Object Cache -> Delete''' |
| − | ** | + | ** Once both VIs are running, you should see the MicSourcLocator-Robots -> MotorMoving indicator turn off and the Thetas[0] count up. The signals for both microphones will be displayed on the graph of RobotMicSourceLocator.vi |
| − | ** | + | ** Click on MicSourceLocator-Robots.vi -> MoveRobots and the robots should rotate a small amount. |
| − | * | + | == Project 2 == |
| − | * | + | * Part A: '''Compute Angle on a Single Robot''' |
| − | * | + | **'''Modify''' RobotMicSourceLocator to '''Compute''' the angle of arrival on the Robot platform using your FindCCPeak.vi and ComputeAngle.vi. It should transmit the angle to MicSourceLocaotr-Robots running on the PC using the Shared Variables. |
| − | * | + | ** If you get error -52003, there is probably an un-handled exception. If you are using Cross-Correlation then the problem is you are running out of memory. |
| + | ** Set "d" on MicroPhonePair[0] on the front panel My Computer/MicSourceLocator-Robots.vi. This will be communicated to Robot0/MicSourceLocator-Robots.vi via the shared variable. | ||
| + | * Part B: '''Move the Robot''' | ||
| + | ** '''Modify''' MoveRobot vi to move the robot to the position indicated by the SharedVariable sent from MicSourceLocator-Robots.vi -> MicroPhonePairs[0]. You will have to push the MoveRobots control to get it to send the new X,Y and Rotation to Robot0. | ||
| + | * Part C: '''Source Location using 2 Robots''' | ||
| + | **Use My Computer -> MicSourceLocator-Robots.vi to communicate with 2 robots. | ||
| + | ** Change NUM_ROBOTS variable by right-clicking on Project -> Properties -> Conditional Disable Symbols and set NUM_ROBOTS = 2 | ||
| + | **Modify MicSourceLocator-Robots.vi to compute the source location and plot the web using the angles computed on the robots | ||
| + | ** Our derivation assumes that the accoustic source is in the +y half plane of both microphone pairs so only put the sources in that region. | ||
| + | ** Make sure it works for Rotation = 45 on the right microphone pair and Rotation = -45 for the left microphone pair. | ||
| + | **Test on the 2 robot microphone array | ||
| + | ** Test out your triangulation with the robots in different position and rotations as commanded by MicSourceLocator-Robots. | ||
| + | * Part D: '''Track Audio Source Automatically''' | ||
| + | **Modify MicSourceLocator-Robots.vi to autmoatically move the robots towards the estimate source position. The goal is to position them 0.4m from the source rotated +/- 45 degrees from the x-axis. | ||
| + | **Extra Credit - More robust design | ||
| + | ***Compare the automated robot locations against the previously computed robot locations to make sure they are the same (or close) before commanding the motors to move. This way you won't move the robots if you get 1 noisy measurement. | ||
| + | ***Check to see if it the robots are within a small window of the source before updating the robot position so you don't move the robots based on quantization noise | ||
Latest revision as of 16:25, 4 April 2016
<mediaplayer width=640 height=480>FILE:Chady.flv</mediaplayer><mediaplayer width=640 height=480>FILE:RaphaelAndZach.flv</mediaplayer>
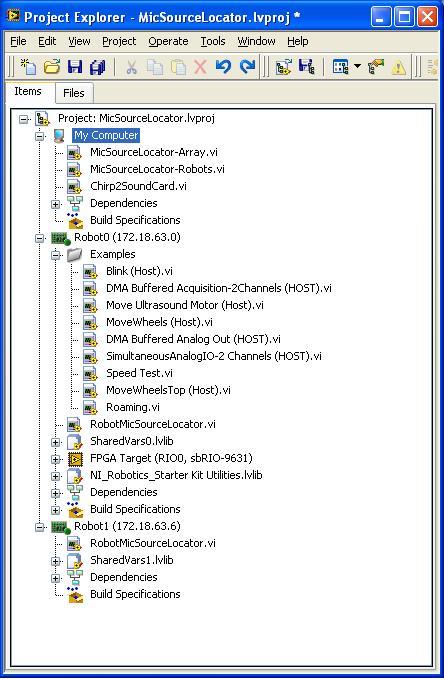
- Download RoboticSensing.zip and extract to your Home Directory if you haven't already. Run RoboticSensing\MicSourceLocator.lvproj.
- Description of RoboticSensing.lvproj
- Make sure you run your code from a mapped network drive
- Run Sample Code:
- There is a toggle switch on the robot for charging the battery or running programs on the robot. Switch it to the RUN position. When you are finished with the robot, return it to the cabinet, plug in the charger and switch the toggle switch to CHARGE.
- Turn on the Master power switch and the Motor switch on one of the sbRIO robots. Wait 20 seconds and right click on Robot0 and select Properties and enter the IP labeled on the robot.
- Open My Computer -> MicSourceLocator-Robots.vi. Run this VI. This VI will work with either 1 or 2 robots.
- Open Robot0 -> RobotMicSourceLocator.vi. Run this VI.
- Once both VIs are running, you should see the MicSourcLocator-Robots -> MotorMoving indicator turn off and the Thetas[0] count up. The signals for both microphones will be displayed on the graph of RobotMicSourceLocator.vi
- Click on MicSourceLocator-Robots.vi -> MoveRobots and the robots should rotate a small amount.
Project 2
- Part A: Compute Angle on a Single Robot
- Modify RobotMicSourceLocator to Compute the angle of arrival on the Robot platform using your FindCCPeak.vi and ComputeAngle.vi. It should transmit the angle to MicSourceLocaotr-Robots running on the PC using the Shared Variables.
- If you get error -52003, there is probably an un-handled exception. If you are using Cross-Correlation then the problem is you are running out of memory.
- Set "d" on MicroPhonePair[0] on the front panel My Computer/MicSourceLocator-Robots.vi. This will be communicated to Robot0/MicSourceLocator-Robots.vi via the shared variable.
- Part B: Move the Robot
- Modify MoveRobot vi to move the robot to the position indicated by the SharedVariable sent from MicSourceLocator-Robots.vi -> MicroPhonePairs[0]. You will have to push the MoveRobots control to get it to send the new X,Y and Rotation to Robot0.
- Part C: Source Location using 2 Robots
- Use My Computer -> MicSourceLocator-Robots.vi to communicate with 2 robots.
- Change NUM_ROBOTS variable by right-clicking on Project -> Properties -> Conditional Disable Symbols and set NUM_ROBOTS = 2
- Modify MicSourceLocator-Robots.vi to compute the source location and plot the web using the angles computed on the robots
- Our derivation assumes that the accoustic source is in the +y half plane of both microphone pairs so only put the sources in that region.
- Make sure it works for Rotation = 45 on the right microphone pair and Rotation = -45 for the left microphone pair.
- Test on the 2 robot microphone array
- Test out your triangulation with the robots in different position and rotations as commanded by MicSourceLocator-Robots.
- Part D: Track Audio Source Automatically
- Modify MicSourceLocator-Robots.vi to autmoatically move the robots towards the estimate source position. The goal is to position them 0.4m from the source rotated +/- 45 degrees from the x-axis.
- Extra Credit - More robust design
- Compare the automated robot locations against the previously computed robot locations to make sure they are the same (or close) before commanding the motors to move. This way you won't move the robots if you get 1 noisy measurement.
- Check to see if it the robots are within a small window of the source before updating the robot position so you don't move the robots based on quantization noise

