Sunlight Alarm
Window Shade Alarm Log
Presentation 1
Contents
Proposal
Overview
Our goal is to create an apparatus that opens your window shades automatically in the morning, providing a more pleasant way to wake up than a loud alarm. Our apparatus would use a stepper motor to open the shades paired with an Arduino and Dual Step Motor Shield. The stimuli to open the shades would be based on time as inputted by the user using a keypad attached to the Arduino. A Raspberry Pi would fetch the current weather and time and send it to the Arduino to be displayed on LCDs, informing the user of the time and weather.
Team Members
- Sam Chai
- Cole Fitzsimmons
- Arnob Dam
- Andrew O'Sullivan (TA)
Objectives
- Build frame and shade
- Program Raspberry Pi to send time and weather to Arduino
- Use NTP and Wunderground API
- Program Arduino to accept time and weather from Raspberry Pi
- Program Arduino to accept input from user
- Program Arduino to control motors
- 3D print pieces to attach blind to shade
- Attach motors to frame/shade
- up/down pull-string
Challenges
- Learn how to use SolidWorks
- We will use SolidWords to 3D print gears, clamps and other physical parts for the opening/closing function of our device
- Learn how to program Raspberry Pi
- We are using Raspberry Pi instead of Arduino because we will need Raspberry Pi's capability to access the internet. Through the internet, we will have access to and display both time and weather
- Running Python whenever the Raspberry Pi reboots
- Store local city data while Arduino is incapable of storing all of them
- Debouncing all of the buttons seperately
- Generating enough torque to raise gears
- Silencing gears
Gantt Chart
Budget
- Raspberry Pi (supplied)
- Arduino (supplied)
- 2 Stepper motors (supplied)
- Arduino LED Backpack (for time) $11.95
- Arduino LCD and Keypad (for weather) $23.95
- 22ft of 2X4s $??
- 1 inch #8 wood screws $??
- 2 inch #10 multi-purpose screws $??
- We would recommend using longer screws such as these.
- Shaft Collar - Clamp (1/4", 2 Pack) $...
- one pack corner braces $1.97
- 2 packs straight brackets $5.36
- Probably not necessary
- String $??
- Screw Eyes $1.18
- Shipping (Adafruit) $7.17
- 12V Power Supply
- Transportation Costs $10
- Blind (30" x 60") $31.09
Total: $
Design and Solutions
Description
Overall Setup
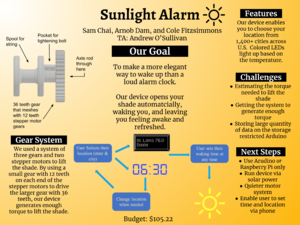
Our Sunlight Alarm consisted of a system of a Raspberry Pi, an Arduino, 2 stepper motors, a 3D printed gear system, an LED display, and an LCD display. The Raspberry Pi fetched the current time and weather data from the internet and sent it to the Arduino. The Arduino then displayed the weather and time on the displays. Using two buttons connected to the Arduino, the user can select a time at which the shade will open. When that time is reached, the Arduino begins to open the shade by running two stepper motors which drive the gear and spool system.
Arduino and Raspberry Pi
Gear System
As well as gears, we had to 3D model and print holder for the two stepper motors. This included taking very precise measurements of the stepper motors so that our holder would be a snug fit. We modeled the holder with screw holes to both attach the motor to the holder and the holder to the frame. Step file
Frame
The frame was built to resemble a window frame. The shade was attached to the inside and top of the frame as a normal shade would. The frame was built from 2x4s, wood screws, and metal brackets. The dimensions of the inside of the window were 30" x 60". We took 3 8ft 2x4s and cut them into 5 pieces: 2 measuring 3', 2 measuring 6'2", and 2 measuring 1'.
New Skills
- Using Raspberry Pi
- 3D modeling
- Learning more about Arduino
- Learning more about using power tools and building things
Results
We successfully built a a device that:
- displayed the current time, weather conditions, and temperature in a location selected by the user using the buttons on the LCD display
- opened the shade automatically at a specific time selected by the user using the buttons on the breadboard
- changed the color of the LCD display based on the temperature
- automatically unwound the spool to make resetting the device easier
We completed almost of our goals with the exception of attaching another stepper motor to the twist bar that controls the orientation of the slats. This was a minor goal, not necessary to the success of the project. We decided it was more important to accomplish the main goals of displaying the weather and raising the blinds, so we de-prioritized this objective due to time restraints.
what we need to do here (according to final report guidelines)
- Present all your results, including modules that only partially worked.
- Discuss how the results compare to your original objectives.
- Identify the critical decisions or factors in your project that stopped you from getting a better result (try to avoid obvious comments such as "we run out of time").
- Include a copy of the poster you used in your demonstration to help explain your results.


