Holograms at Home
Contents
Description
Team members
- Kevin Kim
- Hyunseok Choi
- TA: William Luer
Project Overview
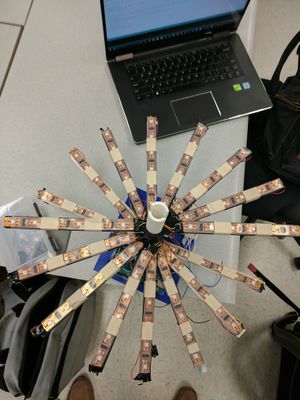
We are attempting to create a spinning LED display capable of displaying 3D objects from all directions on a cylindrical shape. Our display can include basic shapes such as cubes, cylinders, and spheres. Finally, our display will be able to animate such shapes.
Objectives
- Design a mechanically robust device that will house the components including Arduino, batteries, and LEDs.
- Position each component so the device is capable of displaying basic 3D objects on a cylindrical volume
- Develop an algorithm to control when each LED turns on and off during the display cycle
Challenges
- Having a mechanical design that has a center of mass around the axis of rotation
- Mount the device on a motor
- Build a device so the wires are not entangled while device is spinning
- Wire connections do not break while device is spinning
- Ensure that device spins at constant rate
- Determine ideal rpm for device for visual display
- Mounting battery and Arduino on the spinning portion of the device
- Mounting Frame unto the motor
Budget
- Arduino Mega: $0 - provided
- Arduino Redboard: $0 - provided
- 80A esc trackstar motor and motor controller: $0 - provided
- Electrical Tape: $0 - provided
- Insulated Copper Wires: $0 - provided
- Stepper Motor[17hs13-0404s]: $0 - provided
- Soldering Tools: $0 - provided
- 3D Printing material and 3D Printer: $0 - provided
- D batteries: $8.79 link denied by spam filter
- Battery holder: $4.10 link denied by spam filter
- LED strips x3: $29.95 x 3 = $89.85 [1]
- Hall Effect Sensor $9.99 [2]
- N52 Neodymium magnets - $11.98 [3]
Total: $124.71
Design and Solutions
Constructing our device consisted of 3 parts: 1. Mechanical Design 2. Circuitry and Wire Management 3. Algorithm Design
Mechanical Design
Two mechanical structures were made: LED layer frame and the motor frame
- LED layer frame (insert pictures)
The first thing we did was to create a structure that can house our LEDs, Arduino Mega, and the battery to power our Arduino.
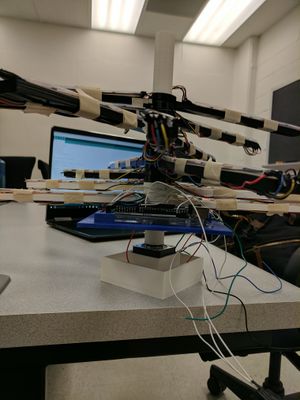
The design we came up with consisted of layers to mount LED strips on, bottom layer to house the Arduino and the battery, and a pole that can fit other parts. All designs were made using Solidworks and Inventor. First, we designed a circular pole that can be used to fit in other parts of the frame, motor shaft, and the bearing on the bottom. Next we designed a flat, rectangular layer that can house our Arduino and the battery. Next, we modulized the design for frames that can hold LED strips. We also considered wire management issues and made the center of each circular fits hollow.
- Motor Frame (insert pics)
Design of the motor frame changed as our initial idea to use a stepper motor did not work out due to lack of torque it can provide. Initially, we planned on installing a stepper motor on the bottom to spin our device. However, as out stepper motor failed to provide enough torque to spin our device, we decided to use 80A ESC Trackstar motor while keeping the stepper motor as a bearing.
We changed our design into a C-chaped structure that has the motor on the top. We initially created a wooden structure with CAD designed L-bracket on the bottom; however, the structure could not withstand the mechanical vibration caused by the motor. Through a rigorous search process, we acquired a pre-made structure with more than satisfactory mechanical robustness. We fine-tuned the frame to hold the motor and the LED layer frame.
Due to dimension and fit issues, we attached a band to the motor shaft to have it spin another thicker shaft attached to the top of the circular pole of our LED frame. We visited the machine shop to install wooden blocks on the bottom to function as stands for the LED frame due to height issues. Next, we designed a case that can fit in the stepper motor using Solidworks. Finally, we designed and 3D printed a case that can hold our LED frame to solve mechanical vibration issues.
Circuitry and Wire Management
- Wiring LED strips
The difficulty in wire management came from wiring multiple LED strips. Total of 16 strips, each containing 6 LEDs, had to be wired. We wired half of the LED strips together into 1 extend strip and the same for the other. In order to manage various wires, we attached a breadboard on our LED frame. In order to help with threading wires, our design for the pole had a hollow center to thread wires through. We first taped the wires with electrical tape to secure the connections and prevent any unwanted electric connections. Realizing that the wire connections would not be secure enough, we soldered the wires to each strip. Each LED strip has 4 wires - 5V, Clock, Data, and Ground. Since we had 2 "extended" LED strips, we connected strip 1 to pins 51 and 52 and strip 2 to pins 39 and 41 on the Arduino. We connected the 5V and GND to the bread board to only have one wire be connected to 5V and GND pins on the Arduino board.
- Wiring Hall Effect Sensor
Wiring the hall effect sensor to the Arduino is quite simple. Hall effect sensor has 3 connections - 5V, Vin, and GND. We soldered wires to each prong and applied shrink wraps to cover the connections. We connected the 5V wire to 5V connection on the breadboard and the similar to other wires. We connected a 10kΩ resistor to go between 5V an Vin on the breadboard as required. Next, we connected the Vin to pin 2 on the Arduino. Then, we taped the hall effect sensor to the bottom of the LED frame layer holding the Arduino. We placed our neodymium magnet directly below the hall effect sensor and taped it over on the floor of the motor frame to make sure the magnet does not stick to the battery on the LED frame..


