PartyBox log
1/22 - 1/28
- Group finalized PartyBox project idea
- General objectives: LED array, modular and connectable, response to live music, different modes, wireless (if time permits)
- Wiki page published
1/29 - 2/4
- Group met with TA Nathan to discuss project proposal and demo.
- Developed finer ideas of project (center cube with processor and power, no wireless, only music and standby modes, and modularity with plugs flush to cube surface).
- Drafted and finished a project proposal, including a Gantt chart.
- Agreed upon minimum weekly meeting, Monday at 7pm
2/5 - 2/11
- Met with Nathan and discussed issues with the previously submitted proposal, most importantly the need for an additional arduino on the second cube
- Group meeting on 2/8/17:
- Sketched out a basic picture of what we’re brainstorming
- Add sketch to proposal?
- LEDs 4 x 4 x 4 with none on bottom where Arduino is located
- Reevaluated how we would get the two cubes to connect
- Considered more complicated mechanisms, such as force sensors, but ultimately decided on just wiring the inputs and outputs of the two arduinos together using male/female plugs
- Fix Budget
- Removed items we previously thought we would need (micro-USB)
- Add new objects to connect the cubes
- Physically: Magnets? (Could be too expensive) 3D Print locking mechanism?
- Plugs/wires straight from an output port of one Arduino to an input port of the other
- Specify resistors
- Magnets, microphones, acrylic adhesive, counters, transistors
- Fix formatting of proposal
- Adjust Gantt chart
- More time for physical construction
- More actions occurring simultaneously
- Add more details to the overview in the proposal (size specifications, reason for two cubes)
- Sketched out a basic picture of what we’re brainstorming
- Group meeting on 2/9/17
- Dropped the plan for the second cube due to budget constraints
- Adjusted Gantt chart accordingly to account for the change in objectives
- Finalized budget
- Spruced up project proposal
Lydia:
- continued to research LED Matrix implementations. Used this tutorial
Graham:
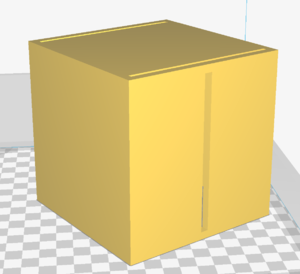
- began learning how to operate AutoDesk Inventor and the labs 3D printer
2/12 - 2/18
Meeting with Nathan 2/15/17:
- We do not want to use the battery to power our testing. Therefore, we should purchase a wall adapter that will not take up any power
- We need to add a circuit board to our budget. The lab supplies a prototyping circuit board that we can use for our initial circuit, but we need to purchase a permanent one that we solder our final circuit to so that it does not move while the box is in use.
- After removing the second cube, our project is not as interactive as we would hope. We are considering options to make our cube more interactive, such as the ability for the user to change the light colors.
- For Graham, who is working with 3D printing: Graham should print something very simple and something that we know works with the 3D printer to gain some experience with the 3D printer.
- Graham should also print something with Nathan first so that he can then print without supervision.
- Our objectives need to be formalized some more: mainly, "finished box" is not very clear nor does it give a good explanation of our project. We can get rid of it or explain more thoroughly.
Graham:
- continued to learn Inventor, and began experimenting with suspension structure design
Lydia:
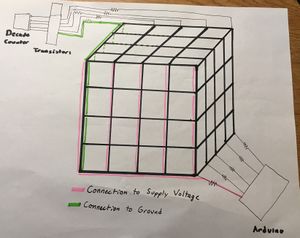
- Worked on concept design for LED matrix
- Five LED sheets running horizontally with each sheet sharing a common voltage supply connection
- Five perpendicular LED sheets would be used for the ground connection
- Identified the following challenges:
- How would the wiring in the corners of where two sides of the cube meet work?
- Is it necessary for the ground connection to be at the top of the cube? Is there a way to keep the decade counter and transistors at the bottom?
- Needed to check with Graham and his design for the structure to resolve these challenges
2/19 - 2/25
Group Meeting 2/20/17:
- Nathan suggested 1) addressable LED strips and 2) Bluetooth second cube. However, we ultimately decided not to use either of them -- but we will discuss with Nathan at our meeting on Wednesday.
- 1) Our problem with the LED strips is that they cannot bend the way we want for the design of our cube
- 2) We cannot afford a second cube, as just one cube nearly puts us at budget.
- We decided on a time for our first evaluation.
Meeting with Nathan 2/22/17:
- Nathan told us that we can cub the addressable LED strips and solder them back together, which eliminates our main concern with them. Furthermore, if we were to use these strips, it would take a huge burden off our shoulders as we would no longer have to wire 100+ individual LEDs.
- The LED strips that Nathan linked us to has already been vetted.
- We are not sure how much power we will need for our project (such as, lighting all the LEDs at a reasonable brightness). We can test what power supply we will need with power readouts in the lab, and use those readouts to figure out what our circuit will need.
- In the meantime, we will remove our battery from our budget, but leave a reasonable amount of money for us to buy whatever power supply we ultimately decide on.
- We are still hesitant about our microphone choice.
Group Meeting 2/24/16:
- In researching more about the LED strips and microphone, we have discovered the spectrum shield which will automatically process the data from the microphone we use.
- Group decided to use LED strips and have them light the faces without the inside.
- With the changes to our design, we are need to change our budget:
- We are now getting rid of: the individual RGB LEDs, resistors, gauge wire (we discovered it would be provided by the lab), battery and switch (temporarily, until we finalize our power supply), decade counters, and transistors.
Lydia:
- Scrapped current progress on the implementation of a matrix for the LED circuitry
- Began researching LED strips and how addressable LED strips work
2/26 - 3/4
Group Meeting 2/27/17:
- Edited our Gantt chart to reflect the new tasks that have surfaced with the recent changes in our design (eg. learning how to use the spectrum shield), as well as removed unnecessary ones.
- We found a new microphone that has better reviews than our old one and updated the budget accordingly. We also sent it to Nathan for approval.
- However, the cord of the microphone is 60" long, so there is the dilemma (Sarah's task) of how to place it into the cube.
- Our budget has been approved (except for the microphone), so we decided to begin to order our items: we ordered the LED strips and the spectrum shield + headers.
- We noted that the acrylic casing may not be needed depending on the final design of the suspension structure, but that is something that we can decide later on.
Graham:
- began reworking 3D printed structure because of the inclusion of LED strip lights instead of LEDs


