Potentiometer + Arduino
Jump to navigation
Jump to search
Goal:
- Wire a potentiometer to Arduino.
What You'll Need:
- One Arduino breakboard (here we use Sparkfun RedBoard).
- One potentiometer that can be used on Arduino board (Trimpot 10K with Knob).
Hookup:
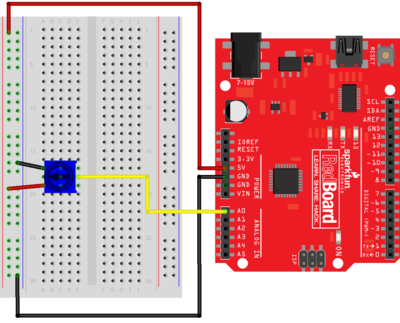
- The potentiometer can be used as a variable resistance. Here it will be used to control an electrical potential (i.e., voltage), which the Arduino will be able to read via the analogRead(). Consequently, the potentiometer should be connected to an analog input pin.
- To hookup a potentiometer properly, we first insert three pins on the bottom of this potentiometer to Arduino board. Then use one jumper wire to connect an anode pin to a voltage pin (5v). Also a cathode should be connected to a ground pin. For the potentiometer part, the top and bottom pins will be connected to one positive and one negative pins. The middle pin of the potentiometer goes to one analog pin.
- After you have finished all these steps, you should have something look like this:
