Cheers!
Revision as of 22:02, 8 February 2017 by Jessieshi97 (talk | contribs)
Overview
Have you ever feel frustrated that the soda liquid line always rises higher than your expectation that it spilled all over your table? We are here to help. 'Cheers' is a automated soda pouring machine that takes a bottled soda and pour it into glassware without spilling the fizz. It utilizes 3D printing techniques for contructing the mechanical framework and Arduino to control the system. 'Cheers' tilts your soda bottle and glass to a perfect angle towards each other for the pouring mechanism to occur and will adjust angles as more soda accumulate in the glassware. The mechanism will stop after the beer height reached your desired level and voila, Cheers!
Team Members
- Jessie Shi (Tianjiao): Chemical Engineering, System Engineering ’18
- Haixiang Ren: System Engineering ’18
- Natalie Ng: TA
Objective

- Replicate the project found on youtube but replace the beer bottle with soda glass bottle and a correct size glassware. There will also be no bottle rotating mechanism. The control for tilting mechanism will be changed to a pulley rope system outlined in Figure 1.
- Glassware can have two angles. Position 1 is vertical to the table and position 2 is tilted by an angle to the horizontal. Angle is determined through experiments that if the glassware were tilted to that angle and filled without spilling, the liquid will take up approximately 2/3 of the total volume of glassware.
- Soda bottle should be able to have 2 positions. Position 1 is vertical to table and Position 2 is tilted to an angle above the horizontal line. Soda bottle should move slowly from position 1 to position 2 and able to be stopped and return to position 1 if prompted by color sensor.
- There will be two pouring mechanisms, one where glassware is tilted to position 1, and bottle will tilt slowly from position 1 to 2, stop signal is determined by color sensor. The second pouring mechanism is after the when glassware is in position 1, and soda bottle tilt slowly from position 1 to 2, stop signal determined by weight sensor. Time in between determined through experiments.
- Implementation of color sensor to detect when the liquid in glassware has reached the tip of glassware at position 2, and then both glassware and soda bottle will return to position 1.
- After the foam falls off (estimate time required through experiments), weight sensor at the bottom of glassware is used to help the soda bottle add the last portion of soda into the glassware until its total weight reached a predetermined amount (liquid should be approximately 2 cm to the tip of glassware).
- Start of the program is through pressing a push button.
- Protection cover will be used to on top of the Arduino, motors and spool. Four pulley will be used as shown in Figure 1 to eliminate the chances of electroshock.
- The demo will include demonstration on pouring soda using the complete assembled model.
- we will attach new picture of the specified glassware and kind of soda bottle by friday **************
Challenges
- 3D printing
- learn solidworks
- design the soda bottle and glassware holder.
- design two spools that could fit onto the stepper motor to control the rope length.
- Arduino
- Learn Arduino programming language.
- Implementing the Arduino code with laser and adjusting parameters to stable control the tilting mechanism.
- Hardware
- Stepper motor should keep control system stable during tilting mechanism and not going too fast/slow
- Design a circuit that connects the step motor, push button, laser sensor onto Arduino.
- Optimal height of laser pointer should be determined as the glassware is tilted.
- Determine the rpm value on step motor as the spool pulls the fishing line, which controls the tilt angle.
- The soda bottle should be able to tilt an angle more than 90 degrees from its original position.
- Safety
- Electricity hazard when circuit interacts with liquid
- Rope might break
Budget
- Nema 17 Stepper Motor x 2: $24.98
- Color Detector: $9.99
- Load Cell Amplifier HX-711: $9.95
- Load Cell, straight bar 10kg: $6.95
- Wall Adapter Power Supply: $5.69
- Epoxy Glue: $7.28
- Tack Switch Push Button: $1.99 (+$2.69 shipping)
- Extension Cord: $7.99
- Resistor Kit: $9.89
- Screw and Nut: $8.99
- Soda and glassware – $10 from walmart
- Arduino: provided
- 3D printing: provided
- Power Pro Fishing Braided line – 50 lbs limit: owned
- Magnet Screw Driver tool kit - owned
- Homewdepot to find budget for wooden base!!!!!!!!!!!!!
- buy something for water
Total: $ 78.82 (recalculate required!!!!!!!!!!!!!!!!!!!)
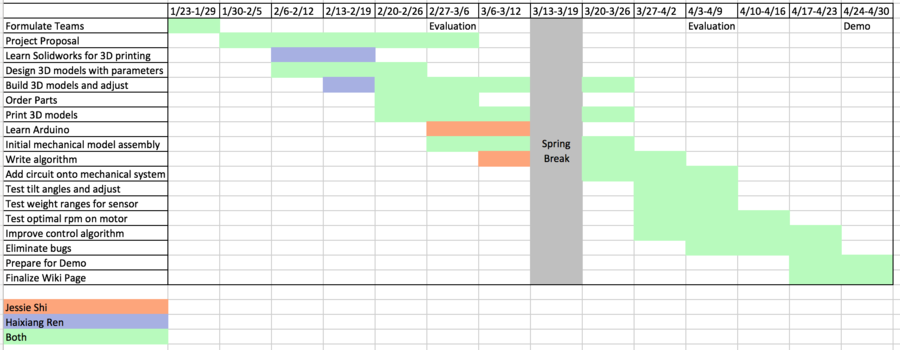
Gantt Chart