SecuriDoor
Contents
Overview
Have you ever left the house and, hours later, fretted over whether you locked your door? It's a familiar feeling--and one that can be avoided. Our project can be used to solve this all-too-common problem. Through our website interface, a user can remotely lock their door and eliminate the worry associated with common forgetfulness. Using the website, a user will be able to command the physical aspects of our design to activate a servo which pushes the door's lock into place.
Find our weekly log here
Group Members
- Clayton Keating
- Savannah Rush
- Nathan Schmetter (TA)
Objectives
We will achieve success with this project if we are able to effectively lock and unlock a door using a locking mechanism on the Raspberry Pi via a website. Specifically, the communication between the site and the locking mechanism is the focus of this success and must execute without error for success to be achieved. We must also transmit an image taken from a webcam on the Pi and display it on the website. Additionally, our project has the potential to include more features, such as motion sensors and alarms for further home security.
Our final project demonstration will consist of short and long range tests of the system to show off the site's realistic use.
Challenges
- Familiarization with Raspberry Pi
- Building a housing mechanism such that it can be attached to a door
- Ensuring that the app cannot lock you out of your own home
- Maximizing range of communication between locking mechanism and web application
- Ensuring security of the website
Gantt Chart
Budget
- MCM Electronics TowerPro SG-5 Standard Servo-$11.99
- MCM Electronics Raspberry Pi 3 Model B Board and Case Kit-$42.99
- Single Cylinder Bright Brass Residential Deadbolt-$10.48
- [1]-$7.99
- Website Hosting and Domain (Essential Plan)-$5.95/month for total of $17.85
- 3D Printing Materials (Free -- Provided)
- Breadboard and Resistors (Free -- Provided)
Total Budget: $91.30
Design and Solutions
View our code here.
Design Components
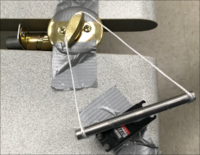
The central physical element of the SecuriDoor system is the locking mechanism. This locking system is, in essence, a servo motor connected to a deadbolt on the inside of a door that can be controlled by a Raspberry Pi 3. We initially considered a housing mechanism for the servo that would be placed overtop of the deadbolt and would directly turn the lock; however, this design would not work as the connection would not allow for easy access to manually turn the deadbolt. Instead, we pursued an offset connection between the servo and the lock utilizing a wide bar attachment to the servo and two strong wires or strings that latch onto either side of the deadbolt. This final design can be seen in the graphic below.
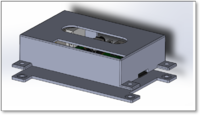
Another design element we were interested in was a 3D printed case for the Raspberry Pi that would attach to the door for ease of use. We were able to design such a case with two connecting parts that has the necessary openings for wiring and other device connections to attach. Unfortunately, the case was not printed due to time constraints; however, the model for the case can be seen below.
Server and Hosting
We used Web.com for our cloud server and site hosting. Through their platform, we purchased a domain name (thesecuridoor.com) and had a site accessible via nearly any network. To send files to be displayed on the site I used an FTP software called Filezilla. For more information on Filezilla and its use, please see our tutorial here.
To make our homepage visually appealing, I used Web.com's site builder to design the components. To achieve our objectives, I created the PHP and HTML scripts for all of the other pages on the site. These scripts are found on the repository linked above. The main feature of the site is the 'checker.php' file, which contains a form where a user submits their desired lock setting. Using GET methods, this data is sent to another file on the site, 'doorstatus.txt', which is downloaded by the Pi. This communication is discussed further in the next section.
Coding Solutions
Throughout the semester we worked on independent Python scripts for testing purposes. One script controlled the servo, one downloaded and read a file on the website, and the final script took an image using a webcam connected to the Pi and sent it to be displayed on the server. Near the end of the semester, we combined each of these scripts into one, with specific methods performing each of the functions. This script is shown in the GitHub repository (linked above) and is titled 'getFile.py'.
For each of the aforementioned functions, we utilized different Python packages and functionalities. To control the servo, we used the GPIO package. To download and send files from/to the website, we employed an FTP connection. To determine the user's desired lock setting and control the servo, the getFile() method downloads a file on the site and writes its contents to a file on the Pi every 5 seconds. The script continually checks the string contained in the file on the Pi, which is either "lock" or "unlock". Depending on the string value, the servo changes position according to the desired setting. To send the image, the sendPic() method is employed, which takes an image on the Pi webcam every 5 seconds and sends it to a file (again using FTP) on the server, which is immediately displayed on the site.
On the website side, we utilized HTML and PHP scripts. For the main functionality, we used GET methods to transmit variables. These are the variables that are downloaded by the Pi which help to determine the user's desired preferences.
Security
Security is a major concern with our project. As our project currently stands, anyone could log on to the website and control the user's door. Obviously this would need to change if our system were brought to market. If we were to continue on this project, we would need to add layers of security to the website.
First and foremost, robust password protection needs to be instituted. To mimic a real-world product, each of our locking mechanisms would be given their own unique password, only known to the purchaser of the product. I would code these unique passwords into the .htaccess file that already exists in our file system, which would ensure that only the purchaser of the locking mechanism would be able to remotely control their lock and move past the site homepage.
However, password protection is not the only security concern. Since we are using FTP to send data from the Pi to the server, a hacker can easily gain anonymous access to the FTP server and view the data that is displayed on the site. A hacker could see if a user had recently locked or unlocked their door and could reasonably infer the current status of the lock, as well as view the picture taken in front of the door. Because this image is updated constantly, at all times a hacker could spy on a user's door and have continuous access to the image.
There are many potential solutions to help mitigate these security concerns. Many of these solutions are outside the scope of this project and certainly beyond the understanding of two non-computer science students. However, there exists one promising solution that could have been chosen for this project, had we had access to a different Wifi network and router, other than the WashU Wifi. Instead of FTP protocol to send data to the server, we would have instead utilized port forwarding. Port forwarding is a more secure option, as there are many defense features available to prevent hacking. Port forwarding would be a fine choice for a home router and network, but due to WashU IT, we were unable to institute this option.
Results
Final Locking Mechanism
Our final product can be seen below. We were successfully able to connect the web server to the Pi and, on the school's wifi network, send the "lock" or "unlock" signal to the Pi and lock or unlock the door. We also found that we were able to connect to the server via mobile phone, which we were not expecting to accomplish. Overall, we were satisfied with the execution of our final product and believe our demo is an impressive display of systems engineering.
Final Website
Demo Poster
Comparison to Objectives
Our project achieves both of the major goals we set at the beginning of the semester: to successfully control a lock via a website and to display an image on the website that is taken on the Pi. However, some of the ancillary objectives were not met. Ideally, our Raspberry Pi/servo mechanism would have been encapsulated in a 3-D printed case which we designed. Unfortunately we did not achieve this in time for the demo. We also desired for our scripts on the Pi to run immediately upon reboot. However, even after an hour with Prof. Feher, we were unable to complete this. We hypothesize that this was an issue with the Pi having trouble connecting to the wifi. When the script ran upon startup, the wifi was not yet connected, which resulted in the script terminating.
Critical Decisions
CLAYTON talk about our alternative design instead of the case, why we chose to use a monitor for our demo (bc we didnt get our script to run upon reboot), etc
Potential Project Extensions
CLAYTON
Tutorial
Find our tutorial here.
References
https://www.w3schools.com/php/php_forms.asp
http://www.instructables.com/id/Simple-and-intuitive-web-interface-for-your-Raspbe/


