Difference between revisions of "Cheers!"
Jessieshi97 (talk | contribs) |
Jessieshi97 (talk | contribs) |
||
| Line 147: | Line 147: | ||
====Circuit==== | ====Circuit==== | ||
[[File:CFC.png|400px]] | [[File:CFC.png|400px]] | ||
| − | |||
====Elaborated Flow Chart==== | ====Elaborated Flow Chart==== | ||
Revision as of 21:53, 2 May 2017
Contents
Overview
Have you ever felt frustrated that soda always rises higher than you expect and spills all over your table? We are here to help. 'Cheers' is a automated soda pouring machine that takes a bottled soda and pours it into glassware without spilling the fizz. It utilizes 3D printing techniques for constructing the mechanical framework and an Arduino to control the system. 'Cheers' tilts your soda bottle and glass to an angle towards each other to minimize the fizzing and the tilting mechanism stops after the soda height reaches your desired level and voila, Cheers!
Team Members
- Jessie Shi (Tianjiao): Chemical Engineering, System Engineering ’18
- Haixiang Ren: System Engineering ’18
- Natalie Ng: TA
Objectives


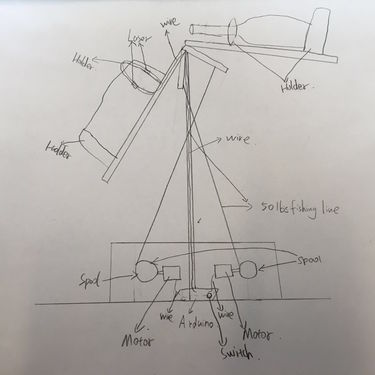
- Replicate the project found on youtube but replace the beer bottle with a soda glass bottle and appropriately sized glassware. There will also be no bottle rotating mechanism. The control for the tilting mechanism will be changed to a pulley rope system outlined on the right figure. The glassware will be kept on the table instead of swinging.
- Print a sturdy mechanical frame and a stable soda and bottle holder so that they do not misalign while pouring.
- System should be able to handle different size and height of glassware with few restrictions.
- Soda should be poured into glassware smoothly and without spilling.
- Create an algorithm which lets the measures the distance of the liquid in glassware and adjust the speed of servo motor accordingly.
- If possible, conduct the same experiment, but change the Mexican glass soda bottle to a generic soda can or plastic soda bottle.
Steps required to complete project
- There will be one pouring mechanism. The bottle should tilt fast when no liquid is coming out from the bottle and then poured slowly until the glassware is full or liquid in bottle has been used up.
- Distance sensor will be used to estimate the height of liquid in glassware, and they adjust motor speed accordingly.
- Start of the program is initiated by a toggle switch.
- All electronics (Arduino, motor and toggle switch) will be held on top of the mechanical system by constructing a wooden stage.
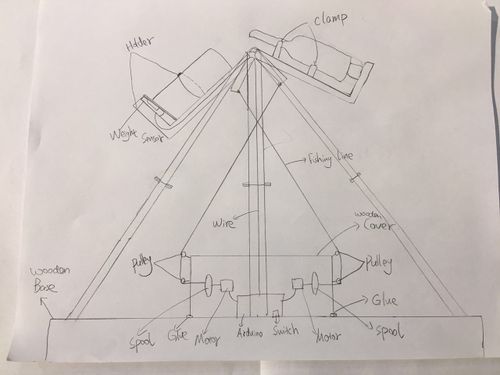
- The four pulley system cuts the torque needed from the motor to 1/4 its original value.
- Fishing line with 65 lbs limit will be used to prevent the rope from breaking.
- The demo will include a demonstration of pouring soda using the completely assembled model.
- If time permits, we will try to modify the same mechanism for a soda can or plastic soda bottle to increase the utility of the product.
Challenges
- 3D printing
- Learn Solidworks.
- Design specific dimensions of soda bottle, glassware holder etc. (For large parts, we will have to split into two as each print has a maximum dimensions of 8 inches)
- Design base to hold the motor in place.
- Build models using Solidworks and 3D print them.
- Arduino
- Learn Arduino programming language.
- Implementing the Arduino code with distance sensor and servo motor and toggle switch.
- Debugging code and adjusting parameters to control the tilting mechanism.
- Hardware
- Servo motor should keep control system stable during tilting mechanism and not go too fast/slow.
- Design a circuit that connects the servo motor, push button and weight sensor to the Arduino.
- Find the various servo motor rotation speeds outlined in the objectives section by conducting experiments (use tap water instead of soda).
- Determine the rpm value on the servo motor as it pulls the fishing line, controlling the tilt angle.
- The soda bottle should be able to tilt at an angle more than 90 degrees (position 3) from its original position.
- Safety
- Electricity hazard when circuit interacts with liquid: elevate the electronic circuit above the mechanical system level to mitigate the risk of wetting the electronics.
- Rope might break: use appropriately weight-rated fishing line.
Budget
- Continuous Rotation Servo Motor x 2: $36 (+$5.50 shipping)
- Toggle switch: $1.95 (+$5.72 shipping)
- Solder bread board: $1.49
- Double pulley (12-pack): $21.98
- AC/DC Switch Power Supply: $6.29
- Maple Board x10 feet:$14.00
- Medium Density Fiber Board=:$5.95
- Poplar board x2: $2.90
- U-bolt x 2= $5.16
- Clear Plastic Cups, 80 Ct: $2.63
- Coca-Cola Mexican Glass Bottle, 355 mL x 6: $5.98 (purchase in Walmart store)
- Mountain Dew Mexican Bottle (12 oz) x 4:$4.49 (purchase in Walmart store)
- Fitzs Fitz's 4 Pack Soda:$4.57(purchase in Schnucks store)
- Lifting platform:$14.49
- Ultrasonic Distance Sensor: provided
- Arduino UNO board: provided
- 3D printing: provided
- Nut and bolts: provided
- Power Pro Fishing Braided line – 65 lbs limit: owned
- Magnet Screw Driver tool kit: owned
- Extension Cord - owned
- Glassware: owned
- Dremel rotary tool: owned
- Super glue: owned
- Double Coated tape: owned
Total: $132.63
Gantt Chart


Design and Solutions
Tutorials for how to use the Ultrasonic Distance Sensor or the Servo Motor can be found following the links.
System Framework
In order to monitor the liquid + fizz height in glassware, it is reasonable for us to implement either a distance sensor or a liquid level sensor. The latter could require us to put the sensor directly into the liquid so we eliminated the possibility as most users would not wish to drink soda that was dipped by a sensor.
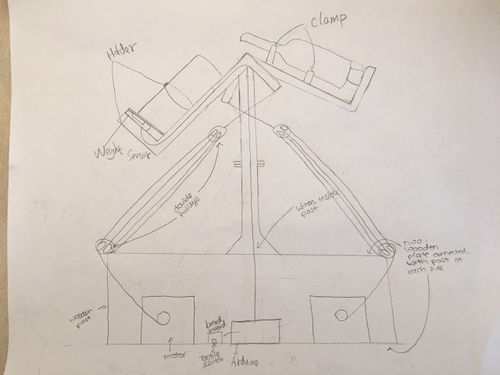
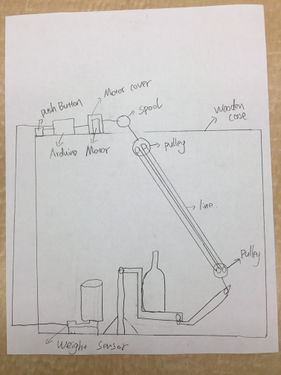
Our initial design of the system includes the both the bottle and the glassware tilting towards each other for the pour. However, it is very hard to add the distance sensor into the system as the glassware will tilt and the possibility of liquid getting into the sensor in case of an emergency should be minimized. We then modified the design in which we kept the glassware stationary and only tilt the bottle. The pulley system was added so that it can reduce the required torque on the motor to 1/4.
The wooden frame was designed so that the electric system is elevated above the mechanical system to minimize chances of electric shock when liquid gets on the electronics.
Design Evolution
Edition 1
Edition 2
Edition 3
Edition 4

Edition 5

Edition 6


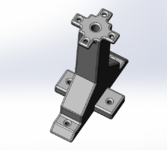
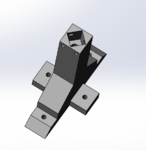
Mechanical System (3D Design)
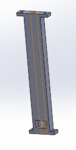
The very first problem with the SolidWorks design that we encountered for the mechanical system design is how to make stable posts and axis system so that it will not fall apart or misalign during the program. In addition, the Ultimaker 2 Extended printer in our lab can only print a maximum length of 8 inch for each dimension, so it is crucial that we can affix two parts well that it does not break.
- In order to have stable posts, we decided design holes and use nut and bolts to affix them to the wooden frame so that it is sturdy and can be taken off easily. Our initial design of the posts includes holes for the nut and bolts to affix the two part of the base together. We changed our posts design from the 1st to the 2nd because it could be more stable if the two parts have a large amount of overlap and not just screwed together.
Base Edition 1
Base Edition 2
Upper part for Base edition 2


- We have to keep the horizontal axis stationary and not turning while the bottle is tilting because friction between it and the posts would more likely lead wobbling of the system during the pour. We added an a concave and convex part onto the two 3D designs to fix this problem.
Base upper with concave part
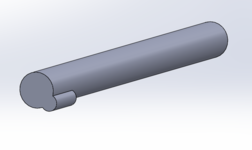
Horizontal rotation axis with convex part
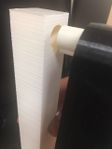
Prints


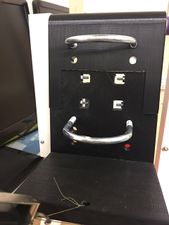
- Motor holder and pulley holder was designed to stabilize the motor and pulley onto the wooden frame respectively. Toggle switch is added for safer user interface as it hides the wire openings and soldering parts that goes onto the toggle switch. Spool for the fishing line was designed so that it can be glued onto one of the accessories bought with the motor.
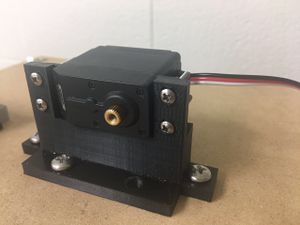
Motor Holder
Pulley Stabilizer
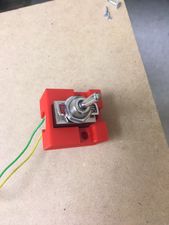
Toggle switch holder
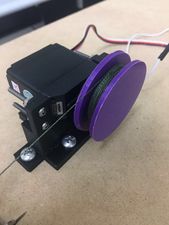
Spool


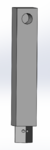
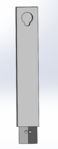
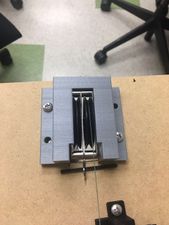
- Distance sensor suspension system and holder was designed so that the sensor can be suspended to a desired height that can measure the height of liquid in glassware without receiving interference signals caused by the Mexican bottle neck. In addition, the wires that goes onto the distance sensor can be hidden in the print to minimize chances of electric shock.
Lower half of distance sensor suspension system

Ultrasonic distance sensor holder


Code and Electrical System
Code can be found here.
- In order to accurately measure the height of liquid in glassware, the choice of distance sensor is important. The infrared is good in a way that the bottle neck will have a lower chance of interference with the reading. However, it does not deal good with liquids, so we decided to use the ultrasonic distance sensor.
- There are fluctuations in the sensor readings so we decided that for each distance reading used in the code would be an average of 40 values. We coded a function that takes the average of the 40 measurements so that we can use it conveniently throughout our final algorithm.
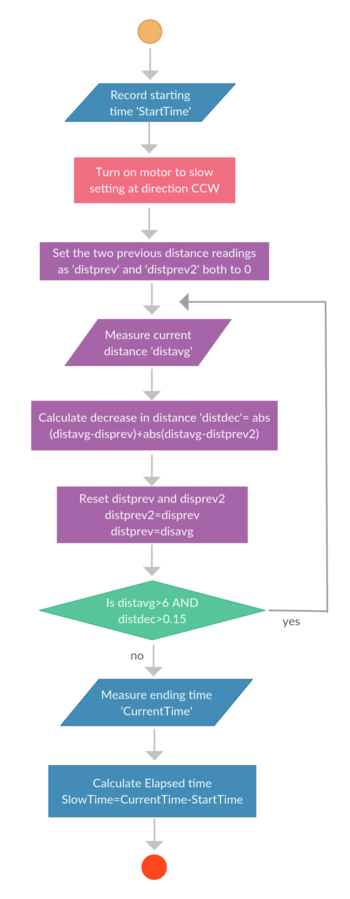
- The bottle should be tilted slowly when liquid starts coming out of it but it should not be at that same slow speed while it is on the way up (no liquid out yet). We decided to hardcode two speed settings (98 and 95 respectively, magnitude of values explained here) on the servo motor (determined experimentally) that can serve as the fast and slow modes. When distance sensor does not sense a difference (less than 2cm, value determined experimentally) between the initial distance reading (no liquid) and the current one, then it will uses the fast speed. If the difference is larger than 2cm (liquid pouring out), then it is switched to slow speed.
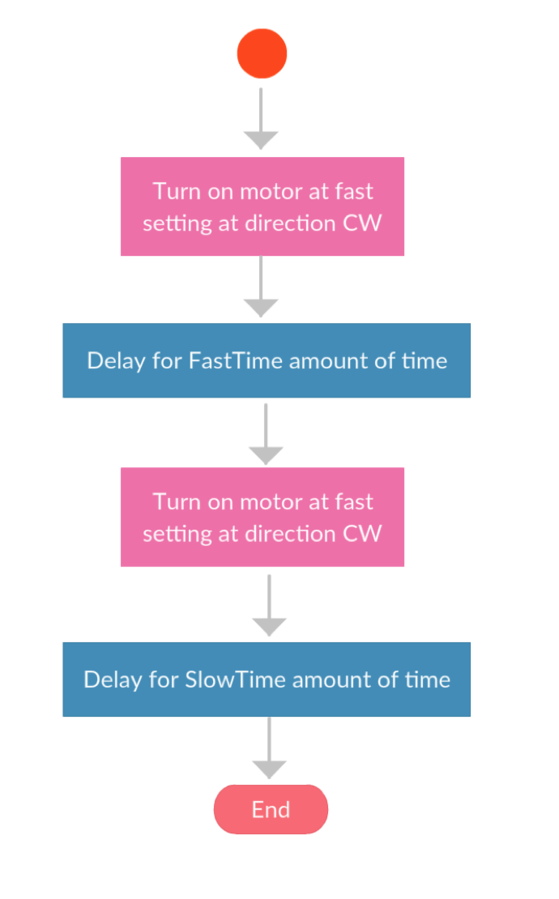
- The bottle should be able to return to its original position. We use the millis() function to measure the time for both fast and slow mode. The servo will operate at the same two speeds as when the bottle is tilting up, but in a different direction (hardcoded values of 82 and 85) with their respective time using the delay(ms) function. More information behind the choice of those speed values found here.
- The code have to account for various situations
- Liquid in bottle is more than the volume in glassware: Because each glassware is adjusted so that the height of its tip aligns with the height of two posts, so we manually measured that distance between the sensor and the desired final liquid level(when glassware is filled) to be 6cm and hardcoded onto the Arduino.
- Liquid in bottle is less than the volume in glassware: The code tracks the two previous readings(average of 40 readings) from the distance sensor. If the average difference between the current reading and previous 2 readings is less than 0.075 cm (determined through experiment), then the bottle will tilt back to its original location.
Circuit

Elaborated Flow Chart
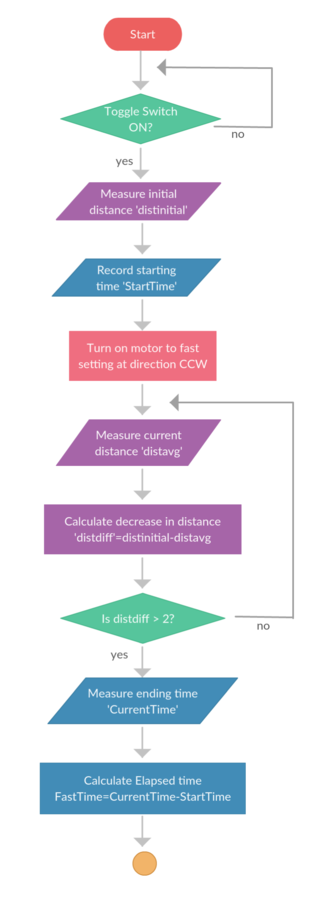
Flow Chart 1
Flow Chart 2
Flow Chart 3


Mexican Bottle and Glassware
We wish that our system was able to accommodate different kinds of 355 mL (12oz) Mexican bottle as they differ in height, girth, and curvature across various soda brands. In order to do so, we decided to drill 5 sets of holes on the bottle holder for the U-bolts so that we can choose the most appropriate ones to use for each brand.
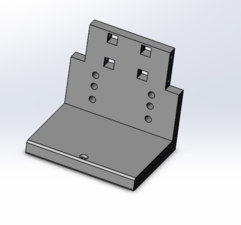
Bottle holder base
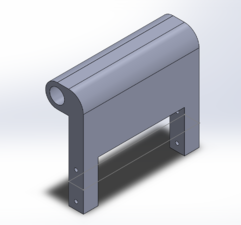
Bottle holder swing
Printed our version


The system would be nearly useless if we have to use the same glassware for each trial, so we decided to implement an elevating system using lifting platform to accommodate various glassware heights. By conducting various experiments, we found the limitation on height of glassware to be 7cm - 17cm. In order to make the code more versatile, the user have to manually adjust the height of glassware to align with the height of two posts before starting the program. The standardization height was chosen for convenience because it would be absurd if the user had to use a ruler and measure the height before each trial. A restriction on the diameter of the tip of the glassware was determined empirically to be 7cm as it must have enough room to fit both the ultrasonic distance sensor and the Mexican bottle neck. In addition, the system was also able to be poured into plastic party cups as long as it meets the same requirements.

7 cm tall glassware
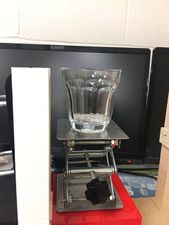
17 cm tall glassware


Results and Next Steps
Our system was very successful at pouring soda into a glassware without spilling under given restrictions (outlined in demo poster).
Mechanical Design
- The wooden frame worked very well with providing a reaction torque for the motor without falling apart. The 3D printings were very sturdy that no misalignings happened during the pour.
- The restriction on the height of glassware is very reasonable as most commercially available glassware or party plastic cups are with that height range.
- The restriction on the minimum diameter of the glassware was set to be 7cm, but we found commercially available party plastics cups that do not satisfy that limit. We experimentally chose 7cm as the limit because the glassware opening have to leave space for both the ultrasonic distance sensor and the Mexican bottle neck. The dimensions of the distance sensor is 2 inch * 1 inch, which takes up the same amount of the space as the bottle neck in the glassware opening. If we can find a distance sensor that is smaller in size and also works with liquids, we can lower the value for minimum diameter.
Code and Electric System
- Our code was able to successfully pour soda from a Mexican glass bottle into a glassware without spilling. Only this one code is needed to deal with situations where the liquid in bottle is less than the volume of the glassware and those in which there is more liquid in the bottle. Theoretically, we do not need to use the connect out laptop to the Arduino during the demo, but we chose to do so in case emergency happens that we have to quickly tilt the bottle down to stop soda from spilling.
- We spend a large amount of time using the IR distance sensor to measure the water level height. The readings were very accurate at first but then it experienced extremely large fluctuations. After the second evaluation and some researching, we realized that infrared does not work well with liquids that we then decided to switch to Ultrasonic distance sensor instead. This meant that we only had less than 3 weeks before the demo to work with the ultrasonic distance sensor.
- The restriction on the minimum amount of liquid in the glassware is set to be 50mL. This value is fairly reasonable as people can just pour liquid less than this volume themselves. If we had more time, we can try to deal with situation with liquid less than 50 mL or even empty bottle in the code to make the system more versatile.
Videos for 3 typical senarios
- Liquid in bottle is more than the volume in glassware, minimum height of glassware (7 cm)
- Liquid in bottle is less than the volume in glassware, maximum height glassware (17cm)
- Liquid in bottle is more than the volume in glassware, minimum diameter glassware (7cm)
Demo
Our demo was very successful as presenting our project. We bought 10 bottles of soda and they were all out!
Poster

Video
Future Considerations
- We can try to accommodating various kinds of bottles on the system, including 500mL plastic soda bottle and soda cans. The reason that we chose to start the project with Mexican glass bottle was that it has a very narrow neck which decrease its chance of interfering with the ultrasonic sensor during the pour. We attempted to use this same program on the 500mL coca cola plastic bottle and it was able to work just like the Mexican bottle, but time was not enough to complete more experiments.
- Our system require the user to manually adjust the height of glassware using the lifting platform so that the tip of the glassware aligns with the height of the two posts. It would be nice if our system can do that itself. We can 3D print parts that fit a motor well on the knob of the lifting platform and add a laser sensor that detects interference on the highest point of the two posts. We can use the laser as sensor to control how the motor turns, which then will be able to control the height of the lifting platform and thus the height of the glassware.
Repositories
Code
https://bitbucket.org/jessieshi97/cheers/