Difference between revisions of "I2C + Arduino"
Djsullivan (talk | contribs) |
Djsullivan (talk | contribs) |
||
| Line 1: | Line 1: | ||
[[File:I2cA.png|center]] | [[File:I2cA.png|center]] | ||
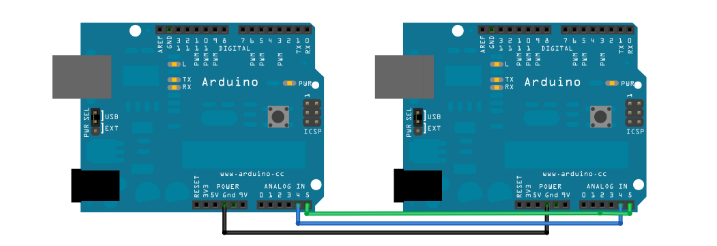
| − | The ''[https://www.arduino.cc/en/Reference/Wire (Wire library)]'' allows communication between the Arduino and other I2C compatible devices, for example another Arduino. To connect an I2C device, you must connect data(SDA) and clock(SCL) pins together, on the Uno these are pins A4 and A5. Also, both devices must share the same ground. Below is an example of a master reading from a slave. On the left is the code for the master, leaving out the argument on Wire.begin() initializes the device as a master. The requestFrom method takes the inputs of a slave address and how many bytes to take from that slave, then proceeds to send a signal to the slave asking for this information. On the slave side, initialize Wire.begin(address) with the address of that slave. Something to note: if the slave is an Arduino you may set the address for example 8 is used here, however other I2C devices may have a fixed address. The MPU6050 IMU has a fixed address of 0x68, so make sure any I2C devices planned to be used have | + | The ''[https://www.arduino.cc/en/Reference/Wire (Wire library)]'' allows communication between the Arduino and other I2C compatible devices, for example another Arduino. To connect an I2C device, you must connect data(SDA) and clock(SCL) pins together, on the Uno these are pins A4 and A5. Also, both devices must share the same ground. Below is an example of a master reading from a slave. On the left is the code for the master, leaving out the argument on Wire.begin() initializes the device as a master. The requestFrom method takes the inputs of a slave address and how many bytes to take from that slave, then proceeds to send a signal to the slave asking for this information. On the slave side, initialize Wire.begin(address) with the address of that slave. Something to note: if the slave is an Arduino you may set the address for example 8 is used here, however other I2C devices may have a fixed address. The MPU6050 IMU has a fixed address of 0x68, so make sure any I2C devices planned to be used have unique addresses. In the slave set up, the onRequest method registers what happens when a master requestsFrom. Here, the function requestEvent is run. Finally, inside the function requestEvent(), to send data use the method Wire.write(). Important: notice only 1 byte at a time is being sent over, what if you want to send over an int which is composed of 2 bytes? A solution is to send over the higher bytes first, then the lower bytes second and recombine the two back into an integer on the other side. So lets say we want to send the int 20,000 from the slave to the master. On the slave side, under "hello" create the integer num, create an array myArray[2];. Set myArray[0] = (num>>8 & 255), to get the upper bytes, this is using bit operators you can find out more (here). Then set the lower bytes myArray[1] = num & 255 and finally send it with Wire.write(myArray). You must also change on the master side to request for 8 bytes now instead of 6! |
[[File:Master.png|left|600px]] | [[File:Master.png|left|600px]] | ||
Revision as of 21:48, 13 December 2016
The (Wire library) allows communication between the Arduino and other I2C compatible devices, for example another Arduino. To connect an I2C device, you must connect data(SDA) and clock(SCL) pins together, on the Uno these are pins A4 and A5. Also, both devices must share the same ground. Below is an example of a master reading from a slave. On the left is the code for the master, leaving out the argument on Wire.begin() initializes the device as a master. The requestFrom method takes the inputs of a slave address and how many bytes to take from that slave, then proceeds to send a signal to the slave asking for this information. On the slave side, initialize Wire.begin(address) with the address of that slave. Something to note: if the slave is an Arduino you may set the address for example 8 is used here, however other I2C devices may have a fixed address. The MPU6050 IMU has a fixed address of 0x68, so make sure any I2C devices planned to be used have unique addresses. In the slave set up, the onRequest method registers what happens when a master requestsFrom. Here, the function requestEvent is run. Finally, inside the function requestEvent(), to send data use the method Wire.write(). Important: notice only 1 byte at a time is being sent over, what if you want to send over an int which is composed of 2 bytes? A solution is to send over the higher bytes first, then the lower bytes second and recombine the two back into an integer on the other side. So lets say we want to send the int 20,000 from the slave to the master. On the slave side, under "hello" create the integer num, create an array myArray[2];. Set myArray[0] = (num>>8 & 255), to get the upper bytes, this is using bit operators you can find out more (here). Then set the lower bytes myArray[1] = num & 255 and finally send it with Wire.write(myArray). You must also change on the master side to request for 8 bytes now instead of 6!


