Difference between revisions of "Smarter Blinds"
Lkaniewski (talk | contribs) |
Lkaniewski (talk | contribs) |
||
| Line 116: | Line 116: | ||
===Formulas=== | ===Formulas=== | ||
| − | *The user inputs a number from 1 to 5 indicating how bright they would like the room to be. The | + | *The user inputs a number from 1 to 5 indicating how bright they would like the room to be. The photoresistor has a max value of 1023. Therefore, the formula for converting the number inputted to a value that corresponds with the photoresistor values is 1023/5 multiplied by the user input value. 5 corresponds to very bright and 1 corresponds to a very dark room. |
| + | *Another formula created was to correlate the position of the blinds to the brightness desired. The position of the blinds that correlates to the brightest setting is when the blinds are perpendicular to the window letting a maximum level of light pass through. The motor, after initialized moves the blinds 45 degrees then however many more degrees needed to position the blinds at the desired brightness. This formula is steps_needed = (4076 * 5.5) + (5 - bright_scale) * (4076); | ||
=== Electronics === | === Electronics === | ||
Revision as of 19:47, 5 April 2019
Smarter Blinds
Contents
Proposal
Team Members
- Elizabeth Saliba
- Liza Kaniewski
- Michael Williams (TA)
Links
Budget: Nite Light & Smarter Blinds
Overview
New technology has allowed society to make improvements to daily items including thermostats and other objects around the home. Fascinated with this idea of do-it-yourself home improvement projects and the wide breadth of tasks that can be accomplished we have decided to make Smarter Blinds. We will be creating blinds that move according to user input. By incorporating aspects that allow the blinds to move according to sunlight and temperature in the room to eliminate the use of air conditioning or heating we hope to make our blinds energy efficient. This way, our hope is that energy consumption in the home will be reduced through our creation of Smarter Blinds.
Objectives and Goals
- Have the blinds open from being completely closed to open over a period of time set by the user
- Make the design efficient and compact so that it could work for all blinds that utilize rotating rod to open/close
- Have a user inputted preferred light intensity so that the blinds move throughout the day according to desired intensity.
- Make eco-friendly functions that increase/decrease the amount of light let in, which lessens the need for air conditioning/heating
- Find a suitable power source for the blinds such as lithium batteries or potentially solar power
- If time allows, develop a way for the blinds to be controlled on your mobile device via Adafruit App
Challenges
- Learning and effectively using Arduino
- Learning CAD and 3D printing skills with the goal of printing as many parts as possible to be cost effective
- Generating enough power to operate the blinds
- Determining the relationship between temperature, luminous intensity and blind angle
- Making sure the motor is strong enough to turn the blinds
- Creating a design that can be used on various blinds
- Designing a user-friendly app that connects to the blinds via Bluetooth
- Finding a way to determine position of blinds when initially turned on
- Transferring system from Arduino Uno to Feather
Budget
- Arduino UNO
- Digital Light Intensity Sensor Module for Arduino, $5.49 * Do not need to purchase
- RGB LCD Shield Kit for Character Display, $23.95 *Using Feather so now need a different part
- Adafruit FeatherWing OLED - 128x32 OLED Add-on For Feather $14.95
- LM35DZ Temperature Sensor, $1.23 (5)
- Solar Panel, $5.69 *not purchasing now
- Stepper Motor, $14
- Motor Driver, $4.95
- Arduino Feather ($29.95) *
- Adafruit Bluefruit LE UART Friend - Bluetooth Low Energy (BLE),$17.95 * Since using feather do not need this.
- Adafruit App, $0
- Estimated Total Budget: $57.77
- Note: With Feather: $87.72
- Note: With Bluetooth: $75.72
Current Parts Purchased / Have:
- Adafruit FeatherWing OLED - 128x32 OLED Add-on For Feather $14.95
- Digital Light Intensity Sensor Module for Arduino, $5.49 * Do not need to purchase
- LM35DZ Temperature Sensor, $1.23 (5) (ordered)
- Stepper Motor, $14 (may need to purchase additional if current one fails)
- Motor Driver, $4.95(may need to purchase additional if current one fails)
- Arduino Feather ($29.95)
Current Amount Spent: $49.44 + $7.15 = $56.59
Gantt Chart
https://docs.google.com/spreadsheets/d/10uzT7YQ7MJU3zTquifuFkcKUptFDYlntzzncpx78SI4/edit?usp=sharing
Design and Solutions
Mechanics
Construction of Circuit
Functioning of Blinds
- Using the rotating device located at the top of the blinds, it takes approximately 11 revolutions to open the blinds from 0 degrees (with the flaps completely shut) to 90 degrees (with the flaps parallel to the ground)
- 11 revolutions is equal to 44,836 steps taken by the stepper motor; therefore, it takes approximately 498.2 steps to move the blinds 1 degree
3D Printing
- Used OnShape software
- Creation of connector between stepper motor and rotating rod of blinds
- Creation of enclosure to withhold and hide hardware towards the top of the blinds
Mounting Blinds
Programming
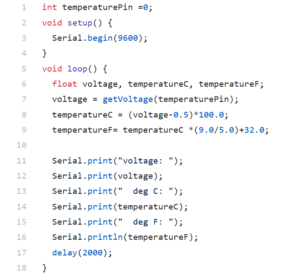
Detecting Temperature of Room
- Used an LM35DX temperature sensor to take in temperature values of the room in which the blinds are located
- Values read from temperature sensor are converted into degrees Fahrenheit, which can be seen in further detail under Code section
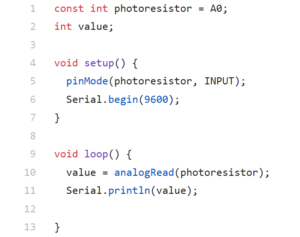
Detecting Luminosity of Room
- Used CdS photocell (photoresistor) to detect the amount of light in the room in which the blinds are located
- Values read from photocell are converted to brightness on a scale of 1-10, which was done to prevent user confusion with unfamiliar brightness values
Receiving User Input
- User is given option to have blinds adjust based off either room temperature or room luminosity
- Text is displayed on Adafruit FeatherWing OLED, and user will utilize three buttons to set desired temperature/luminosity
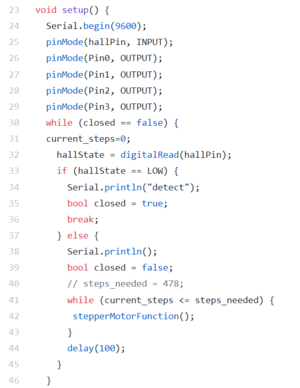
Setting Initial Position of Blinds
- Mounted strong magnet on one flap of blinds
- Hall Effect sensor used to determine when blinds are closed - when magnet is detected, blinds should be completely closed
Opening and Closing the Blinds
- 5VDC Stepper Motor used to rotate position of blinds in both clockwise and counterclockwise directions
- Stepper Motor opens 0 degrees (minimum light) to 90 degrees (maximum light)
Formulas
- The user inputs a number from 1 to 5 indicating how bright they would like the room to be. The photoresistor has a max value of 1023. Therefore, the formula for converting the number inputted to a value that corresponds with the photoresistor values is 1023/5 multiplied by the user input value. 5 corresponds to very bright and 1 corresponds to a very dark room.
- Another formula created was to correlate the position of the blinds to the brightness desired. The position of the blinds that correlates to the brightest setting is when the blinds are perpendicular to the window letting a maximum level of light pass through. The motor, after initialized moves the blinds 45 degrees then however many more degrees needed to position the blinds at the desired brightness. This formula is steps_needed = (4076 * 5.5) + (5 - bright_scale) * (4076);
Electronics
- The ultimate goal for this project is to transfer the wiring from the Arduino Uno to the Feather. We choose to use the Feather because of its Bluetooth chip and builtin battery charging capabilities. Since identifying a power source is one of the challenging decisions we would need to address, using the Feather simplified the process for testing different power sources.
- Schematic of parts
- Pictures of everything soldered onto perfboard/feather
- The reach goal for our project is to use the Bluetooth capabilities of the Feather and create an app using AdaFruit's BlueFruit App
Results
Next Steps
References
Resources
- Past Projects
https://classes.engineering.wustl.edu/ese205/core/index.php?title=Smart_Blinds https://www.hackster.io/Froz3nArcher/smart-blinds-573548 https://www.hackster.io/rjacobo2/lane-tech-hs-pcl-iot-smart-blinds-42a68a (potential design idea)
- Stepper Motor and Arduino
Arduino Modules - L298N Dual H-Bridge Motor Controller Controlling DC Motors with the L298N Dual H-Bridge and an Arduino
- Bluetooth Connection
Adafruit Bluefruit LE UART Friend - Bluetooth Low Energy (BLE) Adafruit Feather 32u4 Bluefruit LE Adafruit Feather 32u4 Bluefruit Overview
- Soldering
Soldering YouTube How to Solder
- Temperature Sensor
- Photoresistor


