Difference between revisions of "EBOX"
| Line 72: | Line 72: | ||
Steps to Build the EBOX: | Steps to Build the EBOX: | ||
| + | |||
1. Program the color patterns | 1. Program the color patterns | ||
| + | |||
2. Upload the code to the Arduino | 2. Upload the code to the Arduino | ||
| + | |||
3. Plug leads into the hardware | 3. Plug leads into the hardware | ||
| + | |||
4. Solder external power source to lights and Arduino | 4. Solder external power source to lights and Arduino | ||
| + | |||
5. CAD box to hold the hardware | 5. CAD box to hold the hardware | ||
| + | |||
6. Assemble table | 6. Assemble table | ||
| + | |||
7. Secure lights around the underside of the table | 7. Secure lights around the underside of the table | ||
| + | |||
8. Plug in power source adapter to an outlet, place a speaker near the microphone, and enjoy! | 8. Plug in power source adapter to an outlet, place a speaker near the microphone, and enjoy! | ||
Revision as of 16:11, 30 November 2018
Contents
Project Proposal
Overview
We created an audio responsive LED lighting system integrated on a desk that can be used as a fun addition to one's home entertainment and lighting systems. The EBOX has 3 modes that the user can set with a tap of a touch sensor to customize the dynamic light patterns to fit any mood.
Group Members
Jordan Gewirtz
Chanel Lynn
Nish Chakraburtty
Tony Sancho-Spore (TA)
Dr. James Feher (Prof)
Link to Log
- https://classes.engineering.wustl.edu/ese205/core/index.php?title=EBOX_Log
- eBOX WUSTL BOX: https://wustl.app.box.com/folder/57307264614
Objectives
- Use an Arduino to implement a Fast Fourier Transform(FFT)
- Integrate the FFT through the Arduino with our LED lights
- Make the LED lights respond music with a specific, non-random color scheme
- Have the Light intensity change with the decibel level of the music
- User interface
Challenges
- learn Arduino
- Soldering
- learn complex circuitry
- carpentry
- writing the code and interfacing the Arduino with the LEDs and Sound receptor
- Learn to not short our entire project
- Learn how to use transistors
- Make sure nothing blows up
- Staying under budget
Gantt Chart
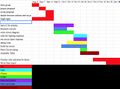
Draft #1
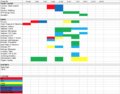
Draft #2
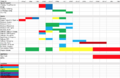
Draft #3

.png)
.png)
Budget
| Item | # of Units: Estimated | # of Units: Actual | Unit Price: Estimated | Unit Price: Actual | Total Price Estimated | Total Price: Actual (Including Shipping) | |
| Arduino (Link) | 1 | 1 | $22.00 | $0.00 (Provided by TA) | $22.00 | $0.00 | |
| Transistors (Link) | 10 | $0.06 | $0.60 | $0.00 (Provided by TA) | |||
| LED (strips - 6ft) (Link) | 1 | 1 | $21.99 | $21.99 | |||
| Arduino Microphone (Link) | 10 | 10 | $0.88 | $0.69 | $8.88 | $6.90 | |
| Table (Link) | 1 | 1 | $39.99 | $39.99 | $39.99 | $43.86 | |
| Capacitive Touch Sensors (Link) | - | 5 | - | $1.40 | - | $6.99 | |
| Total | 14 | $48.78 |
Design And Solutions
Steps to Build the EBOX:
1. Program the color patterns
2. Upload the code to the Arduino
3. Plug leads into the hardware
4. Solder external power source to lights and Arduino
5. CAD box to hold the hardware
6. Assemble table
7. Secure lights around the underside of the table
8. Plug in power source adapter to an outlet, place a speaker near the microphone, and enjoy!
The Software
The Electronics

Electrical Diagram

The Housing
Results
Shortcomings
Poster
External Links
Project Proposal Presentation Powerpoint link: https://docs.google.com/presentation/d/1mnPGURRNoGbIu7AR5VZs8qfj3P0mFTK5Hc8BOpOewkI/edit?usp=sharing
eBOX Log https://classes.engineering.wustl.edu/ese205/core/index.php?title=EBOX_Log
References
- https://sites.wustl.edu/ese498vertigodancefloor/ (Move to the Groove Reference)
- https://github.com/kosme/arduinoFFT (Arduino FFT library)
- https:/ing /forum.arduino.cc/index.php?topic=427386.0 (Arduino FFT discussion page)
- https://www.norwegiancreations.com/2017/08/what-is-fft-and-how-can-you-implement-it-on-an-arduino/ (Arduino FFT tutorial)
- https://www.instructables.com/id/Sound-Reactive-LED-strip/ (Simple version of our project)
- https://www.instructables.com/id/Arduino-Audio-Input/ (Tutorial to take in audio for FFT ~40KHz)
- https://www.instructables.com/id/Arduino-Frequency-Detection/ (Tutorial to analyze in audio for FFT ~40KHz)
- https://www.instructables.com/id/Arduino-Audio-Output/ (Tutorial to output audio for FFT ~40KHz)
- https://www.arduino.cc/reference/en/ (Arduino Language Reference)
- https://www.youtube.com/watch?v=e1FVSpkw6q4 (Simple tutorial, make LEDs dance)
- http://genericnerd.blogspot.com/2009/05/arduino-mood-light-controller.html (Tutorial, LED color transitions)
- https://www.youtube.com/watch?v=kj-oZgmRB2w&t=73s (OnShape Tutorial)
- https://www.youtube.com/watch?v=pMWnsHpDlQE&t=18s (OnShape Tutorial)
- https://www.youtube.com/watch?v=OasbgnLOuPI (HOW TO BUILD THE TABLE AND INTEGRATE THE LEDS)
- https://www.youtube.com/watch?v=5oRir4dck_w (ARDUINO LED LIGHTS WORK AND ARE SOUND RECEPTIVE (with opensource code))
- https://www.youtube.com/watch?v=NQinj-tlU-M (LED coding walkthrough)
- https://www.instructables.com/id/Wire-a-Potentiometer-as-a-Variable-Resistor/ (Potentiometer, Variable Resistor)
- https://playground.arduino.cc/Code/Filters (Real Time Digital Signal Processing Library)
- https://www.amazon.com/DAOKI-Sensitivity-Microphone-Detection-Arduino/dp/B00XT0PH10 (purchased microphone)
- https://randomnerdtutorials.com/guide-for-microphone-sound-sensor-with-arduino/ (Guide for microphone sound sensor)
- https://www.allaboutcircuits.com/technical-articles/introduction-to-capacitive-touch-sensing/ (Understanding Capacitive Touch Sensors (Self-Capacitance Configuration))
- http://henrysbench.capnfatz.com/henrys-bench/arduino-sensors-and-input/catalex-ttp223b-arduino-capacitive-touch-sensor-tutorial/ (Tutorial Capacitive Touch Sensor Arduino)
- https://www.instructables.com/id/How-to-use-OLED-display-arduino-module/ (Tutorial LED display)
eBOX Log https://classes.engineering.wustl.edu/ese205/core/index.php?title=EBOX_Log