|
|
| Line 111: |
Line 111: |
| | | | |
| | Wait for the upload to complete, and your’re done! Navigate to your endpoint (found under '''Properties>Static Website Hosting'''), and assuming you’ve uploaded a file matching your ''Index document'' setting, you should see your site live! | | Wait for the upload to complete, and your’re done! Navigate to your endpoint (found under '''Properties>Static Website Hosting'''), and assuming you’ve uploaded a file matching your ''Index document'' setting, you should see your site live! |
| − |
| |
| − | == Authors ==
| |
| − |
| |
| − | Ethan Shry, Fall 2018
| |
| − |
| |
| − | == Group Link ==
| |
| − |
| |
| − | N/A
| |
| − |
| |
| − | == External References ==
| |
| − |
| |
| − | N/A
| |
| − | uploadTos3Programatically770927 (Click to Expand/Collapse)
| |
| − | = Upload files to AWS S3 Programatically =
| |
| − |
| |
| − | == Overview ==
| |
| − |
| |
| − | This tutorial will cover using python to upload files to AWS S3 programatically. This can be used in conjunction with TODO INSERT LINK HERE to programatically upload files to a website hosted in AWS S3.
| |
| − |
| |
| − | == Matrerials/Prerequisites ==
| |
| − |
| |
| − | This tutorial assumes you have an AWS account established.
| |
| − |
| |
| − | == Process ==
| |
| − |
| |
| − | === About S3 ===
| |
| − |
| |
| − | You will be using Amazon S3 (Simple Storage Service) as a location to upload files to the cloud. You can read more about S3 [https://aws.amazon.com/s3/ here].
| |
| − |
| |
| − | S3 is essentially a cloud file storage service. Typical use cases might include:
| |
| − |
| |
| − | * File storage for access by other AWS services
| |
| − | * Storage of data files (i.e. <code>.csv</code>, <code>.tsv</code>, <code>.txt</code>) which you might want to process in the cloud or share amongst computers
| |
| − | * Storing AWS log data or other data outputted from AWS services
| |
| − | * As a collection of files referenced on a website (i.e. image or font hosting), like a CDN.
| |
| − |
| |
| − | We will set up a bucket which will be used to as the location to which we must upload our files, and then use the Boto3 python library, along with an IAM profile to upload files to that bucket.
| |
| − |
| |
| − | === Setting up IAM roles ===
| |
| − |
| |
| − | This tutorial assumes you have an AWS account already. If you do not, go ahead and create an AWS account [https://portal.aws.amazon.com/billing/signup#/start here]
| |
| − |
| |
| − | First, we need to set up an IAM profile. This is to get access to credentials which will allow you access to your site to upload files.
| |
| − |
| |
| − | Log in to AWS and navigate to '''Services >Security, Identity, and Compliance> IAM'''
| |
| − |
| |
| − | [[File:nav-to-iam.png|frame|none|alt=|caption navigation]]
| |
| − |
| |
| − | In the left side panel, click on '''Users'''
| |
| − |
| |
| − | Then click '''Add User'''
| |
| − |
| |
| − | Now we will set up our IAM role.
| |
| − |
| |
| − | First, define a username. This user’s access will be restricted to uploading files to s3, so this tutorial will use '''s3-upload'''
| |
| − |
| |
| − | Since you will be uploading files programatically, under '''Select AWS access type''' choose '''Programatic access'''.
| |
| − |
| |
| − | Ensure your user details are similiar to the following and click '''Next'''.
| |
| − |
| |
| − | [[File:iam-user-details.png|frame|none|alt=|caption user details]]
| |
| − |
| |
| − | Now, you must grant our user access to a set of permissions. If desired, you can associate your user with a group and assign permissions to the group (which would be useful if you wanted to have several users uploading to s3), however in this instance this tutorial will attach policies directly.
| |
| − |
| |
| − | Click on '''Attach existing policies directly''', and then in the table find and select '''AmazonS3FullAccess'''.
| |
| − |
| |
| − | Ensure your screen looks like the following and then click '''Next'''.
| |
| − |
| |
| − | [[File:iam-user-policies.png|frame|none|alt=|caption user policies]]
| |
| − |
| |
| − | Review your user is configured as specified and click '''Create user'''.
| |
| − |
| |
| − | You will now be presented with three pieces of information: your ''User Name'', your ''Access key ID'', and your ''Secret access key''. Copy these down and click close.
| |
| − |
| |
| − | '''NOTE:''' you should '''NEVER''' publicly reveal your ''Access key ID'' or ''Secret access key'', on Github or anywhere else. An IAM role is granting access to your AWS account, and if your IAM role has been given enough permissions people can easily hack your account and create enormous charges under your name. If a credential breach is suspected, credentials should '''IMMEDIATELY''' be invalidated. There has been fraudulent AWS activity in this class which has nearly cost a group $'''7200'''. Please keep your credentials secure.
| |
| − |
| |
| − | Finally, click on your newly created user in the Users table, and copy down the '''USER ARN'''.
| |
| − |
| |
| − | Now that your IAM profile is set up, you will establish your S3 bucket.
| |
| − |
| |
| − | === Setting up the bucket ===
| |
| − |
| |
| − | <blockquote>Please note, if you plan to use this tutorial to upload files to an S3 website programatically, you should first follow the '''Website with AWS S3''' tutorial then come back to this tutorial.
| |
| − | </blockquote>
| |
| − | Navigate to '''Services>Storage>S3'''
| |
| − |
| |
| − | [[File:nav-to-s3.png|frame|none|alt=|caption navigation]]
| |
| − |
| |
| − | Click on '''create bucket'''.
| |
| − |
| |
| − | You will then need to configure the bucket settings.
| |
| − |
| |
| − | * Select a bucket name. This must be unique across all buckets in S3. This tutorial will use '''ese205-tutorial-bucket''' as a bucket name.
| |
| − |
| |
| − | Ignore the rest of the settings on this view and click '''next'''.
| |
| − |
| |
| − | This is the Configure Options tab. All the settings here are irrelevant for now, so just click '''next'''.
| |
| − |
| |
| − | Now you must set bucket permissions. Permissions should be as follows:
| |
| − |
| |
| − | * The bucket '''OWNER''' should have both '''Read''' and '''Write''' access. This should be default behavior.
| |
| − |
| |
| − | Click '''next'''.
| |
| − |
| |
| − | In the review tab, verify everything is correct, especially that you have a ''Bucket name'' that you like, then click '''Create Bucket'''.
| |
| − |
| |
| − | Congragulations, you’ve set up your first S3 bucket!
| |
| − |
| |
| − | There’s have one more step before you can upload files to your bucket.
| |
| − |
| |
| − | Open up your bucket by clicking on its name in the Buckets table.
| |
| − |
| |
| − | Navigate to the '''Permissions''' tab, and click on '''Bucket Policy'''.
| |
| − |
| |
| − | Then, paste the following code, being sure to replace ''your-bucket-name'' with your bucket name, and ''user-arn'' with your IAM user’s ARN.
| |
| − |
| |
| − | <blockquote>Note, if you are uploading to a Website hosted with S3 as in the '''Website with AWS S3''' tutorial, you should simply append the policy within '''Statement''' to your current array of '''Statements'''
| |
| − | </blockquote>
| |
| − | <source lang="json">
| |
| − | {
| |
| − | "Version": "2012-10-17",
| |
| − | "Statement": [
| |
| − | {
| |
| − | "Effect": "Allow",
| |
| − | "Principal": {
| |
| − | "AWS": "user-arn"
| |
| − | },
| |
| − | "Action": "s3:PutObject",
| |
| − | "Resource": "arn:aws:s3:::your-bucket-name/*"
| |
| − | }
| |
| − | ]
| |
| − | }
| |
| − | </source>
| |
| − | Be sure to click '''Save'''.
| |
| − |
| |
| − | What you have just done is granted PutObject permissions to your IAM user for this specific bucket.
| |
| − |
| |
| − | === Uploading Files ===
| |
| − |
| |
| − | Now you’ll upload your files.
| |
| − |
| |
| − | You’ll need both '''Python''' and '''Boto3''' installed. '''Boto3''' is the python package you use for interfacing with AWS, and can be installed with <code>pip install boto3</code>.
| |
| − |
| |
| − | Then, you can upload your files. The code to do so is as follows:
| |
| − |
| |
| − | <source lang="python">
| |
| − | import boto3
| |
| − | # Create a Boto3 session obejct with your IAM user credentials
| |
| − | session = boto3.Session(
| |
| − | aws_access_key_id='',
| |
| − | aws_secret_access_key='',
| |
| − | )
| |
| − | # Ensure the region name matches the region of your bucket. us-east-1 matches US East (N. Virginia)
| |
| − | s3 = session.resource('s3', region_name='us-east-1')
| |
| − | # Replace bucket-name with your bucket name, as well as the name of the file you want displayed in your bucket, including the extension
| |
| − | object = s3.Object('bucket-name', 'file-name-for-bucket.extension')
| |
| − | # Put your local file into the bucket by replacing the path-to-local-file with your desired file to upload, including the file extension
| |
| − | object.put(Body=open('path-to-local-file.extension', 'rb'))
| |
| − | </source>
| |
| − | Now if you refresh your S3 bucket, you should see your uploaded file!
| |
| | | | |
| | == Authors == | | == Authors == |
Overview
This tutorial will cover using AWS S3 as an easy, cheap way to host a website online and how to upload files to AWS S3 which can be viewed from a public URL.
Materials/Prerequisites
This tutorial assumes you have an AWS account already. If you do not, go ahead and create an AWS account here
Process
About S3
You will be using Amazon S3 (Simple Storage Service) to host a static website in the cloud. You can read more about S3 here.
S3 is essential a cloud file storage service. Typical use cases might include:
- File storage for access by other AWS services
- Storage of data files (i.e.
.csv, .tsv, .txt) which you might want to process in the cloud or share amongst computers
- Storing AWS log data or other data outputted from AWS services
- As a collection of files referenced on a website (i.e. image or font hosting), like a CDN.
You will set up a bucket which will be used to host all of the .html, .css, and .js files used in your website.
Setting up the bucket
Log in to AWS and navigate to Services>Storage>S3

caption navigation
Click on create bucket.
You will then need to configure the bucket settings.
- Select a bucket name. This name will be part of your site URL, and must be unique across all buckets in S3. This tutorial will use ese205-tutorial-bucket as a bucket name.
Ignore the rest of the settings on this view and click next.
This is the Configure Options tab. All the settings here are irrelevant for now, so just click next.
Now you must set bucket permissions. It is very important that the permissions are set as follows:
- The bucket OWNER must have both Read and Write access.
- Under Manage Public Permissions, change from Do not grant public read access to this bucket (Recommended) to Grand public read access to this bucket. This is what will allow anyone to view your site.
Ensure that your permissions look like the following image, then click next.
In the review tab, verify everything is correct, especially that you have a Bucket name that you like, and that Public permissions are Enabled, and then click Create Bucket.
Congragulations, you’ve set up your first S3 bucket!
You have a few more steps before you can upload files to your site.
Open up your bucket by clicking on its name in the Buckets table.
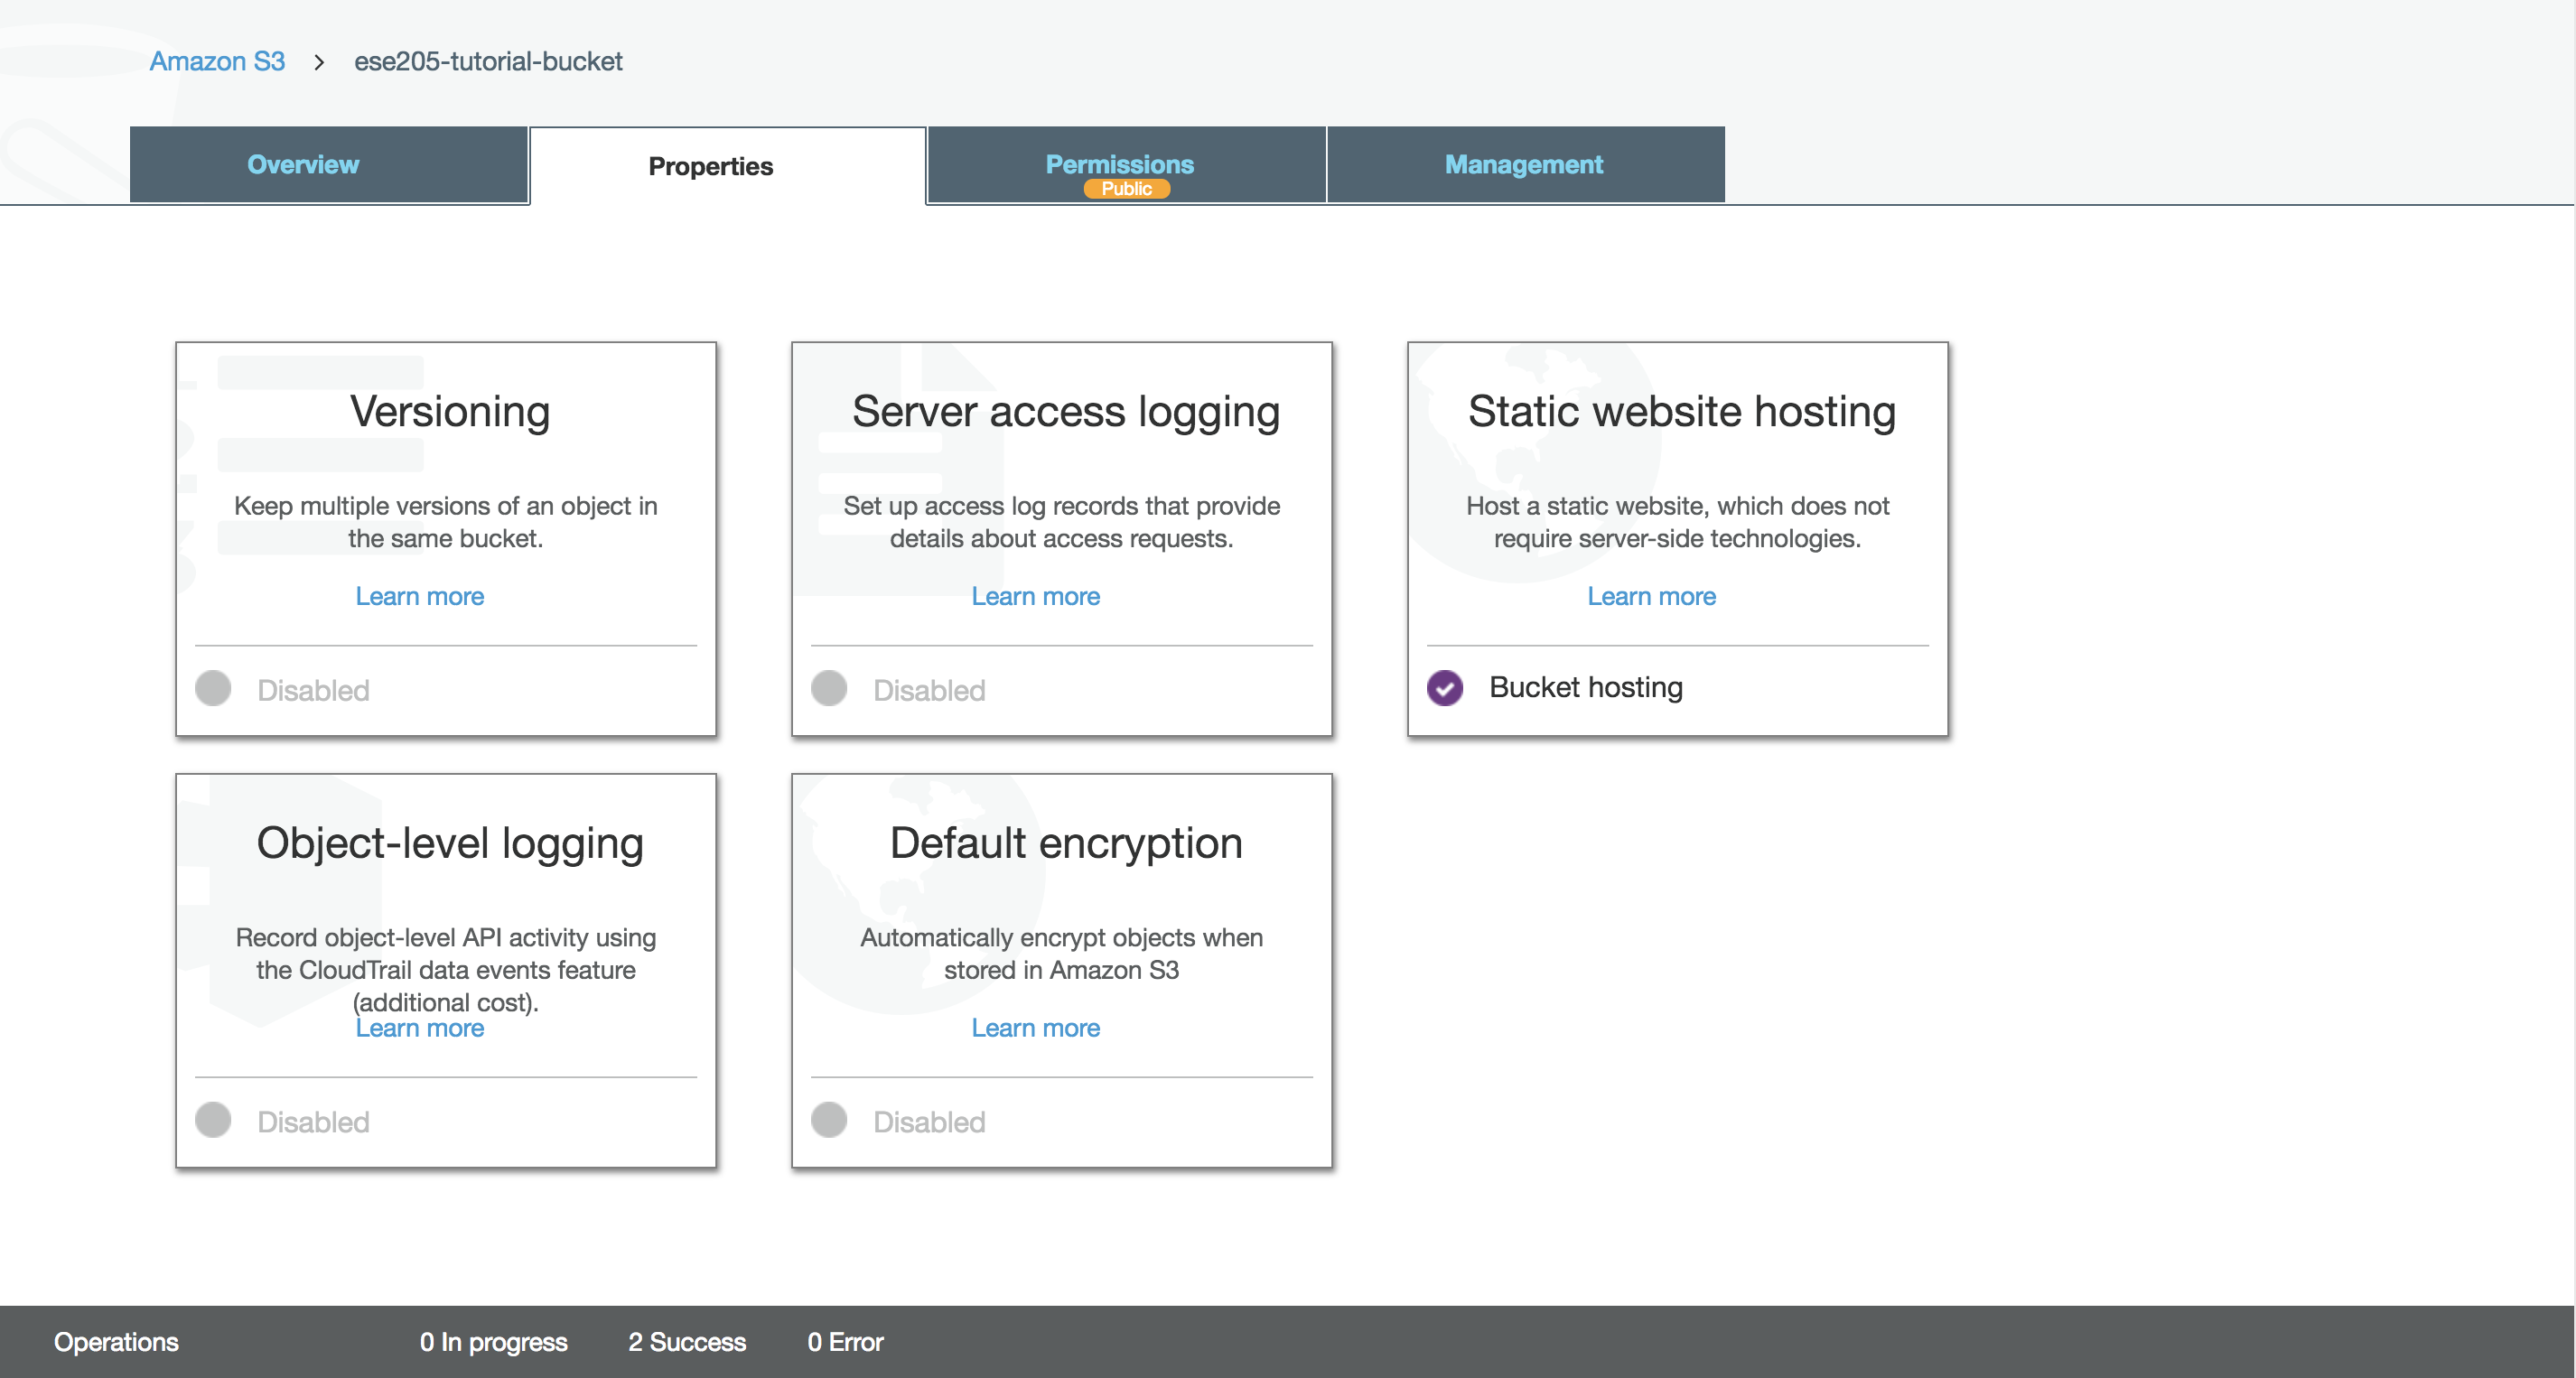
Open the Properties tab.
Click on the Static website hosting card.
- Make a note of the Endpoint. This is the URL where your site will be published to. If you click on it right now, you will get a 404 error.
- Select the Use this bucket to host a website radio button, and enter a name for the Index document. This will be the name of the main html file that your site will navigate to when you open up your Endpoint.
Feel free to ignore all of the other options and click Save.
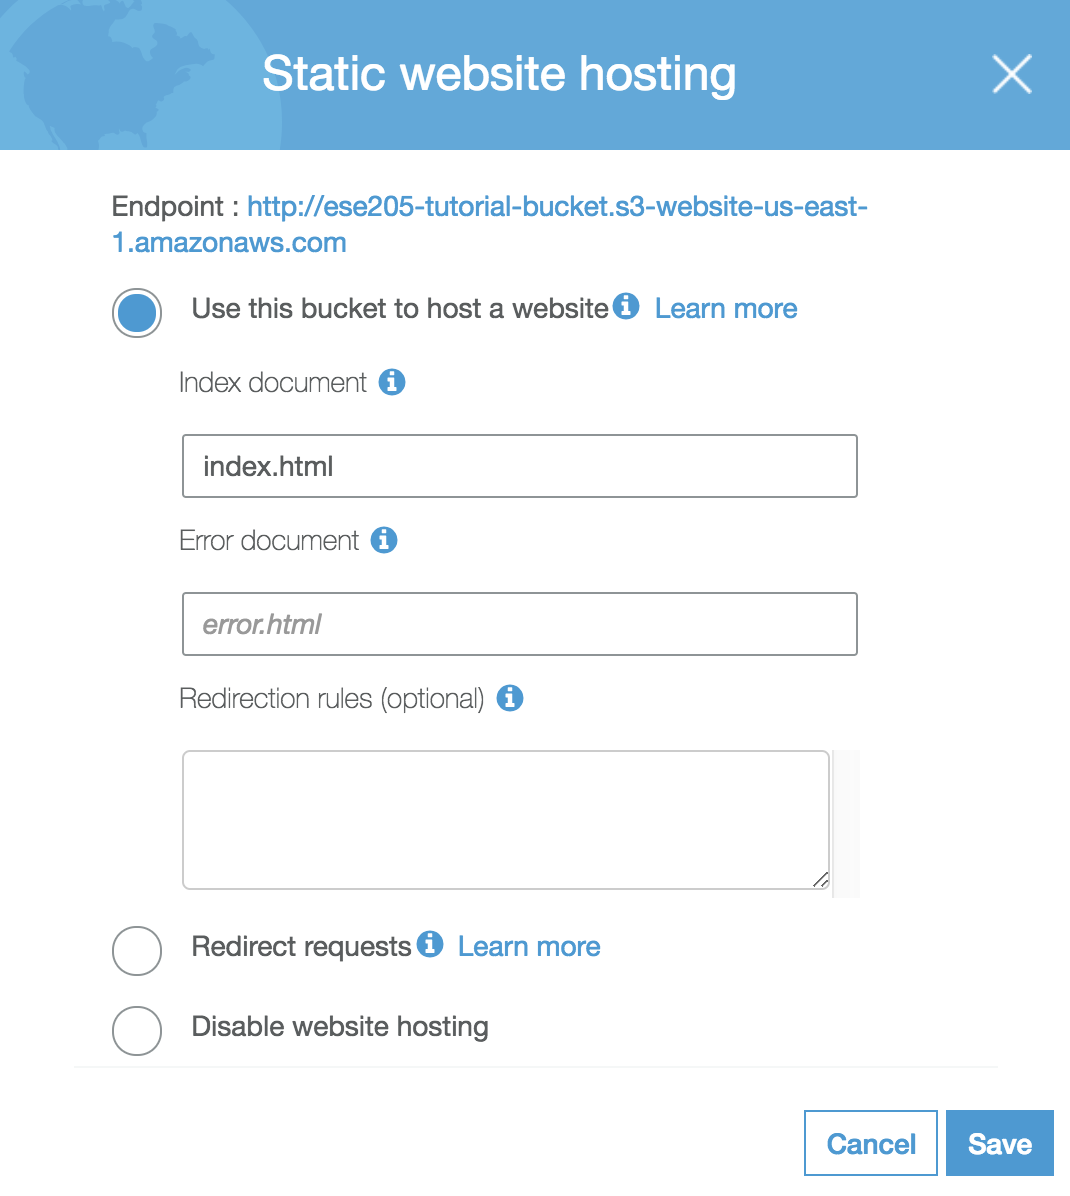
Now your site is configured to serve your content as a static website, as opposed to a collection of files.
Finally, you have to tell the bucket to allow access to all resources inside it to external users. This can be done on a file-by-file basis when files are uploaded, however for simplification this tutorial will just allow access to all files in the bucket all of the time.
Navigate to the Permissions tab, and click on Bucket Policy.
Then, paste the following code, being sure to replace your-bucket-name with your bucket name.
{
    "Version": "2012-10-17",
    "Statement": [
        {
            "Sid": "PublicReadForGetBucketObjects",
            "Effect": "Allow",
            "Principal": "*",
            "Action": "s3:GetObject",
            "Resource": "arn:aws:s3:::your-bucket-name/*"
        }
    ]
}
Your screen should now look like this, and the Bucket Policy tab should now have a Public badge on it.
What you have just done is grant access to all the files in your bucket. Anyone can now go to yourEndpoint/passwords.txt and supposing you’ve uploaded a file called passwords.txt to your bucket, they can view the contents of that file. NEVER store sensitive data, such as Passwords or API Keys Connected to paid services, in your bucket under these settings.
Note that this configuration can be modified to only allow access to certain types of files, which can help protect sensitive resources, however that is outside the scope of this tutorial.
You’ve successfully set up your bucket and configured it to host a website!
Uploading Files
Now it’s time to upload your site files. Feel free to use your own files, otherwise you can find some sample html, css, and js here
Navigate to the Overview tab in your bucket.
Click Upload, and either drag in your files or select them from your drive.
Click Upload.
Wait for the upload to complete, and your’re done! Navigate to your endpoint (found under Properties>Static Website Hosting), and assuming you’ve uploaded a file matching your Index document setting, you should see your site live!
Authors
Ethan Shry, Fall 2018
Group Link
N/A
External References
N/A


