Difference between revisions of "3D Printer"
| (6 intermediate revisions by 2 users not shown) | |||
| Line 1: | Line 1: | ||
We have a 3D printer model ''Ultimaker 2 Extended'' in our lab. | We have a 3D printer model ''Ultimaker 2 Extended'' in our lab. | ||
| − | = Rules and Regulations = | + | == Rules and Regulations == |
| − | + | Only TAs or instructors will print. Once you have your print file ready, contact your TA who will arrange to have it printed. | |
| − | + | Print jobs will be handled on a first come, first serve basis, make sure to consider this as the demo day gets closer..The TAs will place completed prints on the shelf above the printer in the order they are printed (left to right). If you come in and see your print finished and sitting on the print bed or on the shelf, please take it. You can store prints in your team's locker. | |
| − | |||
| − | |||
| − | |||
| − | |||
| − | |||
| − | |||
| − | |||
| − | = Printing Tips = | + | == Starting a Print == |
| + | # Open your .STL file in Cura on the desktop next to the printer (search for "Cura" from the start menu). | ||
| + | # Cura rotates your models 90 degrees and downsizes 10x. To fix this, click on the model and select "rotate" in the bottom left corner. Use the appropriate ring around the model to rotate it 90 degrees. Then click "scale" next to "rotate" and type in "10.0" for "Scale X". | ||
| + | # Save the gcode to your folder, take the printer's SD card and put it in the USB-SD reader below the desk, and copy the gcode to the SD card. '''For first time prints, make a team folder on the SD card for organization.''' | ||
| + | # Return the SD card and scroll the wheel left to select "print". Find your folder and select your model, and you're done. It will heat up, extrude some material in the corner, then begin printing. | ||
| + | # When the print finishes, wait 30 minutes before removing it. The print will be stuck to the bed until it cools off. If you force it, you might break it. | ||
| + | # Peal off the membrane at the print's base. If needed, scrape off the excess with scissors. Be sure to clean up! | ||
| + | Cura lets you print multiple models at once, placing them around the print bed. You can rescale, mirror, add support structure, and change the print quality, and thus the print speed. Experiment with the software to learn its full potential. | ||
| + | |||
| + | == Printing Tips == | ||
Be considerate of how long your print will take. While 15 grams of material may not seem like a lot, it will take over an hour to print. 200 grams, 20 hours. Avoid large blocks of material. If it takes more than 5 hours, ask yourself if it's really necessary, or if you can modify the design to shave off some build time and maintain the model's integrity. | Be considerate of how long your print will take. While 15 grams of material may not seem like a lot, it will take over an hour to print. 200 grams, 20 hours. Avoid large blocks of material. If it takes more than 5 hours, ask yourself if it's really necessary, or if you can modify the design to shave off some build time and maintain the model's integrity. | ||
| Line 24: | Line 26: | ||
</gallery> | </gallery> | ||
| − | + | Cura tries to be smart when creating the gcode. It creates mesh supported thin-walls to reduce material, and it will try and find a way to print an overhang if you give it the challenge. Minimize the amount of work you rely on Cura to do, and instead do it yourself. Focus on "printer friendly" models that minimize material and maximize structural integrity with no overhangs. An ideal print doesn't need Cura to make a support structure. | |
| − | + | == Manuals == | |
| − | |||
| − | |||
| − | |||
| − | |||
| − | |||
| − | |||
| − | |||
| − | |||
| − | |||
| − | |||
| − | |||
| − | |||
| − | |||
| − | |||
| − | |||
| − | |||
| − | |||
| − | |||
| − | |||
| − | |||
| − | |||
| − | |||
| − | |||
| − | |||
| − | |||
| − | |||
| − | |||
| − | |||
| − | |||
| − | |||
| − | |||
| − | |||
| − | = Manuals = | ||
| − | == User Manual == | + | === User Manual === |
The user manual can be downloaded in multiple languages at https://ultimaker.com/en/support/view/16554-user-manual. | The user manual can be downloaded in multiple languages at https://ultimaker.com/en/support/view/16554-user-manual. | ||
| − | == Unboxing == | + | === Unboxing === |
https://ultimaker.com/en/support/view/157-unboxing | https://ultimaker.com/en/support/view/157-unboxing | ||
Your packaging may differ slightly from that shown, as the new packaging is being rolled out as it becomes available. However, should any accessories be missing please contact us immediately. PLEASE NOTE: The filament guide is no longer being included and is not necessary for operation, so please disregard any references to this part. | Your packaging may differ slightly from that shown, as the new packaging is being rolled out as it becomes available. However, should any accessories be missing please contact us immediately. PLEASE NOTE: The filament guide is no longer being included and is not necessary for operation, so please disregard any references to this part. | ||
| − | == Basic Printer Calibration == | + | === Basic Printer Calibration === |
https://ultimaker.com/en/support/view/146-calibration | https://ultimaker.com/en/support/view/146-calibration | ||
| − | == Loading/Changing Filament == | + | === Loading/Changing Filament === |
https://ultimaker.com/en/support/view/16955-changing-filament | https://ultimaker.com/en/support/view/16955-changing-filament | ||
| Line 79: | Line 48: | ||
Please also note that the included glue stick is generally regarded as unnecessary for PLA since your printer uses a heated build platform, but can be beneficial for CPE and ABS. If you do decide to use it, apply an extremely small amount with a moist paper towel - if you can see the glue, it's too much. Once you heat the build platform, the remaining moisture will evaporate, leaving behind a very thin layer of glue. | Please also note that the included glue stick is generally regarded as unnecessary for PLA since your printer uses a heated build platform, but can be beneficial for CPE and ABS. If you do decide to use it, apply an extremely small amount with a moist paper towel - if you can see the glue, it's too much. Once you heat the build platform, the remaining moisture will evaporate, leaving behind a very thin layer of glue. | ||
| − | == Cura Slicing Software == | + | === Cura Slicing Software === |
Cura is the open-source slicing software used by the Ultimaker 2, and can be downloaded here: | Cura is the open-source slicing software used by the Ultimaker 2, and can be downloaded here: | ||
| Line 96: | Line 65: | ||
https://ultimaker.com/en/support/software/cura-1504 | https://ultimaker.com/en/support/software/cura-1504 | ||
| − | == Basic Printer Troubleshooting == | + | === Basic Printer Troubleshooting === |
The most common issues experienced by new users are related to bed leveling and adhesion, and there are a few tips which can help improve bed adhesion: | The most common issues experienced by new users are related to bed leveling and adhesion, and there are a few tips which can help improve bed adhesion: | ||
| Line 107: | Line 76: | ||
https://ultimaker.com/en/support/view/149-atomic-method | https://ultimaker.com/en/support/view/149-atomic-method | ||
| − | == Advanced Printer Troubleshooting/Maintenance == | + | === Advanced Printer Troubleshooting/Maintenance === |
Ultimaker’s official partner 3DVersktan has developed a number of useful guides, which can be found at the following link: | Ultimaker’s official partner 3DVersktan has developed a number of useful guides, which can be found at the following link: | ||
http://support.3dverkstan.se/category/31-guides | http://support.3dverkstan.se/category/31-guides | ||
| − | == Olsson Block == | + | === Olsson Block === |
Installing the Olsson Block is considered an intermediate to advanced activity. If you're just getting started with Ultimaker, we advise using the stock nozzle+heaterblock until you're familiar with the printer, then attempting the upgrade. | Installing the Olsson Block is considered an intermediate to advanced activity. If you're just getting started with Ultimaker, we advise using the stock nozzle+heaterblock until you're familiar with the printer, then attempting the upgrade. | ||
For more information on Olsson Block installation, please visit http://www.ultimaker.com/olssonblock | For more information on Olsson Block installation, please visit http://www.ultimaker.com/olssonblock | ||
| + | |||
| + | == Parts List == | ||
| + | Current print material: Grey PLA | ||
| + | Stock: | ||
| + | *3x Grey PLA | ||
| + | *3x Blue PLA | ||
| + | *3x Red PLA | ||
| + | *3x White PLA | ||
| + | *3x Black PLA | ||
| + | *3x Clear PLA | ||
| + | |||
| + | Ultimaker spare parts. See Ultimaker website for complete list. | ||
| + | *Bowden Tube | ||
| + | *Heater Cartridge | ||
| + | *Hot End Isolator | ||
| + | *Hot End Pack | ||
| + | *Nozzle + Heater Block | ||
| + | *Print Table Glass | ||
| + | *PTFE Coupler | ||
| + | *PT100 B Sensor | ||
| + | *Heated Bed | ||
| + | |||
[[Category:Devices]] | [[Category:Devices]] | ||
Latest revision as of 14:33, 10 July 2018
We have a 3D printer model Ultimaker 2 Extended in our lab.
Contents
Rules and Regulations
Only TAs or instructors will print. Once you have your print file ready, contact your TA who will arrange to have it printed.
Print jobs will be handled on a first come, first serve basis, make sure to consider this as the demo day gets closer..The TAs will place completed prints on the shelf above the printer in the order they are printed (left to right). If you come in and see your print finished and sitting on the print bed or on the shelf, please take it. You can store prints in your team's locker.
Starting a Print
- Open your .STL file in Cura on the desktop next to the printer (search for "Cura" from the start menu).
- Cura rotates your models 90 degrees and downsizes 10x. To fix this, click on the model and select "rotate" in the bottom left corner. Use the appropriate ring around the model to rotate it 90 degrees. Then click "scale" next to "rotate" and type in "10.0" for "Scale X".
- Save the gcode to your folder, take the printer's SD card and put it in the USB-SD reader below the desk, and copy the gcode to the SD card. For first time prints, make a team folder on the SD card for organization.
- Return the SD card and scroll the wheel left to select "print". Find your folder and select your model, and you're done. It will heat up, extrude some material in the corner, then begin printing.
- When the print finishes, wait 30 minutes before removing it. The print will be stuck to the bed until it cools off. If you force it, you might break it.
- Peal off the membrane at the print's base. If needed, scrape off the excess with scissors. Be sure to clean up!
Cura lets you print multiple models at once, placing them around the print bed. You can rescale, mirror, add support structure, and change the print quality, and thus the print speed. Experiment with the software to learn its full potential.
Printing Tips
Be considerate of how long your print will take. While 15 grams of material may not seem like a lot, it will take over an hour to print. 200 grams, 20 hours. Avoid large blocks of material. If it takes more than 5 hours, ask yourself if it's really necessary, or if you can modify the design to shave off some build time and maintain the model's integrity.
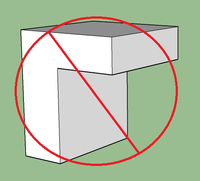
No Overhangs. An overhang is material sticking out sideways with no material between it and the ground. This means you're asking the printer to extrude material on top of nothing, and your print will distort if not fail completely.
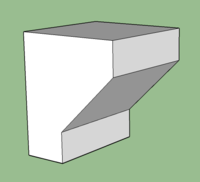
Inclines are okay. The printer has space to extrude material while shifting sideways, so it can handle inclines well. In general, your incline should be at least 45 degrees. Too low of an incline and it will approach looking like an overhang.
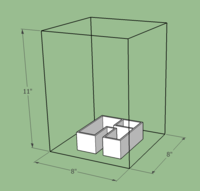
8x8x11" Build Volume. The Ultimaker 2 Extended offers a larger build volume than many printers available. However, when people try to test the build volume by printing to the very edges of the advertised dimensions, they end up running the extruder head into the side clips or grinding various components.


Cura tries to be smart when creating the gcode. It creates mesh supported thin-walls to reduce material, and it will try and find a way to print an overhang if you give it the challenge. Minimize the amount of work you rely on Cura to do, and instead do it yourself. Focus on "printer friendly" models that minimize material and maximize structural integrity with no overhangs. An ideal print doesn't need Cura to make a support structure.
Manuals
User Manual
The user manual can be downloaded in multiple languages at https://ultimaker.com/en/support/view/16554-user-manual.
Unboxing
https://ultimaker.com/en/support/view/157-unboxing
Your packaging may differ slightly from that shown, as the new packaging is being rolled out as it becomes available. However, should any accessories be missing please contact us immediately. PLEASE NOTE: The filament guide is no longer being included and is not necessary for operation, so please disregard any references to this part.
Basic Printer Calibration
https://ultimaker.com/en/support/view/146-calibration
Loading/Changing Filament
https://ultimaker.com/en/support/view/16955-changing-filament
IMPORTANT: If you're getting started with 3D printing, we strongly recommend using the included reel of PLA. Due to its low extrusion temperature and good platform adherence, PLA experiences much less warping than other materials. Using PLA when you're learning to use your Ultimaker allows you to build a solid understanding of the printing process and will increase your rate of successful prints - and also your enjoyment - down the road.
Please also note that the included glue stick is generally regarded as unnecessary for PLA since your printer uses a heated build platform, but can be beneficial for CPE and ABS. If you do decide to use it, apply an extremely small amount with a moist paper towel - if you can see the glue, it's too much. Once you heat the build platform, the remaining moisture will evaporate, leaving behind a very thin layer of glue.
Cura Slicing Software
Cura is the open-source slicing software used by the Ultimaker 2, and can be downloaded here:
https://ultimaker.com/en/cura-software/list.
When updating to a newer version of the software, it is also important to check that your printer is loaded with the most up-to-date version of firmware:
https://ultimaker.com/en/support/view/148-cura-and-firmware
The software has recently gone through a major update with version 15.06, which is still in the beta phase and is being updated continually. Operational information for Cura version 15.06 can be found at:
https://ultimaker.com/en/support/software/cura-1506
Because this version is a beta in active development, you may experience performance issues. If you prefer to use the latest stable version of the software, please download version 15.04.2. Information for this version can be found at:
https://ultimaker.com/en/support/software/cura-1504
Basic Printer Troubleshooting
The most common issues experienced by new users are related to bed leveling and adhesion, and there are a few tips which can help improve bed adhesion:
https://ultimaker.com/en/support/view/257-improve-bed-adhesion
If a print does not complete successfully or there is no material being extruded, there may be an issue with the filament. The first point to check is the feeder on the back of the printer to ensure that the filament has not been ground down. If this is not the case, there may be a nozzle clog. This can usually be solved using a simple manual feeding process known as the “Atomic method”:
https://ultimaker.com/en/support/view/11704-extrusion-problems
https://ultimaker.com/en/support/view/149-atomic-method
Advanced Printer Troubleshooting/Maintenance
Ultimaker’s official partner 3DVersktan has developed a number of useful guides, which can be found at the following link:
http://support.3dverkstan.se/category/31-guides
Olsson Block
Installing the Olsson Block is considered an intermediate to advanced activity. If you're just getting started with Ultimaker, we advise using the stock nozzle+heaterblock until you're familiar with the printer, then attempting the upgrade.
For more information on Olsson Block installation, please visit http://www.ultimaker.com/olssonblock
Parts List
Current print material: Grey PLA Stock:
- 3x Grey PLA
- 3x Blue PLA
- 3x Red PLA
- 3x White PLA
- 3x Black PLA
- 3x Clear PLA
Ultimaker spare parts. See Ultimaker website for complete list.
- Bowden Tube
- Heater Cartridge
- Hot End Isolator
- Hot End Pack
- Nozzle + Heater Block
- Print Table Glass
- PTFE Coupler
- PT100 B Sensor
- Heated Bed