Difference between revisions of "NFC Lock"
m (Protected "NFC Lock" ([Edit=Allow only administrators] (indefinite) [Move=Allow only administrators] (indefinite))) |
|||
| (28 intermediate revisions by 2 users not shown) | |||
| Line 71: | Line 71: | ||
* set up included jumpers on the board to use hardware SPI mode | * set up included jumpers on the board to use hardware SPI mode | ||
* wire the board to a 4050 level shifter chip according to online schematics | * wire the board to a 4050 level shifter chip according to online schematics | ||
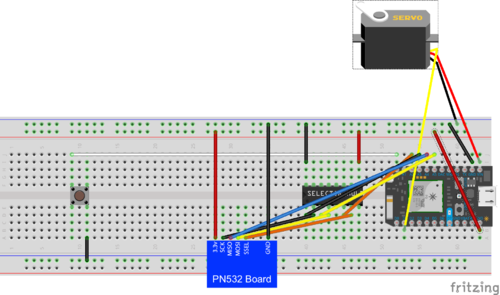
| − | * wire the 4050 to the Photon's pins according to those schematics | + | * wire the 4050 to the Photon's pins according to those schematics (see Fritzing diagram below for wiring specifics) |
| + | * set up the Photon and create a Particle account | ||
* load the PN532 Arduino library onto the Photon | * load the PN532 Arduino library onto the Photon | ||
* start up the PN532 from the Photon in code | * start up the PN532 from the Photon in code | ||
These steps allowed us to check for the presence of NFC tags with the PN532 board, send a tag's information back to the Photon, and deal with the information appropriately within the Photon's code. [https://github.com/kaimbanks/NFCLock Code here]. | These steps allowed us to check for the presence of NFC tags with the PN532 board, send a tag's information back to the Photon, and deal with the information appropriately within the Photon's code. [https://github.com/kaimbanks/NFCLock Code here]. | ||
| + | |||
| + | [[File:NFCLock Wiring.png|500px|thumb|center|Wiring Diagram]] | ||
===Module 2: Photon + I/O=== | ===Module 2: Photon + I/O=== | ||
| Line 81: | Line 84: | ||
* Inner Button: we needed a way to interact with the Photon from the inside, seeing as the knob part of the deadlock would be covered by the 3D-printed enclosure. As a result, we chose to wire a simple pulldown button that would lock and unlock the door from the inside. | * Inner Button: we needed a way to interact with the Photon from the inside, seeing as the knob part of the deadlock would be covered by the 3D-printed enclosure. As a result, we chose to wire a simple pulldown button that would lock and unlock the door from the inside. | ||
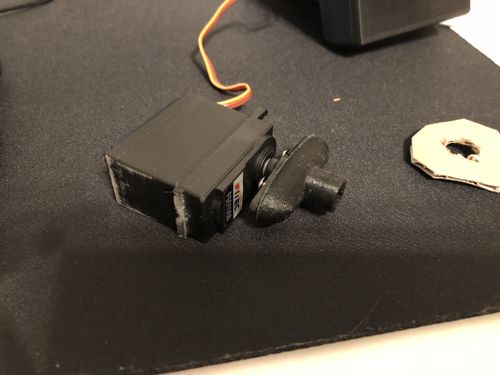
* Deadbolt Servo: the Photon needed to somehow manipulate the deadbolt. We chose [https://www.sparkfun.com/products/11965 this] high-torque hobby servo. Initially, we were concerned that the Photon wouldn't be able to output enough voltage to power the servo, but wiring the servo directly to the VIN pin allowed us to get close to the suggested 5 volts and it worked great without a voltage converter. | * Deadbolt Servo: the Photon needed to somehow manipulate the deadbolt. We chose [https://www.sparkfun.com/products/11965 this] high-torque hobby servo. Initially, we were concerned that the Photon wouldn't be able to output enough voltage to power the servo, but wiring the servo directly to the VIN pin allowed us to get close to the suggested 5 volts and it worked great without a voltage converter. | ||
| + | [[File:Deadbolt servo.JPG|500px|thumb|center|The Servo (plus its attachment for the deadbolt)]] | ||
This module was the simplest, but was a critical component of the overall assembly. We had several issues with servos (one burnt out, and another disappeared) so this module held us back for longer than we would have liked. | This module was the simplest, but was a critical component of the overall assembly. We had several issues with servos (one burnt out, and another disappeared) so this module held us back for longer than we would have liked. | ||
===Module 3: Native iOS App=== | ===Module 3: Native iOS App=== | ||
| + | We created a simple iOS app in Xcode to allow users to toggle and check the lock status of the door. Particle had a tutorial on integrating their service with iOS and Android apps, so we were able to use their preexisting functions to allow user authentication and interaction with the board. The app consisted of 3 separate pages: A login page, a main screen (with the status and toggle button for the door), and a sliding settings panel that showed user and board information, and allowed users to log out of the app. | ||
| + | |||
| + | [[File:Lock nfcapp.png|500px|thumb|center|The iPhone App (side note:device name was chosen at random by Particle)]] | ||
| + | |||
| + | We ran into some difficulties trying to get NFC capabilities working in the app. Because NFC is still essentially a beta feature, there was very little documentation and online help regarding any issues we ran into. Eventually we were able to get to look for a nearby tag once the user logged in. Unfortunately, because we didn't have the Secure Element for the PN532 NFC board, we never ended up using the app's NFC functionality and the code remains commented out. | ||
| + | |||
===Module 4: Housing + Demo Setup=== | ===Module 4: Housing + Demo Setup=== | ||
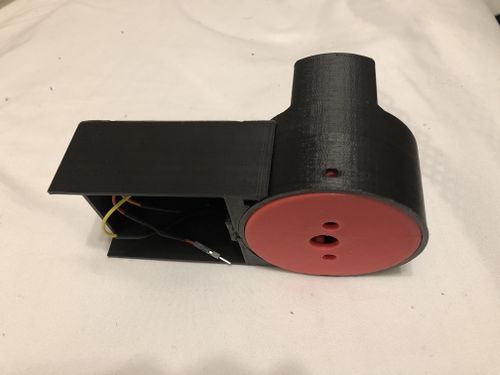
| − | At this point, everything was working great - the servo actuated properly when an authorized NFC card was brought into proximity with the reader, the button functioned nicely, and the iOS app could control the servo from afar through the Particle API - but it had no housing/enclosure. After many hours in the CAD lab on campus, we stumbled across a [https://www.thingiverse.com/thing:852169 Thingiverse page] that was designed for a very similar smart lock application. We edited the STL files to fit our own servo and wires, printed it out, and everything fit perfectly. | + | At this point, everything was working great - the servo actuated properly when an authorized NFC card was brought into proximity with the reader, the button functioned nicely, and the iOS app could control the servo from afar through the Particle API - but it had no housing/enclosure. After many hours in the CAD lab on campus, we stumbled across a [https://www.thingiverse.com/thing:852169 Thingiverse page] that was designed for a very similar smart lock application. We edited the STL files to fit our own servo and wires, printed it out, and everything fit perfectly. The slightly-edited files are available [https://github.com/kaimbanks/NFCLock/tree/master/CADFiles here]. |
| + | [[File:Lock housing.jpg|500px|thumb|center|The Printed Enclosure]] | ||
<br> | <br> | ||
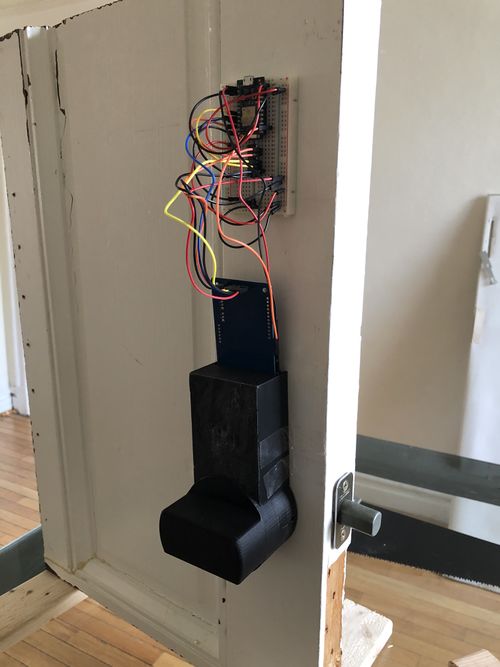
| − | Once the enclosure was finished and the wiring was set, we needed to attach the assembly to a "demo door". We used a 1.75"-thick door for the demo. We | + | Once the enclosure was finished and the wiring was set, we needed to attach the assembly to a "demo door". We used a 1.75"-thick door for the demo. We purchased a standard Kwiset deadbolt from Home Depot, drilled appropriately-sized holes in the door according to the included specifications sheet, and attached everything to the door. The enclosure replaces the knob portion of the deadbolt. |
| + | [[File: DemoDoor.JPG | 500px|thumb|center|The Demo Setup]] | ||
===Tutorials=== | ===Tutorials=== | ||
| Line 94: | Line 106: | ||
==Results== | ==Results== | ||
| + | [[File:NFC_Lock_Final.MOV |700px| Center|The Assembly In Action]] | ||
| − | === | + | ===Comparison to Original Objectives=== |
Though the project overall was a success, we were unable to implement one of the features we wanted to from the start: allowing an iPhone's NFC capabilities to talk to the PN532 chip. We spent hours and hours trying to get this to work, to no avail, until extensive research finally revealed that native iPhone apps will not talk to NFC boards unless those boards have a Secure Element installed. According to securetechalliance.org: "The secure element (secure memory and execution environment) is a dynamic environment in which application code and application data can be securely stored and administered and in which secure execution of applications occur. The element resides in highly secure crypto chips (usually a smart card chip)." Such a chip, and its corresponding software license, costs several hundred dollars and was not within the scope of this project. <br><br> | Though the project overall was a success, we were unable to implement one of the features we wanted to from the start: allowing an iPhone's NFC capabilities to talk to the PN532 chip. We spent hours and hours trying to get this to work, to no avail, until extensive research finally revealed that native iPhone apps will not talk to NFC boards unless those boards have a Secure Element installed. According to securetechalliance.org: "The secure element (secure memory and execution environment) is a dynamic environment in which application code and application data can be securely stored and administered and in which secure execution of applications occur. The element resides in highly secure crypto chips (usually a smart card chip)." Such a chip, and its corresponding software license, costs several hundred dollars and was not within the scope of this project. <br><br> | ||
| − | Essentially, iPhones will not communicate with non-secured NFC chips to avoid situations in which a NFC reader may be programmed to steal data from the iPhone. | + | Essentially, iPhones will not communicate with non-secured NFC chips to avoid situations in which a NFC reader may be programmed to steal data from the iPhone. As a result, we chose to have our native app interact with the Photon via the Particle API (which is fully encrypted and very secure) instead, and we used a NFC tag (in the form of a card) instead of a smartphone's NFC capabilities. |
| + | |||
| + | <br> | ||
| + | Outside of that, our project was successful in every way. The deadbolt opened when approached by an authorized NFC card, the iOS app interfaced nicely with the Particle API, and the enclosure did a great job of hiding some of the messiness and holding the servo tightly against the deadbolt. Our demo went well on demo day, and we experienced very few issues with the demo setup once it was fully assembled. | ||
| + | |||
| + | ===Improvements=== | ||
| + | Though the project worked great and was a lot of fun to work on, it certainly wasn't perfect. If we had more time to work on it, here are a few things we would choose to implement: | ||
| + | *If we had a large enough budget, we would absolutely look into purchasing the Secure Element so that iPhones could natively communicate with the PN532 board. | ||
| + | *Given more time, we would have designed the 3D-printed enclosure to be a little larger so that the breadboard itself could fit inside. This enclosure would also likely be machined from metal instead of printed to increase durability. | ||
| + | *Our demo setup requires the Photon to be powered by a USB outlet. A rechargeable battery pack is a logical next step for this project. | ||
| + | *Changing which cards are "authorized" to modify the deadbolt state is currently a clunky process. A good next step would be to streamline this process and allow for the creation of user groups, for example, each of which could have different permissions regarding the lock. | ||
===Presentation=== | ===Presentation=== | ||
Latest revision as of 12:17, 5 May 2018
Contents
Proposal
Overview
This is a NFC-enabled smart lock that interfaces with existing standard deadbolt assemblies. It allows a user to unlock their door(s) with their smartphone or an NFC tag without needing to carry around annoying physical keys.
The team of two will design and assemble an electronic, Arduino-powered drop-in deadbolt assembly that can be unlocked with registered NFC-enabled devices such as the Apple Watch, newer iPhones, or most Android phones. The lock will be operated by a Particle Photon chip; the Photon is be web-enabled and will be NFC-enabled thanks to a PN532 NFC breakout board, allowing it to check NFC credentials and be operated remotely from a web app or mobile app. A small battery pack (x6 AA's) will provide power to the Arduino and servo.
A detailed user story indicating the flow of events that allow the lock to function:
- John Doe downloads the native iOS app for the smart lock
- John Doe signs in to his Lock account on the native app, linking his phone's credentials to his account
- John approaches the door with the phone, and the phone recognizes the NFC signal coming from the Photon
- The phone sends an encrypted HTTPS web request to the Photon's webhook API along with its unique credentials (UID or Serial No.)
- The Photon accepts the request, checks the data against its list of registered devices, and decides whether or not to open the deadbolt
- If the credentials are approved, the Photon will apply an electronic signal to the deadbolt servo, opening the door
Members
- Kai Banks
- Nikki Wines
- Nathan Schmetter (TA)
- James Feher (Instructor)
Primary Goals
- Use NFC-enabled device to unlock your deadbolt (assuming the device is registered & authorized)
- Secure, relatively hack-proof system
- Polished finished product (custom-designed 3d-printed enclosure, etc.)
- Web-enable product so that it can be monitored & manipulated from web app and native iOS app
Secondary Goals
- Replace AA battery pack with rechargeable pack for convenience
- Implement backup authentication method in case wifi or power goes out
Design
The NFC Lock will be compatible with any door with a standard lock hole. The outward-facing side will consist of a standard doorknob and small NFC-enabled area. The inward-facing side will feature a standard doorknob and will house the Arduino and power supply (or will connect to a wall outlet for prototyping purposes, if power turns out to be an issue). The inward-facing side, which will look like a plastic block several inches in height and width, will also house the servo motor that attaches to and manipulates the deadbolt.
Technology-wise: the Arduino will constantly emit a low-power NFC signal from the outside of the door. When a phone comes into proximity with the signal, the native NFC Lock app will be launched automatically (or manually, if this proves difficult) and will submit a webhook request to the Particle API. This encrypted request will contain the phone's unique information. The Photon will interpret the request and check the enclosed credentials against an encrypted list of authorized credentials. If the credentials are not found in the list, the door will not open; if they are, the Arduino board will send power to the servo, opening the deadbolt for ten-ish seconds and allowing the authorized user in.
Challenges
- First and foremost, security. All web requests MUST be encrypted & sent through HTTPS (as they may contain sensitive information, like phone UIDs and serials)
- Not biting off more than we can chew (see Goals section)
- Keeping budget under $150 for a pretty high-tech product
- Not using an unnecessarily large amount of battery during normal operation (minor)
Materials Needed
- Particle Photon (Arduino Uno with a Particle shield) - [link] - have (normally $20)
- Deadbolt, knobs, assembly - have (not included in price because product relies on there already being a deadbolt present)
- 3D-Printed Enclosure - free
- Servo Motor to control Deadbolt - [link] - $18
- NFC Reader - [link] - $40
- Demo door assembly - $15
TOTAL: <$80
Gantt Chart(s)
Timeline:
Deliverables:
Design and Solutions
Module 1: Particle Photon + NFC Board
The first objective of the project was to get the Particle Photon microcontroller talking to the PN532 NFC breakout board. The idea was to get the NFC board to recognize the presence of NFC tags and then send the information encoded within the tags to the Photon, which would determine what corresponding action to take. For an in-depth tutorial on how we achieved this goal, check this link. The basics are as follows:
- solder header pins onto the PN532 board
- set up included jumpers on the board to use hardware SPI mode
- wire the board to a 4050 level shifter chip according to online schematics
- wire the 4050 to the Photon's pins according to those schematics (see Fritzing diagram below for wiring specifics)
- set up the Photon and create a Particle account
- load the PN532 Arduino library onto the Photon
- start up the PN532 from the Photon in code
These steps allowed us to check for the presence of NFC tags with the PN532 board, send a tag's information back to the Photon, and deal with the information appropriately within the Photon's code. Code here.
Module 2: Photon + I/O
The I/O for this project involved three components:
- PN532 Board (see above)
- Inner Button: we needed a way to interact with the Photon from the inside, seeing as the knob part of the deadlock would be covered by the 3D-printed enclosure. As a result, we chose to wire a simple pulldown button that would lock and unlock the door from the inside.
- Deadbolt Servo: the Photon needed to somehow manipulate the deadbolt. We chose this high-torque hobby servo. Initially, we were concerned that the Photon wouldn't be able to output enough voltage to power the servo, but wiring the servo directly to the VIN pin allowed us to get close to the suggested 5 volts and it worked great without a voltage converter.
This module was the simplest, but was a critical component of the overall assembly. We had several issues with servos (one burnt out, and another disappeared) so this module held us back for longer than we would have liked.
Module 3: Native iOS App
We created a simple iOS app in Xcode to allow users to toggle and check the lock status of the door. Particle had a tutorial on integrating their service with iOS and Android apps, so we were able to use their preexisting functions to allow user authentication and interaction with the board. The app consisted of 3 separate pages: A login page, a main screen (with the status and toggle button for the door), and a sliding settings panel that showed user and board information, and allowed users to log out of the app.
We ran into some difficulties trying to get NFC capabilities working in the app. Because NFC is still essentially a beta feature, there was very little documentation and online help regarding any issues we ran into. Eventually we were able to get to look for a nearby tag once the user logged in. Unfortunately, because we didn't have the Secure Element for the PN532 NFC board, we never ended up using the app's NFC functionality and the code remains commented out.
Module 4: Housing + Demo Setup
At this point, everything was working great - the servo actuated properly when an authorized NFC card was brought into proximity with the reader, the button functioned nicely, and the iOS app could control the servo from afar through the Particle API - but it had no housing/enclosure. After many hours in the CAD lab on campus, we stumbled across a Thingiverse page that was designed for a very similar smart lock application. We edited the STL files to fit our own servo and wires, printed it out, and everything fit perfectly. The slightly-edited files are available here.
Once the enclosure was finished and the wiring was set, we needed to attach the assembly to a "demo door". We used a 1.75"-thick door for the demo. We purchased a standard Kwiset deadbolt from Home Depot, drilled appropriately-sized holes in the door according to the included specifications sheet, and attached everything to the door. The enclosure replaces the knob portion of the deadbolt.
Tutorials
One of the most difficult parts of the entire project was getting the NFC breakout board to communicate properly with the Particle Photon. We created an in-depth tutorial (linked below) that illustrates exactly how to get the two devices working in tandem.
[to tutorial]
Results
Comparison to Original Objectives
Though the project overall was a success, we were unable to implement one of the features we wanted to from the start: allowing an iPhone's NFC capabilities to talk to the PN532 chip. We spent hours and hours trying to get this to work, to no avail, until extensive research finally revealed that native iPhone apps will not talk to NFC boards unless those boards have a Secure Element installed. According to securetechalliance.org: "The secure element (secure memory and execution environment) is a dynamic environment in which application code and application data can be securely stored and administered and in which secure execution of applications occur. The element resides in highly secure crypto chips (usually a smart card chip)." Such a chip, and its corresponding software license, costs several hundred dollars and was not within the scope of this project.
Essentially, iPhones will not communicate with non-secured NFC chips to avoid situations in which a NFC reader may be programmed to steal data from the iPhone. As a result, we chose to have our native app interact with the Photon via the Particle API (which is fully encrypted and very secure) instead, and we used a NFC tag (in the form of a card) instead of a smartphone's NFC capabilities.
Outside of that, our project was successful in every way. The deadbolt opened when approached by an authorized NFC card, the iOS app interfaced nicely with the Particle API, and the enclosure did a great job of hiding some of the messiness and holding the servo tightly against the deadbolt. Our demo went well on demo day, and we experienced very few issues with the demo setup once it was fully assembled.
Improvements
Though the project worked great and was a lot of fun to work on, it certainly wasn't perfect. If we had more time to work on it, here are a few things we would choose to implement:
- If we had a large enough budget, we would absolutely look into purchasing the Secure Element so that iPhones could natively communicate with the PN532 board.
- Given more time, we would have designed the 3D-printed enclosure to be a little larger so that the breadboard itself could fit inside. This enclosure would also likely be machined from metal instead of printed to increase durability.
- Our demo setup requires the Photon to be powered by a USB outlet. A rechargeable battery pack is a logical next step for this project.
- Changing which cards are "authorized" to modify the deadbolt state is currently a clunky process. A good next step would be to streamline this process and allow for the creation of user groups, for example, each of which could have different permissions regarding the lock.


