Difference between revisions of "Multi-Input Analog Reading with Arduino Uno"
| Line 16: | Line 16: | ||
==Solutions== | ==Solutions== | ||
| − | 1) Read inputs together | + | 1) Read inputs together <br/> |
| − | [[File:Tutorial Code.JPG]]<br/> | + | [[File:Tutorial Code.JPG|400px|]]<br/> |
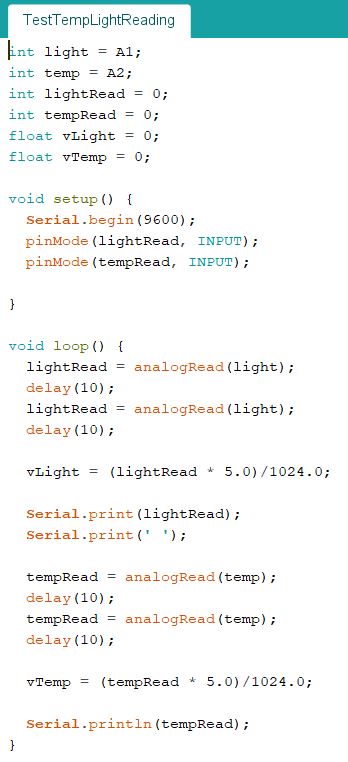
The code here represents a sequential light and temperature reading. Notice how each input is read twice with a delay of 10 microseconds between each reading. The first reading of each input is overwritten by the second and the delay allows time for the voltage to stabilize. <br/> | The code here represents a sequential light and temperature reading. Notice how each input is read twice with a delay of 10 microseconds between each reading. The first reading of each input is overwritten by the second and the delay allows time for the voltage to stabilize. <br/> | ||
| − | 2) Read Inputs Separately | + | 2) Read Inputs Separately<br/> |
| − | + | [[File: ReadLight.PNG |400px|Read luminosity]] | |
| + | [[File: ReadTemp.PNG |400px|Read temperature]] | ||
| + | [[File:SeparateRead.JPG |400px|Call read functions]]<br/> | ||
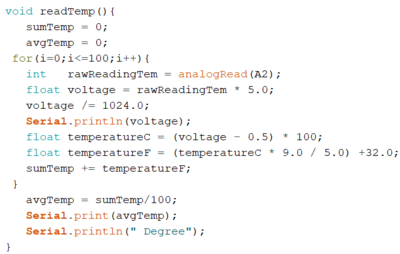
| + | The first two images represent the light and temperature readings respectively. The final piece of code represents the times which the temperature and light read functions are called. | ||
Revision as of 18:47, 5 December 2018
Overview
This tutorial takes the reader through a step-by-step solution to reading multiple analog inputs with an Arduino Uno simultaneously.
Justification
The Arduino Uno is equipped with only one ADC (analog-to-digital converter). Thus, it is not possible to achieve simultaneous readings. The ADC multiplexer needs time to switch and the voltage needs to stabilize.
Materials Needed
- Arduino Uno
- Arduino's IDE
- Multiple analog inputs
Process
Two solutions are available to us depending on the context.
1) If taking readings close together is important: create a delay between readings and take two readings per input and discard the first (to get a more accurate reading)
2) Otherwise create separate read functions that operate at different times (to allow the voltage to stabilize)
Solutions
1) Read inputs together
The code here represents a sequential light and temperature reading. Notice how each input is read twice with a delay of 10 microseconds between each reading. The first reading of each input is overwritten by the second and the delay allows time for the voltage to stabilize.
2) Read Inputs Separately


The first two images represent the light and temperature readings respectively. The final piece of code represents the times which the temperature and light read functions are called.

