Difference between revisions of "MedLit"
| Line 8: | Line 8: | ||
[[MedLit Project Proposal|Project Proposal ]] | [[MedLit Project Proposal|Project Proposal ]] | ||
| − | [[Embedding Electronics in 3D Printed Objects|Link to | + | [[Embedding Electronics in 3D Printed Objects|Link to Tutorial]] |
== Group Members == | == Group Members == | ||
Revision as of 20:19, 1 May 2018
Contents
Project Overview
Description
This project will create a way for users to always remember to take time-sensitive medication as well as have that medication readily available. A bracelet that holds a weekly supply of medication will alert the wearer at a certain time each day to take said medication. The problem we are tackling with this device is the issue with certain time sensitive medication, particularly birth control. In the case of birth control, perfect use (taken at same time each day) leads to more than 99% effective birth control, whereas imperfect use is only about 92% effective. This device will help the wearer to reach "perfect use" of their medication.
Group Members
- Lauren Bhambri
- Moira Mulholland
- Anton Salem
- John Fordice (TA)
Objectives
A successful project would include:
- 1. A Wearable bracelet (bangle) that slips on
- wide enough to fit a hand through while being tight enough to stay on
- printed using the 3D printer
- 2. A minimum of 7 compartments that fit most birth control pills
- compartments are accessed through screw on caps
- 3. LED reminder every 24 hours
- LED light goes off at the same time each day, reminding wearer to take medication
- able to turn off light when medication is taken
- Reach Goals:
- motor to vibrate bracelet when timer for medication goes off
- create water resistant bracelet
- LED light indicating power supply of bracelet
- lights up red when battery is low
Challenges
Challenges we foresee for this project include:
Software
- Finding a microprocessor that is the right balance between small, workable, and inexpensive
- Programming the microprocessor and understanding the program needed
- programming a 24 hour timer
Mechanics
- Creating a bracelet design that will efficiently fit all pieces
- 3D printing the bracelet so that we may insert our electronics in it
- 3D printing with two different materials, urethane for the majority of the bracelet and PLA for the cases holding the pills
- Finding a way to check battery level without using too much charge in the process
- designing and printing screw on caps for each pill compartment
Electronics
- connecting battery, ATTiny, and LED lights properly with wires
Design Milestones and Solutions
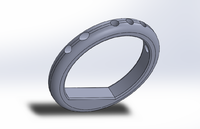
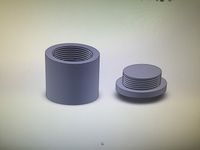
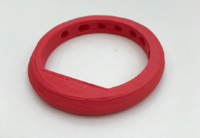
Some preliminary work we accomplished includes working with the AtTiny to light an LED, using solid works to design a pill capsule, and designing and printing a preliminary bracelet.
Our greatest design issue thus far has been designing a pill case. Printing threading for a screw on cap is difficult due to the sizing of the thread. Our current solution is to print cases similar to a rubber stopper that will be held into the holes of the bracelet via friction, while also locking into place by adding a knob to the cap that fits into an indent in the compartment. This ended up working well and staying in place so that the pill is securely held within the bracelet's compartments.
Software
We successfully coded a program that took in a delay time and turned on the LED when the time period ended. Follow this link to see more: Code on BitBucket
Mechanics
After many different designs, we finally found one that worked for us. We printed the bracelet in three different parts: one was the entire top half of the bracelet (all 7 compartments), and then we split the bottom half into a front and back half in order to insert the electronics correctly. This was the only way to do it using the resen??? printer because ???. However, with the regular 3D printer, it was more ideal to pause the printing halfway through, insert the electronics, and finish printing the top half. This fully enclosed the electronics in the bracelet without having to glue any parts together.
Here is the link to our public CAD files: MedLit on GrabCAD
Electronics
We accurately soldered the ATtiny, LED, button, and wires together in a way that fit within our desired bracelet size.
Budget
- Microprocessor (atTiny): $2.84
- Tiny AVR Programmer: $19.95
- 312 Battery (24 count): $8.37
- microLED lights (3): Already have
- 3D Printer TPU Filament: Already have
Total: $31.16
Cost per individual bracelet: $3.83
Future Work
In the future, we would like to make our product customizable in the following ways:
- Additional button that allows the user to set the timer for a specific, changeable amount of time
- Different size pill compartments for different medications
- Color customization
We would also like to add the following designs to our project:
- Additional lights on each compartment so the user needs to know which pill to take at each time
- Vibration alert
- LED alert when battery supply is low
Mass Production
Mass production would be more efficient and cheaper long term to pay for an injection mold which usually cost about $1,000. The other pieces of the bracelet is cheaper when bought in high volumes:
- 120 312 Batteries (2 per bracelet): $33.80
- 300 microLEDs with resistors: $11.86
- 100 AtTinys: $103
- Liquid casting rubber (enough for about 600 bracelets): $149
300 Bracelets would cost about $563.36 which gives a price of $1.88 per bracelet


