
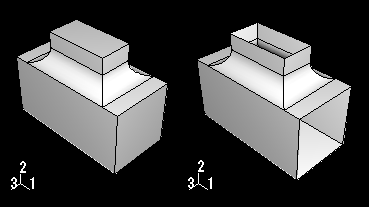
To make a part valid or precise, you can use the remove faces tool to remove selected faces from a three-dimensional solid or shell or from a two-dimensional planar part. After you have selected the faces to remove, ABAQUS/CAE looks for adjacent faces that define a feature. You can remove the entire feature, or you can remove only the selected faces. When you remove one or more faces from a solid part, ABAQUS/CAE converts all of the cells in the part to a shell, as shown in the following figure:
The Query toolset provides a set of geometry diagnostic tools that allow you to locate areas of invalid and imprecise geometry. For more information, see “Using the Query toolset in the Part module,” Section 11.16.4. The operation to remove faces is stored as a feature of the part; as a result, you can use the Model Tree to restore faces that you deleted.
To remove faces:
From the main menu bar, select Tools![]() Repair.
Repair.
ABAQUS/CAE displays the Geometry Repair Tools dialog box.
Tip:
You can also remove faces using the ![]() tool, located with the repair tools in the Part module toolbox. For a diagram of the repair tools in the toolbox, see “An overview of repair techniques,” Section 47.2.
tool, located with the repair tools in the Part module toolbox. For a diagram of the repair tools in the toolbox, see “An overview of repair techniques,” Section 47.2.
From the dialog box, select Remove faces and click OK.
Select the faces that you want to remove. You can select the faces from the viewport or select an existing set containing the faces.
Note: The default selection method is based on the selection method you most recently employed. To revert to the other method, click Select in Viewport or Sets on the right side of the prompt area.
You can use a combination of drag select, [Shift]+Click, [Ctrl]+Click, and the angle method to select more than one face to remove. For more information, see “Selecting objects within the current viewport,” Section 6.2.
Tip:
If you are unable to select the desired faces, you can change the selection behavior by clicking the selection options tool ![]() in the prompt area. For more information, see “Using the selection options,” Section 6.3.
in the prompt area. For more information, see “Using the selection options,” Section 6.3.
Click mouse button 2 to indicate that you have finished selecting faces.
Note: If you are removing one or more faces from a solid part, ABAQUS/CAE indicates that removing the faces will result in the solid being converted to a shell and prompts you to continue.
ABAQUS/CAE removes the selected faces.
If you have finished repairing the part, you should check its validity by clicking mouse button 3 on the part in the Model Tree and selecting Update validity from the menu that appears.
