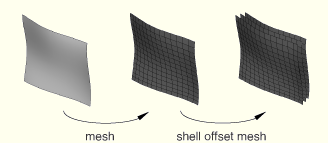
Select Mesh Edit from the main menu bar to generate layers of shell elements that are offset normal to element faces selected from an existing mesh, as shown in the following figure:

To generate layers of shell elements:
Enter the Mesh module.
From the Object field in the context bar, select Part and select an orphan mesh part from the list of parts. This tool is available only for working on an orphan mesh part.
From the main menu bar, select Mesh Edit.
Edit.
ABAQUS/CAE displays the Edit Mesh dialog box.
Tip:
You can also display the Edit Mesh dialog box using the ![]() tool, located at the bottom of the Mesh module toolbox.
tool, located at the bottom of the Mesh module toolbox.
In the dialog box, do the following:
In the Category field, select Mesh.
From the Method list, select Offset (create shell layers).
Click OK.
Use one of the following methods to select the element faces from which ABAQUS/CAE will generate the layers of shell elements. You can select shell element faces or solid element faces, but you cannot select both. If you select shell element faces, the direction of the surface normals of adjacent shell elements must be consistent. You can reverse the surface normal direction of shell elements using the Flip normal tool. For more information, see “Reversing the surface normal direction of shell elements,” Section 41.6.3.
Selecting individual elements
From the menu in the prompt area, select Individually.
Select the element faces.
[Shift]+Click additional element faces to add them to your selection.
If necessary, [Ctrl]+Click selected element faces to unselect them.
When you have finished selecting element faces, click mouse button 2.
Specifying an existing surface
Click Surfaces on the right side of the prompt area.
ABAQUS/CAE displays the Region Selection dialog box containing a list of surfaces that you have created.
Select the surfaces, and click Continue. The surface must contain only quadrilateral or triangular faces.
Note: The default selection method is based on the selection method you most recently employed. To revert to the other method, click Select in Viewport or Surfaces on the right side of the prompt area.
Selecting elements using the angle method
From the menu in the prompt area, select by angle.
Enter an angle (from 0° to 90°), and select an element face. ABAQUS/CAE selects every adjacent element face from the selected face until the angle between the element faces is equal to or exceeds the angle that you entered. (See “Using the angle method to select multiple objects,” Section 6.2.3, for more information.)
After you use the by angle method, you can [Shift]+Click additional element faces to add them to your selection or [Ctrl]+Click selected element faces to remove them from your selection. (See “Combining selection techniques,” Section 6.2.4, for more information.)
When you have finished selecting element faces, click mouse button 2.
From the Offset Mesh - Shell Layers dialog box that appears, do the following:
If you selected shell element faces from which to offset, you can choose the color that indicates the desired offset direction. The two colors from which you can choose correspond to the two sides of the selected element faces. You can also choose Both to indicate that ABAQUS/CAE should create layers of shell elements on both sides of the selected shell elements.
Enter the Distance between layers. You can enter a value of 0; for example, if you want to create multiple layers of skin reinforcements that share nodes.
Enter the Number of layers.
If desired, toggle on Specify initial offset, and enter a value for the initial offset. A negative initial offset indicates overclosure between elements.
If the surface from which you are offsetting contains sharp corners, toggle on Constant thickness around corners. You should also toggle this option on if you anticipate that the generated offset elements may collapse or become inverted. For more information, see “Reducing element distortion and collapse during mesh offsetting,” Section 41.3.3.
To share the nodes of the first layer of shell elements with the nodes of the selected element faces, toggle on Share nodes with base shell/surface. This option is available only if the first layer of shell elements is not offset from the selected element faces.
To delete the selected shell elements after creating the layers of shell elements, toggle on Delete base shell elements. This option is available only if you selected shell element faces from which to offset.
If you want to create a single set containing all of the elements from the shell offset mesh, toggle on Create a set for new elements.
If you want to create separate sets containing the elements from each layer of the shell offset mesh, toggle on Separate set for each layer. ABAQUS/CAE appends Layer-layer number to the set name prefix when it creates separate sets for each layer.
If desired, enter a new name for the single set or a new prefix for the separate sets.
ABAQUS/CAE creates the layers of shell elements offset normal to the selected element faces. When you have finished generating layers of shell elements, click mouse button 2 or the cancel button ![]() in the prompt area to exit the procedure.
in the prompt area to exit the procedure.
Tip: If you make a mistake while generating layers of elements, click Undo in the Edit Mesh dialog box to undo the change. ABAQUS/CAE restores the mesh to its state just before the operation.
