
You can use the view cut options to customize the appearance of a cut model. You can select different options for the portions of the model below the cut, on the cut, and above the cut. You can choose to apply the view cut options to the model or to use the current plot options. View cut options are associated with the viewport rather than an individual view cut; therefore, if the view cut options are applied to the model, any active cut will use them. Figure 34–4 illustrates how the view cut options can be used to customize the model on the cut plane.
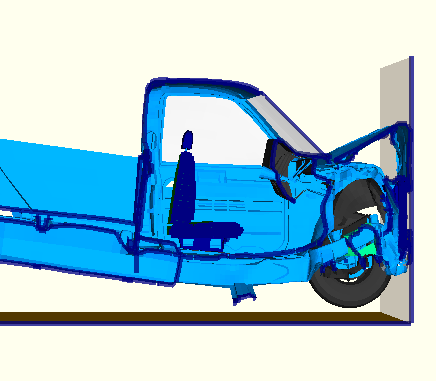
Figure 34–4 Longitudinal view cut through a truck model with customized plot options on the cut plane.
To customize the cut model display:
From the main menu bar, select Options![]() View Cut.
View Cut.
The View Cut Options dialog box appears.
Tip:
You can also use the view cut manager to customize the cut options. From the main menu bar, select Tools![]() View Cut
View Cut![]() Manager, and click Options in the view cut manager.
Manager, and click Options in the view cut manager.
Select the portion of the model that you wish to customize by clicking one of the following tabs: Below Cut, On Cut, Above Cut.
Toggle on Use these options to apply the view cut options to the selected portion of the model. Alternatively, toggle on Use current plot options to apply the common plot options or, if applicable, superimposed plot options to the selected portion of the model.
Click the following tabs to customize the appearance of view cuts in the current viewport:
Basic: Choose render style and edge visibility.
Color & Style: Control model edge color and style and model face color.
Other: The Other page contains the following tab:
Translucency: Control shaded render style translucency.