A skin reinforcement defines a skin that is bonded to the surface of an existing part and specifies its engineering properties. The surface can be a face of a three-dimensional solid part or an edge of an axisymmetric part. The part can be a native ABAQUS part, or it can be an orphan mesh part. When you create a skin, it is not displayed in the viewport; however, it does appear in the Model Tree. You should think of a skin as a property of a part or region, in the same way a section is a property of a part or region.
If you create a skin on an ABAQUS native part, ABAQUS/CAE updates the skin if you make minor modifications to the underlying part. If you edit an orphan mesh part with a skin, ABAQUS/CAE updates the skin if you edit or delete nodes or elements; however, it does not update the skin if you create new nodes or elements.
Each skin is defined by a surface; section name; and, optionally, an offset, material orientation, or rebar reference orientation. You can apply a homogeneous shell section, a composite shell section, a membrane section, a surface section, or a gasket section to a skin. Different skins can share the same section; however, only one skin can be placed on a surface of a part—skins cannot overlap.
Select Special![]() Skin
Skin![]() Create from the main menu bar in the Property module to define a skin. Select Edit from the same menu to make changes to an existing definition.
Create from the main menu bar in the Property module to define a skin. Select Edit from the same menu to make changes to an existing definition.
Skins appear in the Model Tree in a Skins container under the part.
You may need to select the skin in subsequent modeling operations; for example, to:
Prescribe conditions to the skin in the Load module.
Prescribe a thermal gradient on the skin in the Load module.
Assign an element type to the skin.
Create a display group to view the stress values on the skin elements in the Visualization module.
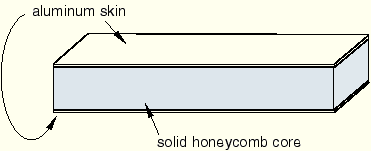
The composite beam shown in Figure 20–14 is an example of how you might use a skin reinforcement in your model.
The beam has a solid honeycomb core and an aluminum skin on the upper and lower faces. You can create a solid part representing the honeycomb and add a skin reinforcement representing the aluminum layers. In the Mesh module you assign solid elements to the honeycomb and shell elements to the skin. The solid and shell elements share the same nodes.After you create a skin, you need to be able to select it in subsequent operations; for example, to assign an element type to the skin in the Mesh module. When you are prompted to select the region, click the selection filter tool ![]() that appears in the prompt area. Select Skins from the list of objects to filter, and select the skin region from the viewport. For more information, see “Filtering your selection based on the type of object,” Section 6.3.2.
that appears in the prompt area. Select Skins from the list of objects to filter, and select the skin region from the viewport. For more information, see “Filtering your selection based on the type of object,” Section 6.3.2.
For detailed information on creating a skin, see “Creating and editing skin reinforcements,” Section 20.3.6.