
Use the Views toolbox to orient, scale, and position a view to one of seven predefined or four user-defined settings. To display the Views toolbox, click the views tool ![]() from the toolbar; the Views toolbox is illustrated in the following figure:
from the toolbar; the Views toolbox is illustrated in the following figure:
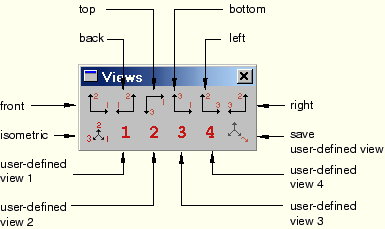
The following custom views are available:
Front, Back, Top, Bottom, Left, and Right: equivalent to observing the model from the six sides of a cube.
Iso: an isometric view. This is the default orientation for three-dimensional models.
User1, User2, User3, and User4: four user-defined views. See “Saving a user-defined view,” Section 5.5.8, for a description of how to save a user-defined view.
If the current viewport is linked to other viewports, ABAQUS/CAE also applies the same custom view to all linked viewports in your session. For more information, see “Linking viewports for view manipulation,” Section 4.5.
To apply a custom view:
From the toolbar, click the View tool ![]() .
.
ABAQUS/CAE displays the Views toolbox.
Tip:
You can also select View![]() Views Toolbox from the main menu or press [F8].
Views Toolbox from the main menu or press [F8].
From the Views toolbox, click the desired tool.
If you have only one viewport, ABAQUS/CAE immediately applies the selected view and unselects it from the Views toolbox. If you have more than one viewport, place the cursor over the viewport whose view you want to change. The cursor changes to a triad; click, and ABAQUS/CAE applies the selected view to that viewport.
Note: When you apply a view that was saved with the Auto-fit option selected, the view adopts the orientation of the saved view and immediately rescales it to fill the viewport. When you apply a view that was saved with the Save current option selected, the view adopts the orientation, zoom factor, and position of the saved view.
Repeat Step 2 as many times as necessary to achieve the desired view.
To close the Views toolbox, click the close button in the upper-left corner of the toolbox.
