A view is a two-dimensional representation—a camera image—of your model or analysis results, displayed in a viewport. ABAQUS/CAE uses a single camera to create the view in each viewport. You can choose from two camera modes to create the desired view of your model or results. The default mode allows you to position the camera anywhere outside the model. The movie mode allows you to position the same camera inside the model as well as outside it. In addition, the movie mode provides you with two clipping planes that you can use to eliminate objects from the view when they are too close to, or too far from, the camera. The view depth is not limited in default mode; objects in the view may be directly in front of the camera or at a distance that makes them too small for you to see in the viewport.
View manipulation tools are available so that you can fully utilize both camera modes. All view manipulation tools can be used in either camera mode, but an “alternate mode” of some view manipulation tools is intended primarily for use in movie mode. For example, the magnify tool allows you to magnify the current view without moving the camera; the alternate mode of this tool moves the camera closer to the model. The effects of both view manipulations appear identical; but when used in the default camera mode, the alternate mode stops working if the camera “hits” the outer edge of the model. In movie mode you can use the alternate mode of the magnify tool to move the camera into and through the model. The view manipulation tools are described in “Understanding the view manipulation tools,” Section 5.2.
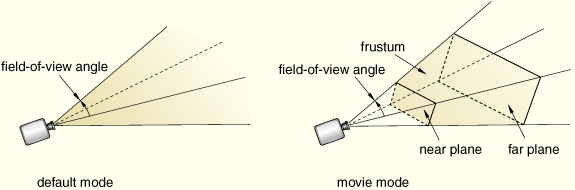
Figure 5–1 shows the two camera modes. The shaded areas in the figure represent the visible space—the view—in each camera mode.
The camera terms that follow are used to describe the view that you see in a viewport:
Camera target
The camera target is a point in space that controls how the camera moves during most view manipulations. For all default views and most view manipulations the camera target coincides with the center point of all objects in the view. If you move the camera target, you change the behavior of all subsequent view manipulations. The camera target moves away from the center of the view only when you use the alternate mode of the pan, rotate, and magnify view manipulation tools.
Frustum
The frustum is the three-dimensional space visible with the movie camera mode. The camera position forms the apex of a pyramid created by a left, right, top, and bottom plane (the same as it does in the default mode). To create the frustum, two additional planes are added to the default view, the near plane and the far plane. Only those objects (or portions of objects) that are within the frustum are visible in movie camera mode.
Field-of-view angle
The field-of-view angle is the larger of the angles between the left and right or the top and bottom planes that form the sides of the view. The angle that is used depends on the shape of the frustum (effectively the shape of the viewport); in both images of Figure 5–1 the angle between the left and right planes is larger; therefore, this angle is indicated as the field-of-view angle. The field-of-view angle applies to both the default camera mode and the movie camera mode; changing the angle is comparable to adjusting the zoom on a stationary camera to expand or shrink the camera image.
The magnify, box zoom, and auto-fit view manipulation tools all change the field-of-view angle to resize the view in the viewport. See “Understanding the view manipulation tools,” Section 5.2, for more information about these tools.
Near plane
The near plane lies perpendicular to the camera direction and is effective only in the movie camera mode. The distance from the camera to the near plane is the closest distance that an object can be to the camera and still remain in the view. The view from the default camera includes objects at any distance, as if the near plane were positioned directly in front of the camera lens.
The near plane is a clipping plane; it removes model surfaces and edges from view without cutting through the model. In the Visualization module you can cut the model such that interior surfaces are visible; for more information, see Chapter 34, “Cutting through a model.”
Far plane
Like the near plane, the far plane lies perpendicular to the camera direction and is effective only in the movie camera mode. The distance from the camera to the far plane is the farthest distance that an object can be from the camera and still remain in the view. The view from the default camera includes objects at any distance, as if the far plane were positioned an infinite distance from the camera lens.
The far plane is a clipping plane; it removes model surfaces and edges from view without cutting through the model. In the Visualization module you can cut the model such that interior surfaces are visible; for more information, see Chapter 34, “Cutting through a model.”