|
Eric Peter, epeter@wustl.edu Todd Schiller, tschiller@acm.org (Under guidance of Prof. Raj Jain)
This application, HoneyRJ, is an implementation of a low-interaction honeypot. A low-interaction honeypot serves a number of limited functionality protocols with the intent of capturing the source of traffic coming to the honeypot. A honeypot is located on an IP address that is used solely for the purpose of the honeypot and not for any legitimate services; any connections to the software are presumed to be malicious and are logged for later review. HoneyRJ was designed to be extremely simple and easily extendable.
This first release can emulate both FTP and IRC servers. HoneyRJ logs all interactions, allowing users to identify potential attack vectors. This user manual shows how to set up and run HoneyRJ on your computer.
In order to run HoneyRJ, the end user must have the following minimum software requirements:
HoneyRJ also has to following minimum hardware requirements:
The following section outlines the process of software configuration and installation. HoneyRJ is unique in that all configuration is done in the source code and therefore must be done at compile time.
HoneyRJ has four configurable options. If the defaults are acceptable to you, you are encouraged to use the provided binary and not re-compile the application.
If you wish to configure these options, please import the provided Eclipse project into Eclipse following the instructions available in the Eclipse documentation and then follow these steps.
Once you have made the desired changes, follow the instructions available in the Eclipse documentation to generate a runnable JAR file.
To install HoneyRJ, place the created JAR file (or the provided HoneyRJ.jar file) in the desired installation directory.
The following section outlines the steps to launch HoneyRJ and provides a brief overview of the the application GUI, in addition to defining terminology specific to HoneyRJ. After reading this section, you should have a good understanding of what features HoneyRJ provides.
If you have reconfigured the application as described above, please replace any reference to the provided file HoneyRJ.jar with your exported JAR file.
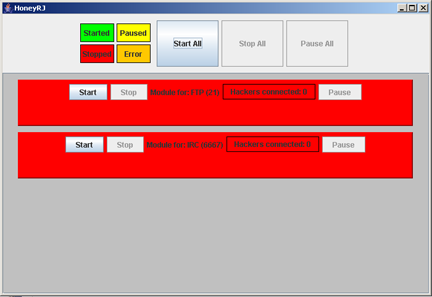
To launch the application, double click HoneyRJ.jar. The application will launch and you will see a window similar to figure 1.
|
|
There are two main parts of the application - the top pane and the module pane. The top pane contains a legend and buttons that affect all installed modules. Below the top pane, is the module pane, which contains a representation of each module that is a part of the application.
In the top pane, you see four legend icons and three buttons. The legend icons are a key to the colors that represent the four states of a module.
The three buttons are used as follows:
The module pane contains a section for each module loaded into the application. Each module contains three buttons that have the same functionality as those in the top header, but they only affect that module. Each module lists the common name of its protocol and the port on which it runs. Finally, each module displays the number of currently connected clients.
A module represents one protocol running within HoneyRJ. A module provides the implementation of a protocol to allow HoneyRJ to communicate with clients as if it were a server running that protocol. A module has four states: stopped, paused, started and error. HoneyRJ can run one or more modules simultaneously.
The following section describes the usage of HoneyRJ in several common tasks. You must have the application configured and running to use this section. As mentioned in the prerequisites, please ensure you do not have any firewalls running that would prevent clients from connecting to your machine. After reading this section, you should have an understanding of how to use the features HoneyRJ provides.
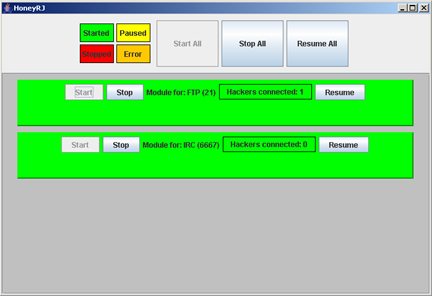
To start all the modules in HoneyRJ, click the Start All button in the top pane. You will see each module turn from red to green, indicating the modules are now listening for connections.
If you only wish to start a subset of modules, click the Start button contained within each desired module's section. The module will turn from red to green, indicating that it is now listening for connections.
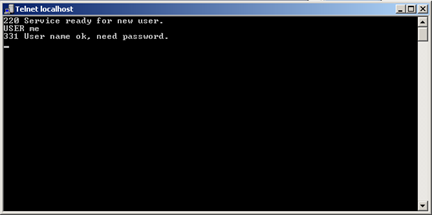
To verify that HoneyRJ is listening for connections, perform the following steps.
|
|
The steps for stopping modules are identical to the steps for starting a module. Replace any reference to start with stop.
The steps for pausing modules are identical to the steps for starting a module. Replace any reference to start with pause.
HoneyRJ logs every connection into an individual file. When HoneyRJ launches, it creates a directory named with a timestamp in the configured logging directory (by default the directory is c:\tmp\). For example, the log files created while writing this documentation were stored in C:\tmp\rj_1238883728078_log\.
Each connection to HoneyRJ creates a new text file within this directory, named by the protocol name, followed by a timestamp and given the extension log. An example of a log file name for the FTP protocol is FTP_1238884135628.log. Log files are updated in real time, that is, whenever a packet is sent or received, it is appended to the log file. If you wish to monitor the logs files in real time, we suggest an application similar to Tail for Win32 [Tail4Win]
A log file consists of the following header lines, which describe the time the connection started, followed by a description of the logging format.
******************************************************

			******Started at: Sat Apr 04 16:28:55 CST 2009********

			TIMESTAMP,SRC_IP:PRT,DST_IP:PRT,PACKET
After the header lines, details of each sent or received packet is logged. The following information is stored about each packet, in the order that appears below.
Each packet sent or received is logged on a separate line. An example of a line representing a sent packet is listed below:
Sat Apr 04 16:28:55 CST 2009,127.0.0.1:2595,127.0.0.1:21,220 Service ready for new user.
Immediately following the packet information are the footer lines, which describe how and when the connection terminated. The examples used below are from a FTP connection.
For a connection that closed due to a connection timeout, the following lines appear.
*****Protocol FTP TIMED OUT talking to /127.0.0.1 using local port 21, connection closed.****

			*****Stopped at: Sat Apr 04 16:30:58 CST 2009*******

			****************************************************
If the connection closed normally, the following lines appear instead:
*Protocol FTP is finished talking to /127.0.0.1 using local port 21****

			*****Stopped at: Sat Apr 04 16:46:29 CST 2009*******

			****************************************************
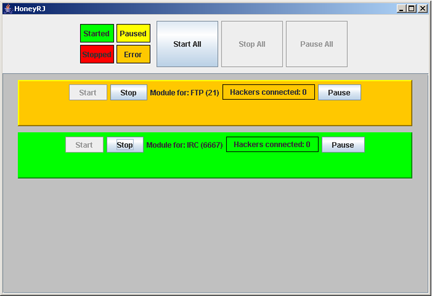
If a module cannot start listening on the port specified by its protocol, it will be in the error state. The error state is visually indicated by the module's section turning to orange. See figure 4 for an example of the FTP module in the error state. An error happens when HoneyRJ cannot bind to the module's specified port. There are two reasons why the error state could happen:
|
To close the application, click the X button in the top right corner. All active connections will be closed.
If the application fails to start, ensure that your configured logging directory exists and is writeable. The application will attempt to create a directory within the configured logging directory and will exit upon failure.