Difference between revisions of "Project2: Triangulation with sbRIO robots"
From ESE497 Wiki
Jump to navigationJump to search| Line 1: | Line 1: | ||
| − | * | + | * Compute Angle on a Single Robot |
** '''View''' the [[LabVIEW_for_Robotics|LabVIEW for Robotics]] page for reference information about the sbRIO robots. | ** '''View''' the [[LabVIEW_for_Robotics|LabVIEW for Robotics]] page for reference information about the sbRIO robots. | ||
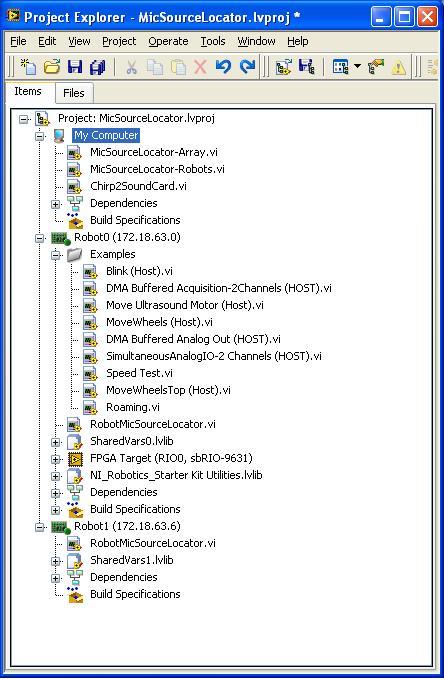
[[File:MicSourceLocatorProject.JPG|MicSourceLocator Project]] | [[File:MicSourceLocatorProject.JPG|MicSourceLocator Project]] | ||
| − | ** '''Open''' DMA Buffered Acquisition-2Channels (HOST).vi and use Save As, save to | + | ** '''Open''' DMA Buffered Acquisition-2Channels (HOST).vi and use Save As, save it to "Compute Angle (Robot).vi" and start editing this. |
| − | * Compute angle of arrival on Robot platform using your ComputeAngle | + | ** Compute angle of arrival on Robot platform using your FindCCPeak.vi and ComputeAngle.vi |
* Source Location using N Robots | * Source Location using N Robots | ||
| − | ** | + | ** '''Right-Click''' on Starter Kit sbRIO and set the IP to the IP labeled on your robot. |
| − | ** | + | ** '''Open''' Starter Kit sbRIO -> MicSourceLocator (Robot).vi and My Computer-> MicSourceLocator (PC with Robots).vi |
| − | ** | + | ** Run these 2 VIs simultaneously and study the block diagrams to make sure you understand how the communication is working |
| − | ** | + | ** Merge Compute Angle (robot).vi and MicSourceLocator (Robot).vi and view the results on the front panel of MicSourceLocator (PC with Robots). |
| − | ** Add a 2nd Robot | + | ** Add a 2nd robot to your project and run MicSourceLocator (Robot).vi on both robots simultaneously. |
| − | ** | + | ** Modify MicSourceLocator (PC with Robots) to compute the source location and plot the web. |
| − | * | + | * Move robots |
| − | + | * Automated controller algorithm to optimize robot positions | |
| − | |||
*Thin client communication to Robot | *Thin client communication to Robot | ||
Revision as of 16:11, 17 June 2010
- Compute Angle on a Single Robot
- View the LabVIEW for Robotics page for reference information about the sbRIO robots.
- Open DMA Buffered Acquisition-2Channels (HOST).vi and use Save As, save it to "Compute Angle (Robot).vi" and start editing this.
- Compute angle of arrival on Robot platform using your FindCCPeak.vi and ComputeAngle.vi
- Source Location using N Robots
- Right-Click on Starter Kit sbRIO and set the IP to the IP labeled on your robot.
- Open Starter Kit sbRIO -> MicSourceLocator (Robot).vi and My Computer-> MicSourceLocator (PC with Robots).vi
- Run these 2 VIs simultaneously and study the block diagrams to make sure you understand how the communication is working
- Merge Compute Angle (robot).vi and MicSourceLocator (Robot).vi and view the results on the front panel of MicSourceLocator (PC with Robots).
- Add a 2nd robot to your project and run MicSourceLocator (Robot).vi on both robots simultaneously.
- Modify MicSourceLocator (PC with Robots) to compute the source location and plot the web.
- Move robots
- Automated controller algorithm to optimize robot positions
- Thin client communication to Robot
