Difference between revisions of "BetaDelta"
| Line 118: | Line 118: | ||
===3D Printing=== | ===3D Printing=== | ||
| − | + | ||
| + | After touching up on CAD techniques, preliminary drawings were made. The first CAD model included holes for three sensors, as exemplified by the first picture in the evolution chain, as Beta Delta initially intended to include three sensors. Next, we printed a scaled-down version to ensure the printer could handle the inner intricacies of our design. Once affirmed, we proceeded to print our first to-scale version, which printed successfully. The only edit to our next and final print was to include a slot for our power supply. | ||
=====Evolution of 3D Models===== | =====Evolution of 3D Models===== | ||
| − | [[File:P1.JPG|100px|caption =CAD drawing]] --> [[File:P2.JPG|100px|Down-Sized Print]] --> [[File:P3.JPG| | + | [[File:P1.JPG|100px|caption =CAD drawing]] --> [[File:P2.JPG|100px|Down-Sized Print]] --> [[File:P3.JPG|80px|First To-Scale Print]] --> [[File:P4.JPG|80px|Final To-Scale Print]] |
===Circuitry and Code=== | ===Circuitry and Code=== | ||
Revision as of 02:13, 2 May 2017
Contents
Overview
The purpose of BetaDelta is to provide real-time updates on the availability of a given study room. The information will be uploaded to a website, developed through Amazon Web Services, based on input from the BetaDelta device. The goal for the BetaDelta device is to detect occupancy via motion sensor, connected to a raspberry pi, and encased in a 3D printed shell.
Team Members
- James Tiffany
- Rebecca Smith
- Nial Alwash
- Nathan Schmetter (TA)
Objectives
Device
- Constructed with a raspberry pi and motion sensor
- Encased in a 3D printed shell
- Contain python code capable of processing input from the motion detector
Website
- Developed with Amazon Web Services
- Display updated room occupancy on any device that can access wifi
- Change colors based on occupancy (red for occupied, green for available)
Challenges
- Learn Python coding techniques
- Learn how to use CAD and 3D print
- Build circuit between motion detector and raspberry pi
- Create our own server framework and website using Amazon Web Services
Budget
Gantt Chart
Engineered Solutions
3D Printing
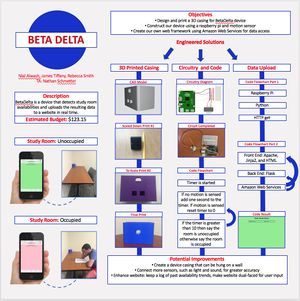
After touching up on CAD techniques, preliminary drawings were made. The first CAD model included holes for three sensors, as exemplified by the first picture in the evolution chain, as Beta Delta initially intended to include three sensors. Next, we printed a scaled-down version to ensure the printer could handle the inner intricacies of our design. Once affirmed, we proceeded to print our first to-scale version, which printed successfully. The only edit to our next and final print was to include a slot for our power supply.
Evolution of 3D Models
Circuitry and Code
We found a tutorial online for how to connect the motion sensor to the raspberry pi, completed the circuit, and then edited a version of code we found online using a counter technique to accept input from the sensor.
Evolution
Data Upload
We developed entirely our own framework, using bits and pieces from tens of tutorials. Our code was two-pronged, including a first set that interpreted the input from the motion sensor and raspberry pi, and a second set that handled the upload of data, display, and communication between our server and database. The code we typed in the raspberry pi was with the python language. This code looked at whether any motion was sensed by the PIR sensor and based on the result of occupied or unoccupied would send the respective information to our database which was created with PickleDB. Then utilizing our ec-2 user, we got information from the database, and depending on what it told us we used a flask application to present if our simulated room was occupied or unoccupied. We then used our jinja2 html code to further redesign and make our website look nice.
Evolution
Results
Presentation Poster
Repository


