Difference between revisions of "Cheers!"
Jump to navigation
Jump to search
Natalie.ng (talk | contribs) |
Jessieshi97 (talk | contribs) |
||
| Line 10: | Line 10: | ||
[[File:HX1.jpeg|right|500px|Figure 1]] | [[File:HX1.jpeg|right|500px|Figure 1]] | ||
| − | # Replicate the project found on [https://www.youtube.com/watch?v=tyv5rVPUGLU&t=21s youtube] but replace the beer bottle with a soda glass bottle and appropriately sized glassware. There will also be no bottle rotating mechanism. The control for the tilting mechanism will be changed to a pulley rope system outlined in Figure 1. | + | # Replicate the project found on [https://www.youtube.com/watch?v=tyv5rVPUGLU&t=21s youtube] but replace the beer bottle with a soda glass bottle and appropriately sized glassware. There will also be no bottle rotating mechanism. The control for the tilting mechanism will be changed to a pulley rope system outlined in Figure 1. The glassware will be kept on the table instead of swinging. |
| − | # Print a sturdy mechanical frame and a stable soda and | + | # Print a sturdy mechanical frame and a stable soda and bottle holder so that they do not misalign while pouring. |
# Soda should be poured into glassware smoothly and without spilling. | # Soda should be poured into glassware smoothly and without spilling. | ||
| − | # Create an algorithm which lets the weight sensor approximate the height of liquid in the glassware and then | + | # Create an algorithm which lets the weight sensor approximate the height of liquid in the glassware and then determine the stopping point for the tilt mechanism of the soda bottle. |
# If possible, conduct the same experiment, but change the Mexican glass soda bottle to a generic soda can. | # If possible, conduct the same experiment, but change the Mexican glass soda bottle to a generic soda can. | ||
Revision as of 06:23, 3 March 2017
Contents
Overview
Have you ever felt frustrated that soda always rises higher than you expect and spills all over your table? We are here to help. 'Cheers' is a automated soda pouring machine that takes a bottled soda and pours it into glassware without spilling the fizz. It utilizes 3D printing techniques for constructing the mechanical framework and an Arduino to control the system. 'Cheers' tilts your soda bottle and glass to an angle towards each other to minimize the fizzing and the tilting mechanism stops after the soda height reaches your desired level and voila, Cheers!
Team Members
- Jessie Shi (Tianjiao): Chemical Engineering, System Engineering ’18
- Haixiang Ren: System Engineering ’18
- Natalie Ng: TA
Objectives
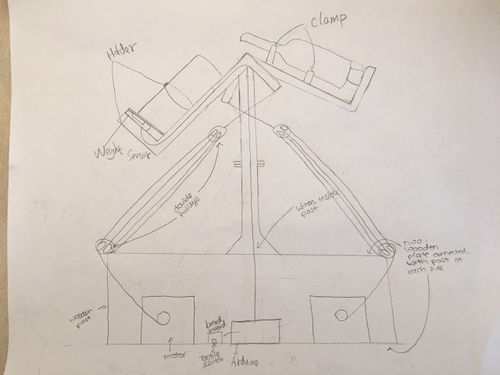
- Replicate the project found on youtube but replace the beer bottle with a soda glass bottle and appropriately sized glassware. There will also be no bottle rotating mechanism. The control for the tilting mechanism will be changed to a pulley rope system outlined in Figure 1. The glassware will be kept on the table instead of swinging.
- Print a sturdy mechanical frame and a stable soda and bottle holder so that they do not misalign while pouring.
- Soda should be poured into glassware smoothly and without spilling.
- Create an algorithm which lets the weight sensor approximate the height of liquid in the glassware and then determine the stopping point for the tilt mechanism of the soda bottle.
- If possible, conduct the same experiment, but change the Mexican glass soda bottle to a generic soda can.
Steps required to complete project
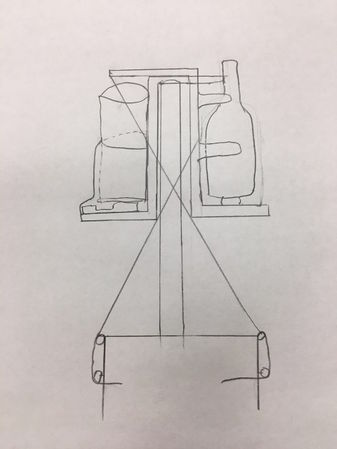
- Glassware can have two positions. Position 1 is perpendicular to the table (Figure 2) and position 2 is tilted by an angle to the horizon. The angle will be determined through experimentation so that, if the glassware were tilted to that angle, the poured liquid will take up approximately 2/3 of the total volume of glass.
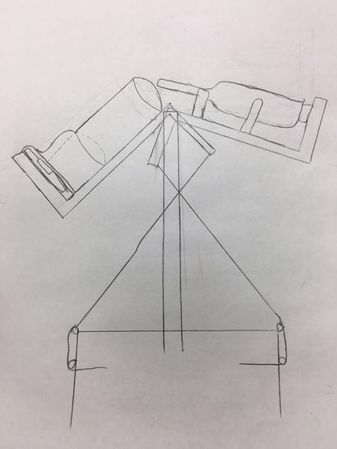
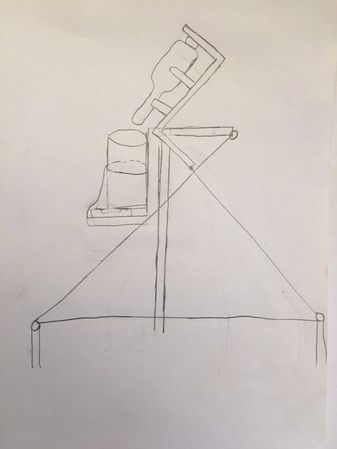
- Soda bottle should be able to maintain 3 positions, each of which is shown in Figures 2, 3 and 4 respectively. The latter two angles will be determined through experimentation. Position 2 will be when the first drop of soda occurs and position 3 is when all the soda in the bottle can be poured out.
- There will be one pouring mechanism so that the glassware and soda bottles both tilt fast from position 1 (Figure 2) to position 2 (Figure 3) (and reach this position at the same time). Glassware is kept at position 2 and the soda bottle is tilted very slowly from position 2 to position 3 to pour the soda slowly into the glassware. When the liquid in the glassware reaches approximately 3 cm to its top, it will tilt back slowly to position 1 while the soda is still pouring. The glassware reaching position 1 and the soda bottle reaching position 3 should happen at the same time. This is when the pouring mechanism ends, after which the soda bottle will return quickly to position 1.
- Weight sensor will be used to estimate the amount of liquid in the glassware and thus control the tilting mechanism.
- Start of the program is initiated through pressing a push button.
- Wooden protective cover will be used to on top of the Arduino, motors and spools. Four pulleys will be used as shown in Figure 1 to eliminate the chances of electric shock. The wires to connect the weight sensor to the Arduino board will be inside the support stands (Figure 1).
- The four pulley system cuts the torque needed from the motor to 1/4 its original value.
- Fishing line with 65 lbs limit will be used to prevent the rope from breaking.
- All the soda from the bottle should be poured into the glassware, which would fill it 3 cm to the tip.
- The demo will include a demonstration of pouring soda using the completely assembled model.
- If time permits, we will try to modify the same mechanism for a soda can to increase the utility of the product.
Note: Pulley system not drawn here
Challenges
- 3D printing
- learn solidworks
- design specific dimensions of soda bottle, glassware holder and frame (we will have to print two parts of the frame and connect them together as 3D printing can only print a height of 6 inches)
- design two spools that could fit onto the stepper motor to control the rope length and four pulleys.
- build models using Solidworks and 3D print them.
- Arduino
- Learn Arduino programming language.
- Implementing the Arduino code with weight sensor and servo motor.
- Debugging code and and adjusting parameters to control the tilting mechanism.
- Hardware
- Servo motor should keep control system stable during tilting mechanism and not go too fast/slow
- Design a circuit that connects the servo motor, push button, laser sensor to the Arduino.
- Find the various tilt angles outlined in the objectives section by conducting experiments (use tap water instead of soda).
- Determine the rpm value on the servo motor as the spool pulls the fishing line, controlling the tilt angle.
- The soda bottle should be able to tilt at an angle more than 90 degrees (position 3) from its original position.
- Safety
- Electricity hazard when circuit interacts with liquid: cover electronic circuit with a wooden protective cover and do not place the circuit directly beneath the mechanical pouring mechanism to mitigate the risk of wetting the electronics
- Rope might break: use appropriately weight-rated fishing line
Budget
- Continuous Rotation Servo Motor x 3: $54 (+$5.50 shipping)
- Load Cell Amplifier HX-711: $9.95 + $5.72 shipping
- Load Cell, straight bar 10kg: $6.95
- Female AC/DC power adaptor: $2.95
- Solder bread board: $1.99
- 1/2x8 copper air chamber(serve as horizontal axis): $4.15
- Double pulley (12-pack): $21.98
- AC/DC Switch Power Supply: $7.68
- Epoxy Glue: $5.47
- Tactile Switch Push Button: $4.49
- Coca-Cola Mexican Glass Bottle, 355 mL x 6: $5.98 (purchase in Walmart store)
- Coca-Cola 2L x 2 = $2.00 (purchase in Walmart store)
- Arduino UNO board: provided
- 3D printing: provided
- Nut and bolts: provided
- Wooden base and wooden protection cover - scrap wood from machine shop, already found
- Power Pro Fishing Braided line – 65 lbs limit: owned
- Magnet Screw Driver tool kit - owned
- Extension Cord - owned
- Glassware: owned
Total: $ 138.81
