Difference between revisions of "OpenCV4"
Jump to navigation
Jump to search
| Line 11: | Line 11: | ||
Follow these [https://www.pyimagesearch.com/2018/09/26/install-opencv-4-on-your-raspberry-pi/ instructions] to install OpenCV onto your Raspberry Pi using the terminal. | Follow these [https://www.pyimagesearch.com/2018/09/26/install-opencv-4-on-your-raspberry-pi/ instructions] to install OpenCV onto your Raspberry Pi using the terminal. | ||
| − | Important note: don't do <code>make-j4</code>. It may freeze so it best to just do <code>make</code> or <code>make-j1</code>. | + | *Important note: don't do <code>make-j4</code>. It may freeze so it best to just do <code>make</code> or <code>make-j1</code>. |
Revision as of 19:21, 6 December 2018
Contents
Overview
This is a tutorial on how to install OpenCV4 and use camera module.
Materials/Prerequisites
- Raspberry Pi
- Raspberry Pi Camera
Process
Install OpenCV
Follow these instructions to install OpenCV onto your Raspberry Pi using the terminal.
- Important note: don't do
make-j4. It may freeze so it best to just domakeormake-j1.
After you have successfully installed OpenCV, you will be able to use import cv2. If you do it on the terminal, you want to put in these code source ~/.profile and then workon cv.
Capturing image
Following these step to set up your camera.
Note: Ignoring GoPiGo installation.
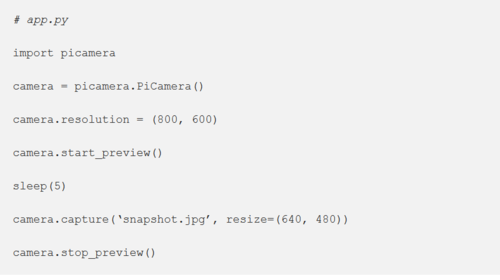
In order to capture image, follow these instruction
Note:
- Use
sleep(measured in seconds) to create a delay between the preview:time.sleep(seconds)
- Another way to enable your camera is: go to the terminal → type in
sudo raspi-config→ selectEnable Camera→ press Enter → selectFinish→ reboot and log back on to the Raspberry Pi.
Authors
- Nhut Dang
- Robert Goodloe
- Ethan Shry(TA)
Fall 2018
