Git
Git is a distributed version control system. It enables you to:
- Keep track of revisions to your files
- Push and pull your revisions to other computers or servers
- Collaborate with other people on the same project
Subversion is the version control system you used in CSE 132. However, Subversion does not have the same agility of Git in terms of local revisions, staging, and collaboration. This guide aims to get you up to speed with the power of Git for multi-developer projects.
Contents
Git TL;DR
Before the first commit:
# Navigate to project
$ cd /path/to/your/directory/
# Initialize folder as git repository
$ git init
# Set target URL
$ git remote add origin <repository URL>
# If this is your first time using git on your machine, you need to set your username and email
$ git config --global user.name "Your Name"
$ git config --global user.email "you@example.com"
For each subsequent commit:
# Add untracked files ( use `git add .` to add all files)
$ git add <filename>
# Commit changes
$ git commit -m "Your commit message"
# Push changes to bitbucket. Unless you are working on a different branch, <branchname> should be `master`.
$ git push -u origin <branchname>
Initializing Git
To initialize a Git repository inside of a folder, you can use Git's init command:
$ git init
This will create a .git directory, where Git will store information about the repository. This command can be run either in an empty folder, or in a folder where files already exist.
Local and Remote Branches
When you create a branch named "mybranch" on your local repository and push changes up to the remote repository, they actually get pushed to a remote branch called origin/mybranch. (Note that origin is the default name for a remote Git repository.) Even after your collaborators pull changes from remote to their local repositories, no new branches are created on their own personal local repositories.
Let's say that you and your partner are both working directly in the master branch (not a great idea for large or professional projects). When you push your changes up, they get saved in origin/master. When your partner goes and pulls changes from remote, if master is still her working copy, your changes will be immediately merged into her local master branch.
In practice, each collaborator will have their own branch, and when they make new versions of the features they are developing, they will merge those changes into master. (When master changes, each collaborator will merge the changes from master back into their personal branch.) What follows is an example that should help illustrate this process.
Adding a Remote
A project that is being tracked with Git needs to be connected to a remote before files are pushed to version control. To add a remote to an initialized Git project, use the git remote add command:
git remote add origin \<repository URL\>
The origin remote is the default server that Git will push to.
Staging
Up to this point, you have been using SourceTree to automatically commit all changes. However, Git enables you to not commit every single file if you don't want to. This is where staging comes into play.
To add a file to the stage, use the add command:
$ git add <filename>
Then, when you run git commit, only those files that have been staged will be updated.
Note: git commit -a commits all files, whether or not they had been staged. git commit (without the -a) only commits those files in the staging area. It is a good idea to run git status before staging files to avoid staging files that should not be committed.
Ignoring Files in Git
Some files should not be committed to version control. Sensitive information such as SSH keys and files containing passwords should be ignored. Dependency folders such as node_modules should also be ignored; dependencies contain an enormous number of files that could change and will cause commit conflicts. . Rather, use the appropriate dependency manager to install those packages after cloning a repository (e.g. npm install). Folders containing virtual environments for frameworks such as Flask should also be ignored, and should instead be generated at will.
To add files to be ignored, edit your .gitignore file:
$ vim .gitignore
In this file, add the file or folder to be ignored.
node_modules
venv
db_connect.php
Staging in SourceTree
Staging in SourceTree is very intuitive. However, before you can use this feature, you need to turn it on. (We had you turn of the staging feature in Module 2.)
- Go to the SourceTree preferences.
- Enter the Git pane.
- Check the box that says "Use the staging area".
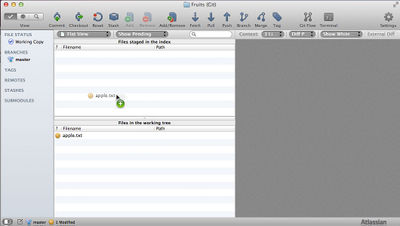
You should now be able to use the staging area! In the "File Status View", you can drag and drop files back and forth between Staged and Unstaged. See the screenshot for an example.
Commits
When you want to create a "snapshot" of your project, what you do in Git is called a commit. The commit finds all files under version control, looks for ones that have been changed, and records the changes in a local archive. You learned how to perform a commit in SourceTree in Module 2.
If you need to determine what files have been changed since the last commit, you can use Git's status command:
$ git status
In SourceTree, the results of git status are displayed nicely in the "File Status View".
Branches and Merging
Git enables you to work on different features of the same software suite in isolation from each other. The way to do this is using branches.
To create a new branch, use the checkout -b command:
$ git checkout -b my-new-branch
Now, when you next commit, you will be committing to the my-new-branch branch rather than the default master branch.
To switch the working copy over to a different branch, use the checkout command:
$ git checkout my-existing-branch
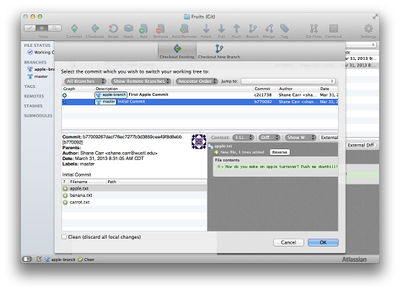
See the screenshot for how to checkout a branch in SourceTree.
To merge changes from a different branch to the current working copy, use the merge command:
$ git merge my-existing-branch
After you merge, if you wish to terminate a branch, use the branch -d command:
$ git branch -d my-existing-branch
Git also has another command called rebase, which is similar to merge except that it combines the commits of each branch into a single branch, but still keeping the head of each branch. For more information on rebase, read this article on the SourceTree blog.
This will all make more sense when we go through an example. We will also be using SourceTree in the example.
Example: Staging and Branches
Suppose I have three files under version control: apple.txt, banana.txt, and carrot.txt. The contents is like so (Thanks to Sumit Khemka for the humor):
- apple.txt: How do you make an apple turnover? Push it downhill!
- banana.txt: What is a ghost's favorite fruit? A boonanaa!
- carrot.txt: How do you make a soup rich? Add 14 carats to it!
All files have been committed to the HEAD, which is by default the master branch:
$ git add -A; git commit
...
$ git status
# On branch master
nothing to commit, working directory clean
Staging
Now, let's change the Apple joke, and keep the Banana and the Carrot the same:
- apple.txt: What kind of apple has a short temper? A crab apple!
We can see in Git and SourceTree that there is one file changed: apple.txt.
$ git status
# On branch master
# Changes not staged for commit:
#   (use "git add <file>..." to update what will be committed)
#   (use "git checkout -- <file>..." to discard changes in working directory)
#
#	modified:   apple.txt
#
Let's go ahead and stage our file:
$ git add apple.txt
In SourceTree, drag a file from the "working tree" pane to the "files staged in index" pane to stage the file.
Branching
But now, instead of committing this change directly to our master branch, let's make a new branch, and let's call it apple-branch.
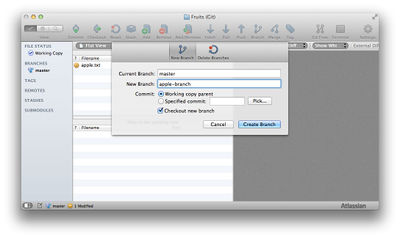
In SourceTree, press the "Branch" button to bring up a little dialog box. See the screenshot for an example.
If we were using the command line, the command would be:
$ git checkout -b apple-branch
Here is what we now see when we run git status:
$ git status
# On branch apple-branch
# Changes to be committed:
#   (use "git reset HEAD <file>..." to unstage)
#
#	modified:   apple.txt
#
Let's now go ahead and commit the changes:
$ git commit -m "First Apple Commit"
[apple-branch c2c1738] First Apple Commit
 1 file changed, 1 insertion(+), 1 deletion(-)
In SourceTree, run the commit as you have been doing in Modules 2-4.
Let's now make a second branch. This branch is going to be rooted at the current version of the master branch, which of course is still the three original jokes. To switch back to the master branch, we use the checkout command:
$ git checkout master
Switched to branch 'master'
In SourceTree, press the "Checkout" button, and choose the revision or branch that you want to checkout; see the screenshot for an example.
We will now make a revision to the Banana joke:
- banana.txt: What would you call two bananas? A pair of slippers!
Let's change the file, stage it, and see the current status.
$ git add -A
$ git status
# On branch master
# Changes to be committed:
#   (use "git reset HEAD <file>..." to unstage)
#
#	modified:   banana.txt
#
We will now create another new branch, and commit our changes to it.
$ git checkout -b banana-branch
$ git commit -m "First Banana Commit"
[banana-branch f876aac] First Banana Commit
 1 file changed, 1 insertion(+), 1 deletion(-)
We can see all branches using git branch -v:
$ git branch -v
  apple-branch  c2c1738 First Apple Commit
* banana-branch f876aac First Banana Commit
  master        b770092 Initial Commit
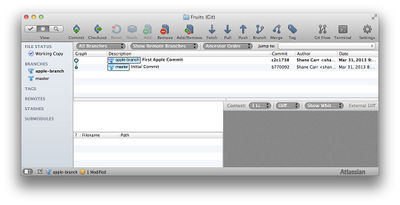
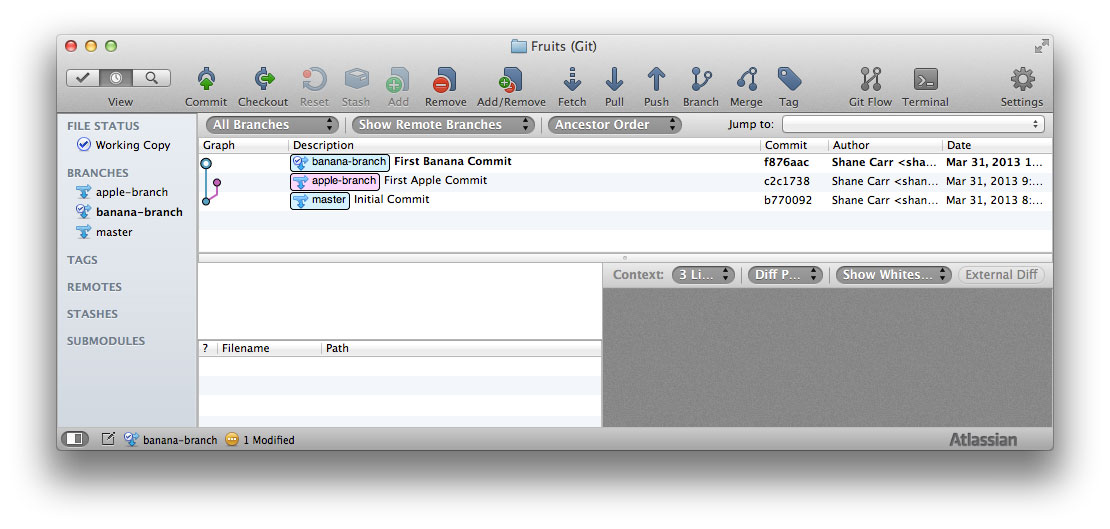
However, this is where a GUI like SourceTree really comes in handy. Here is what you now see in the Log View:
Nifty!
Merging
Okay, so now we want to take the two newest Apple and Banana jokes and merge them both back into master. Let's first merge in banana-branch. We can do this using the merge command:
$ git checkout master
Switched to branch 'master'
$ git merge banana-branch
Updating b770092..f876aac
Fast-forward
 banana.txt | 2 +-
 1 file changed, 1 insertion(+), 1 deletion(-)
WHEN YOU MERGE, YOU TAKE THE CHANGES FROM THE SPECIFIED BRANCH AND MERGE THEM INTO THE CURRENT WORKING BRANCH. It is easy to get this mixed up. Think of it this way: the currently "open" branch is the only one that will get changed when you perform the merge.
We now have the original Apple joke and the new Banana joke in the master branch.
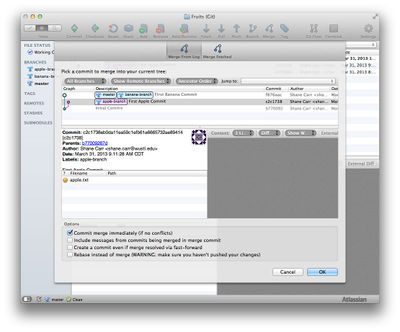
Now let's merge in apple-branch. We can use the command line to do it, but let's see how it works in SourceTree. First press the "Merge" button in the toolbar. You will see a window like the one shown in the screenshot to the right. If everything looks good, press "OK" to perform the merge.
We now have both of the new jokes in our master branch:
$ cat apple.txt
What kind of apple has a short temper?  A crab apple!
$ cat banana.txt
What would you call two bananas? A pair of slippers!
$ cat carrot.txt
How do you make a soup rich? Add 14 carats to it!
Okay, so we are now happy with our Apple joke. Let's close that branch so that it doesn't show up in the list any more:
$ git branch -d apple-branch
Deleted branch apple-branch (was c2c1738).
$ git branch -v
  banana-branch f876aac First Banana Commit
* master        5159c4e Merge branch 'apple-branch'
Let's switch back to our banana branch, make a new joke, and commit that change to the banana branch:
$ git checkout banana-branch
Switched to branch 'banana-branch'
$ echo 'What is the easiest way to make a banana split? Cut it in half!' > banana.txt
$ git commit -am 'Further revising our Banana joke'
[banana-branch cf6a894] Further revising our Banana joke
 1 file changed, 1 insertion(+), 1 deletion(-)
Remember that git commit -a is shorthand for git add -A followed by a plain git commit in most cases.
But guess what: we changed our mind again! Let's try an even better banana joke. This time, I made the change using GUI tools:
- Open banana.txt in your favorite text editor and make the joke say, "Why are bananas never lonely? Because they hang around in bunches!"
- In SourceTree, press "Commit" in the toolbar
- Drag the file to the "Stage" pane, type a commit message like "The best banana joke ever!", and press "Commit"
Finally, let's merge our greatest Banana joke into master and close up banana-branch. Here is how to do it in SourceTree:
- Checkout master
- Press "Merge" in the toolbar
- Select banana-branch and press "Merge"
- To delete the branch, press "Branch" and then "Delete Branch" in the toolbar
- Select banana-branch only, press "Delete Branches", and when asked to confirm, press "OK"
We now have the three newest jokes in our master branch, and all other branches have been cleaned up.
After performing all of the steps in this example, here is how the tree looks in SourceTree:
Conflicts
It might be the case that you inadvertently edit the same file on two different branches. If you do, when you merge one branch into another, a merge conflict will occur.
Example
Suppose both Apple and Banana change the Carrot joke:
# Change the file in the Apple branch
$ git checkout apple-branch
	Switched to branch 'apple-branch'
$ cat carrot.txt
	How do you make a soup rich? Add 14 carats to it!
$ echo 'What\'s a Vegetable\'s favourite martial art? Carrotee!' > carrot.txt
$ git commit -am "Apple changing carrot joke"
	[apple-branch f76f247] Apple changing carrot joke
	 1 file changed, 1 insertion(+), 1 deletion(-)

# Change the file in the Banana branch
$ git checkout banana-branch
	Switched to branch 'banana-branch'
$ cat carrot.txt
	How do you make a soup rich? Add 14 carats to it!
$ echo 'Why did the carrot get an award? Because he was outstanding in his field!' > carrot.txt
$ git commit -am "Banana changing carrot joke"
	[banana-branch f565381] Banana changing carrot joke
	 1 file changed, 1 insertion(+), 1 deletion(-)

# Attempt to merge into master
$ git checkout master
	Switched to branch 'master'
$ git merge apple-branch
	Updating 7ed050b..f76f247
	Fast-forward
	 carrot.txt | 2 +-
	 1 file changed, 1 insertion(+), 1 deletion(-)
$ git merge banana-branch
	Auto-merging carrot.txt
	CONFLICT (content): Merge conflict in carrot.txt
	Automatic merge failed; fix conflicts and then commit the result.
Yikes! What do we do next?
Resolving Merge Conflicts
There are two main ways to resolve merge conflicts: by manually editing the file and choosing the lines of code you want to keep, or by choosing one version of the file and replacing the other entirely.
Manually Editing the Conflicted File
When you open the file after running git merge banana-branch above, you will see something like this:
<<<<<<< HEAD
What's a Vegetable's favourite martial art? Carrotee!
=======
Why did the carrot get an award? Because he was outstanding in his field!
>>>>>>> banana-branch
Git added this notation to help you find which parts of the file were from the current branch (HEAD) and which ones were from the foreign branch (banana-branch). Simply edit the file to reflect the version you prefer, and then commit.
$ emacs carrot.txt # edit the file to reflect the joke you want
$ cat carrot.txt  # optionally check to make sure you've got the right version
	Why did the carrot get an award? Because he was outstanding in his field!
$ git commit -am "Resolving conflict"
	[master 98ba901] Resolving conflict
Keeping One Version and Replacing the Other
Git provides commands that will merge a file from a branch.
- If you want to keep the version in the current branch and ignore the version coming from the foreign branch, run
git checkout --ours carrot.txt - If you want to keep the version coming from the foreign branch and ignore the version in the current branch, run
git checkout --theirs carrot.txt
Here is an example where we keep Banana's version of the joke:
$ git checkout --theirs carrot.txt
$ cat carrot.txt  # optionally check to make sure you've got the right version
	Why did the carrot get an award? Because he was outstanding in his field!
$ git commit -am "Resolving conflict"
	[master 1669536] Resolving conflict
Here is an example where we keep the existing version of the joke, which is Apple's version since we had already merged Apple into master:
$ git checkout --ours carrot.txt
$ cat carrot.txt  # optionally check to make sure you've got the right version
	What's a Vegetable's favourite martial art? Carrotee!
$ git commit -am "Resolving conflict"
	[master 1fdcd7b] Resolving conflict
Tip: If you are using SourceTree, you can right-click the conflicted file in the file browser and select "keep mine" or "keep theirs".
Collaboration
Using Git's powerful branch and merge tools are ideal for team collaboration.
Collaboration Example
Here's the idea: everyone working on a feature has their own branch. Changes from each developer's branch are periodically merged in to the master branch, and developers periodically merge other people's changes from the master branch into their own branch. When the feature is complete and bug-free, the branch is closed.
Suppose there are three developers on a project: Susan, Caroline, and Rachel. They each have their own branch and are developing separate features. Susan is ready to merge her changes into master. Here is what might happen:
- Susan checks out the master branch locally.
- Susan pulls any changes that might be on origin/master into her local copy of master.
- Susan merges relevant changes from her branch into master.
- Susan checks out her own branch again.
- Susan pushes her repo updates to the remote repository.
- Caroline and Rachel check out the master branch locally.
- Caroline and Rachel pull the changes from origin/master to master.
- Caroline and Rachel check out their own branches locally.
- Caroline and Rachel merge master into their respective branches.
- Finally, Caroline and Rachel push everything up to the remote repository.
This can be a cumbersome process, but it is important that you perform it at least once per working session to ensure that everyone's branches are up-to-date.
Alternatives
Fortunately for us, there exist developers who have created additional command-line utilities that automate the above process. One such project is git-up. You and your partner may elect to use git-up instead of manual branching and merging.
