Difference between revisions of "Git"
| Line 101: | Line 101: | ||
[[File:SourceTree-Branching.jpg|400px|thumb|right|Creating a new branch using SourceTree]] | [[File:SourceTree-Branching.jpg|400px|thumb|right|Creating a new branch using SourceTree]] | ||
| − | Let's go ahead and stage our file, | + | Let's go ahead and stage our file: |
| + | |||
| + | <source lang="bash">$ git add apple.txt</source> | ||
| + | |||
| + | In SourceTree, drag a file from the "working tree" pane to the "files staged in index" pane to stage the file. | ||
| + | |||
| + | But now, instead of committing this change directly to our '''master''' branch, let's make a new branch, and let's call it '''apple-branch'''. | ||
In SourceTree, press the "Branch" button to bring up a little dialog box. See the screenshot for an example. | In SourceTree, press the "Branch" button to bring up a little dialog box. See the screenshot for an example. | ||
| Line 129: | Line 135: | ||
</source> | </source> | ||
| − | In SourceTree, the commit | + | In SourceTree, run the commit as you have been doing in Modules 2-4. |
'' under construction '' | '' under construction '' | ||
<source lang="bash">$ git checkout -b branchB</source> | <source lang="bash">$ git checkout -b branchB</source> | ||
Revision as of 22:48, 31 March 2013
Git is a distributed version control system. It enables you to:
- Keep track of revisions to your files
- Push and pull your revisions to other computers or servers
- Collaborate with other people on the same project
Subversion is the version control system you used in CSE 132. However, Subversion does not have the same agility of Git in terms of local revisions, staging, and collaboration. This guide aims to get you up to speed with the power of Git for multi-developer projects.
Contents
Commits
When you want to create a "snapshot" of your project, what you do in Git is called a commit. The commit finds all files under version control, looks for ones that have been changed, and records the changes in a local archive. You learned how to perform a commit in SourceTree in Module 2.
If you need to determine what files have been changed since the last commit, you gan use Git's status command:
$ git status
In SourceTree, the results of git status are displayed nicely in the "File Status View".
Staging
Up to this point, you have been using SourceTree to automatically commit all changes. However, Git enables you to not commit every single file if you don't want to. This is where staging comes into play.
To add a file to the stage, use the add command:
$ git add <filename>
Then, when you run git commit, only those files that have been staged will be updated.
Note: git commit -a commits all files, whether or not they had been staged. git commit (without the -a) only commits those files in the staging area.
Staging in SourceTree
Staging in SourceTree is very intuitive. However, before you can use this feature, you need to turn it on. (We had you turn of the staging feature in Module 2.)
- Go to the SourceTree preferences.
- Enter the Git pane.
- Check the box that says "Use the staging area".
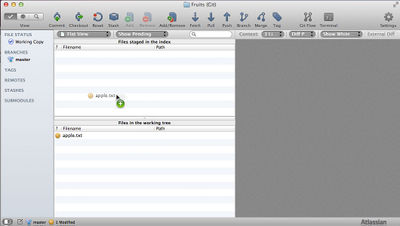
You should now be able to use the staging area! In the "File Status View", you can drag and drop files back and forth between Staged and Unstaged. See the screenshot for an example.
Branches and Merging
Git enables you to work on different features of the same software suite in isolation from each other. The way to do this is using branches.
To create a new branch, use the checkout -b command:
$ git checkout -b my-new-branch
Now, when you next commit, you will be committing to the my-new-branch branch rather than the default master branch.
To switch the working copy over to a different branch, use the checkout command:
$ git checkout my-existing-branch
To merge changes from a different branch to the current working copy, use the merge command:
$ git merge my-existing-branch
After you merge, if you wish to terminate a branch, use the branch -d command:
$ git branch -d my-existing-branch
This will all make more sense when we go through an example. We will also be using SourceTree in the example.
Example: Staging and Branches
Suppose I have three files under version control: apple.txt, banana.txt, and carrot.txt. The contents is like so (Thanks to Sumit Khemka for the humor):
- apple.txt: How do you make an apple turnover? Push it downhill!
- banana.txt: What is a ghost's favorite fruit? A boonanaa!
- carrot.txt: How do you make a soup rich? Add 14 carats to it!
All files have been committed to the HEAD, which is by default the master branch:
$ git add -A; git commit
...
$ git status
# On branch master
nothing to commit, working directory clean
Now, let's change the Apple joke, and keep the Banana and the Carrot the same:
- apple.txt: What kind of apple has a short temper? A crab apple!
We can see in Git and SourceTree that there is one file changed: apple.txt.
$ git status
# On branch master
# Changes not staged for commit:
#   (use "git add <file>..." to update what will be committed)
#   (use "git checkout -- <file>..." to discard changes in working directory)
#
#	modified:   apple.txt
#
Let's go ahead and stage our file:
$ git add apple.txt
In SourceTree, drag a file from the "working tree" pane to the "files staged in index" pane to stage the file.
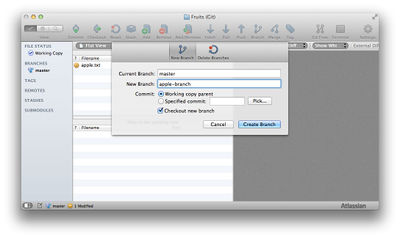
But now, instead of committing this change directly to our master branch, let's make a new branch, and let's call it apple-branch.
In SourceTree, press the "Branch" button to bring up a little dialog box. See the screenshot for an example.
If we were using the command line, the command would be:
$ git checkout -b apple-branch
Here is what we now see when we run git status:
$ git status
# On branch apple-branch
# Changes to be committed:
#   (use "git reset HEAD <file>..." to unstage)
#
#	modified:   apple.txt
#
Let's now go ahead and commit the changes:
$ git commit -m "First Apple Commit"
[apple-branch c2c1738] First Apple Commit
 1 file changed, 1 insertion(+), 1 deletion(-)
In SourceTree, run the commit as you have been doing in Modules 2-4.
under construction
$ git checkout -b branchB

