Assignment : Welcome to CSE131!
Objective
The goals of this assignment are to prepare for the rest of the course! The major parts are:
- Install software we’ll be using for the class.
- Create an account on GitHub, which is a cloud service we will use to distribute and collect your work. (If you already have an account, you will need to add your WUSTL email to it if it isn’t already there.)
- “Accept” the materials needed for this assignment.
- Add the assignment to Eclipse.
- Using Eclipse, which you installed in the first step, on the assignment, which you got in the third and fourth steps.
- Practice “pushing” your work, which both makes a backup copy and is used to “turn in” work.
- “Accept” a repository for “Exercises” and add it to Eclipse.
- Review course details
- “Demo” your work to a TA. This is how we will record credit for most class sessions, so be sure you do it before leaving each class.
- Show the TA your work
- Confirm that your final work is on GitHub
- Confirm that your score is recorded in Canvas
1. Installing Software
We will be using a language called Java to create and run code on our computers. Before you can execute Java code, you need to install two pieces of software:
- The Java Development Kit (JDK). The JDK includes a whole bunch of Java tools that are used to assist in the creation and execution of Java programs. Visit the link above to download the JDK and install it on your computer.
- Professional software developers use an Integrated Development Environment (IDE). As the name describes, it’s used to develop computer programs and it integrates several different useful features:
- It includes a smart editor that helps you create and work with computer code.
- Is can work with other programs called compilers. Compilers translate the program you write into something the computer can run. The JDK that you installed included a compiler.
- Other handy features, like support for debugging assistance
We’ll be using Eclipse, a popular IDE that supports programming in Java.
You should now install: 1. The Java Development Kit (JDK) (first) and 2. Eclipse. Here’s a video you can follow-along with to install both: JDK & Eclipse Install
2. Create a GitHub Account
We will be using software called Git for “version control”. Version control systems (VCS) are great for when you want to record who did what for which file or set of files, and it is especially useful when multiple people collaborate on projects. Here’s a video explaining the concept:
We’ll use the site GitHub to distribute and collect course work. GitHub is a place that hosts git repositories. You’ll need to create a (free) account. Please visit GitHub and sign up for an account. Please use your WUSTL email address, although you can add multiple e-mail addresses. If you already have an account, please be sure to add your WUSTL email. These directions describe how to add additional email addresses.
3. Accepting a new assignment
For each major type of course work you will need to generate a repository on GitHub. You’ll do so by clicking on a link and “accepting” an assignment. Click HERE to accept Lab 0 and follow along with the instructions below.
-
Carefully scroll through the list of names and select only your name!
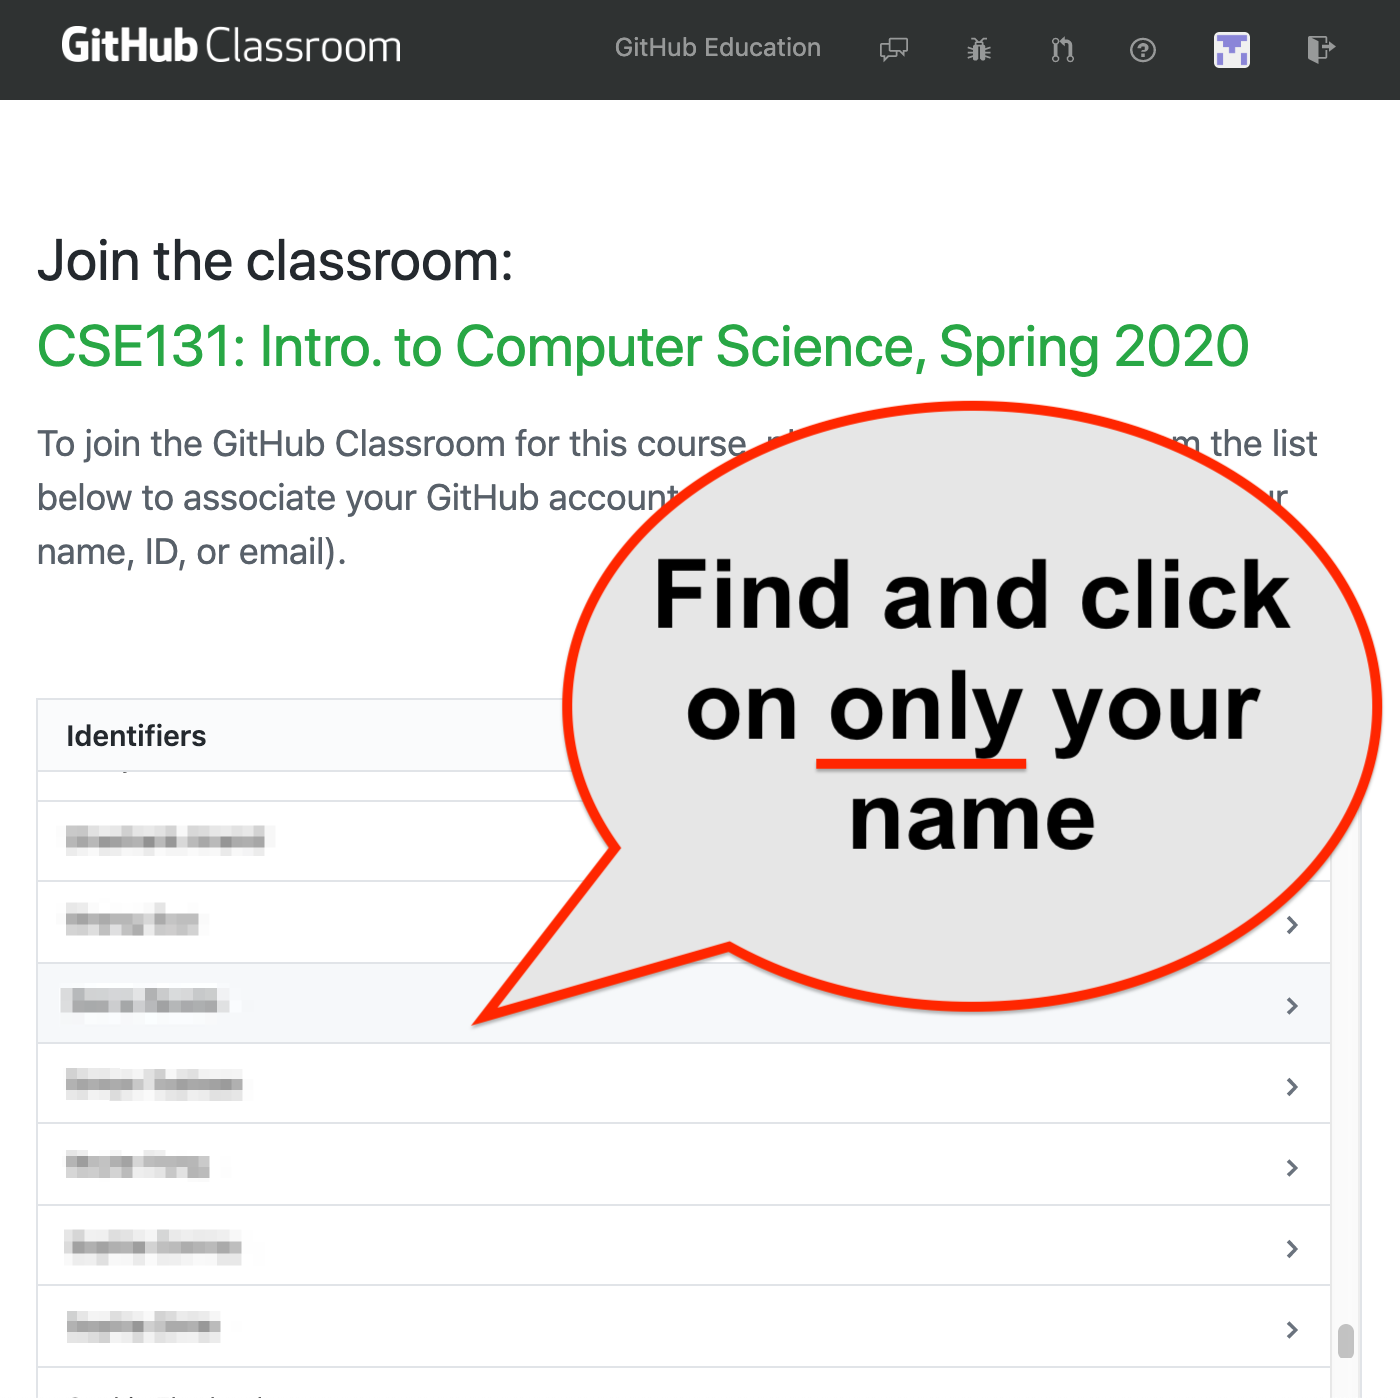
- You only need to do this one time this semester. After doing so, your GitHub account is associated with your name (for this course).
- Select the button to accept the assignment:

- After accepting the assignment, a copy of the assignment materials, called a repository, will be made for you. Click on the link to view the repository:

- Finally, 1) click on
Clone or Downloadand then 2) click the “Copy to Clipboard” button to make a copy of the URI shown.
You’ve now created an assignment repository and have the URI. You’ll need to do steps 2-4 many times this semester.
4. Add the assignment to Eclipse
- Open or go to Eclipse.
- Go to the
Filemenu and selectImport
- Expand the
Gitoptions and selectProjects from Git
- Select
Clone URIand then hitNext
- The URI you copied when you created the assignment should automatically be used (if not, go back to GitHub, copy the full URI for cloning the repository, and paste it in here). Hit
Next
- Enter your GitHub username and password. (You can select
Store in Secure Storeif you don’t want to re-enter your password every time you accept an assignment). SelectLog inwhen ready
- The URI you copied when you created the assignment should automatically be used (if not, go back to GitHub, copy the full URI for cloning the repository, and paste it in here). Hit
Next
- Select
Nexton the Branch Selection window.
- Select
Nexton the Local Destination window.
- Select
Import existing Eclipse Projectand selectNexton the Project Wizard.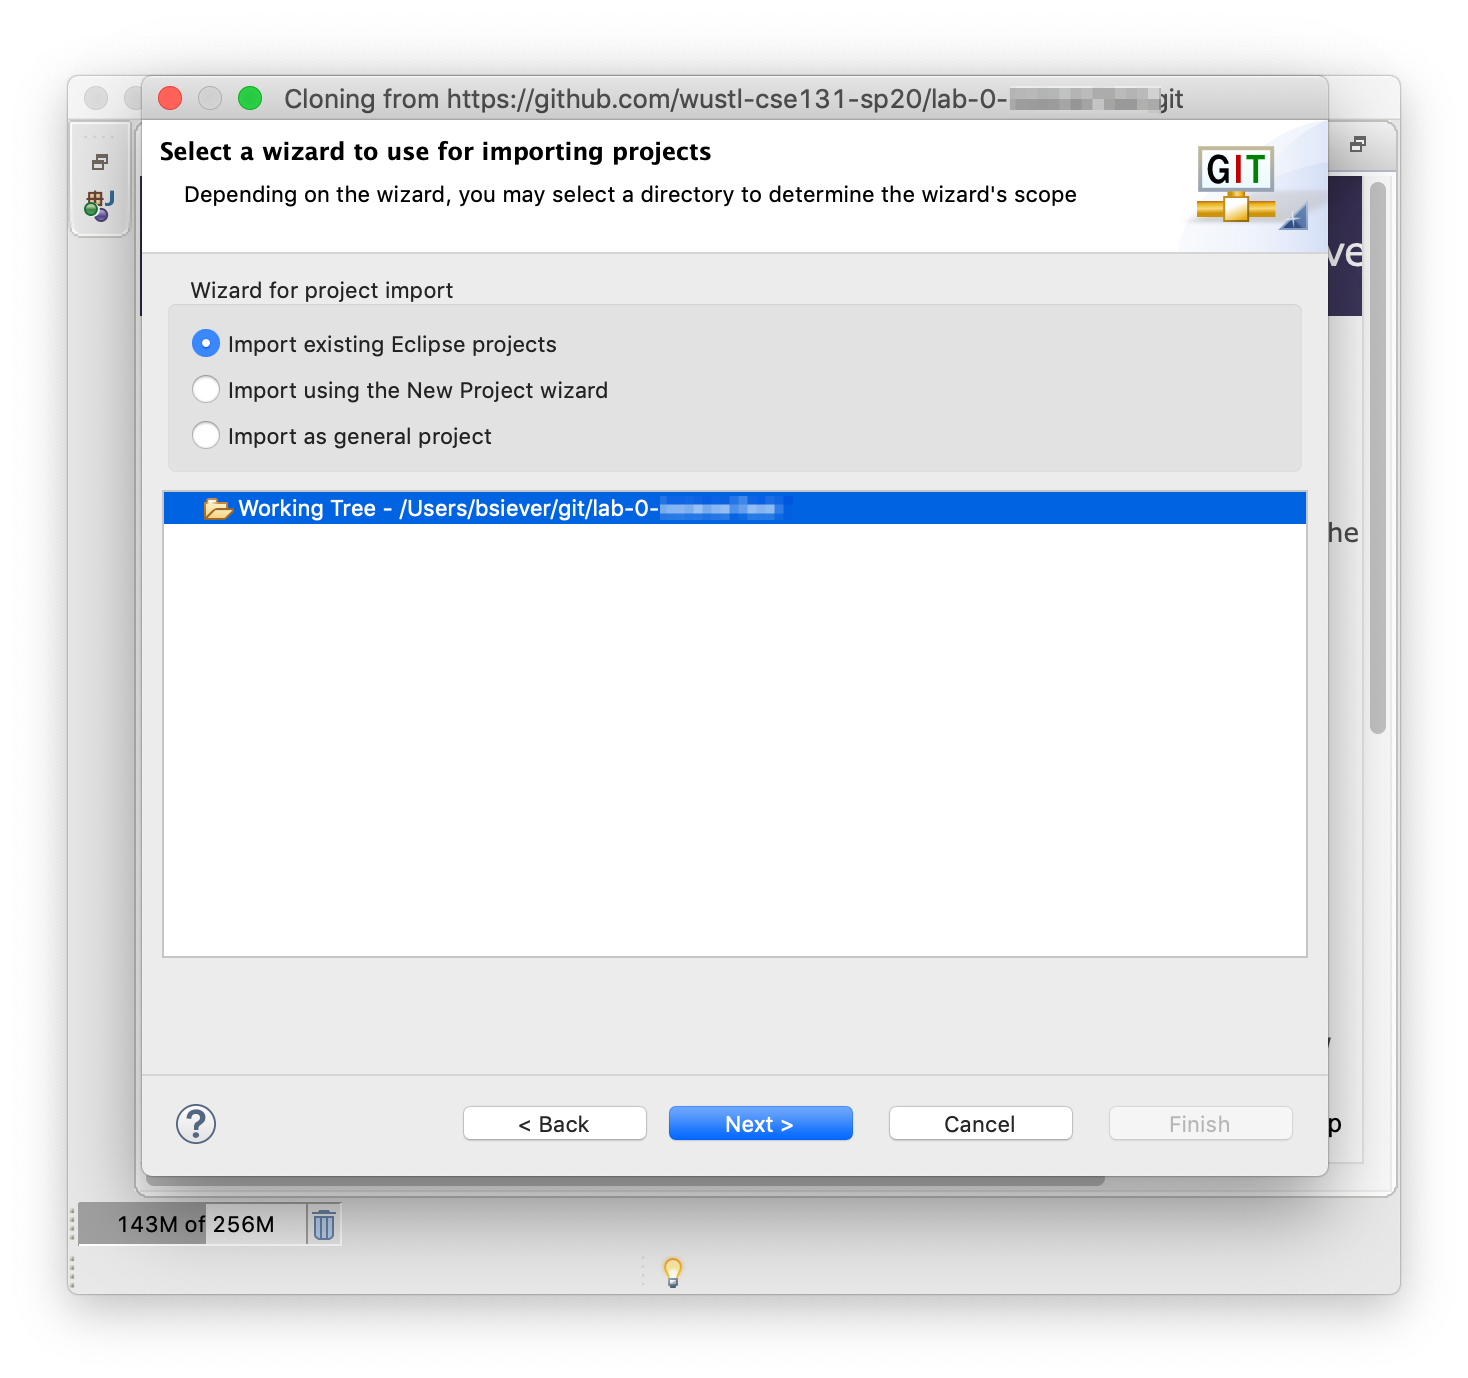
- Select
Finish.
5. Using Eclipse on the Assignment
Your project should now be open in Eclipse. You should have a pane called the Package Explore on the screen (if not, go to the Window menu, select Show View and pick Package Explorer).
- Expand the
lab-0folder. - Expand the
srcfolder. -
Expand the
lab0folder and double click on theRobotInstructions.javafile. It should look something like this:
- Run the other file, the
RobotController.java, by right-clicking on it, selectingRun As, and then selectingJava Application, like:
- A new window should now open. Click on the
Gobutton and you’ll see a simulated robot draw on the screen. It’s merely following the instructions that are being given in theRobotInstructions.javathat you opened. - Close the robot simulation window (not Eclipse).
- Review the contents of
RobotInstructions.java, which should be shown in Eclipse. Make some changes:- Change the
robot.forward(60);torobot.forward(120);. What do you think the robot will do differently? - Run the robot simulator again. Now that you’ve configured Eclipse to run it, you can just select the
Playbutton on the menu:
- Did the robot do what you expected?
- What if you removed the line that now says
robot.forward(120);and replaced it with two lines that each sayrobot.forward(60);? Before making any change be sure to close the simulator. Then make your changes and hit thePlaybutton to see their impact. - Try removing a semi-colon (
;). Eclipse should add red indicators in several places indicating there are errors with the file. These are helpful cues that you should pay attention to in larger programs. The circles in this picture show all the special indicators, which help programmers find the exact locations of this type of problem: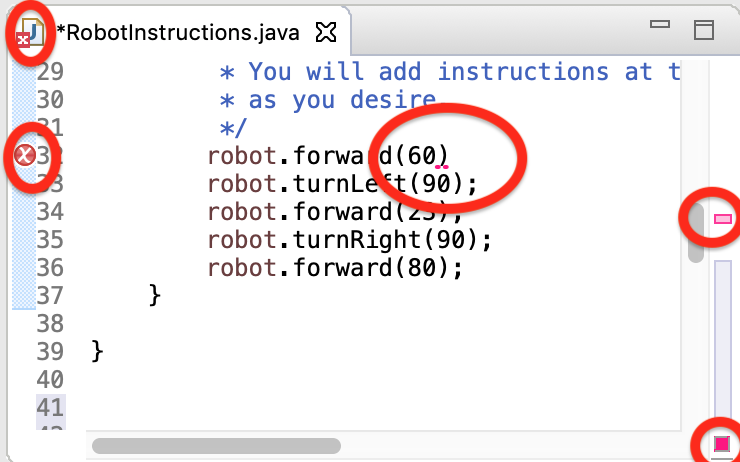
- Try running the program with errors. Eclipse should show a window warning you. Do not hit the
Proceedbutton. - Put the semi-colon back in and correct the errors.
- Add a new, empty line after a
robot.forwardline. Typerobotthen.. Notice that when you hit the.a window appears with a list of options. Eclipse is letting you know the choice available to you here. This is one benefit of using an IDE like Eclipse. - Experiment with changing / adding other commands.
- Change the
Working With Code
Now that you understand how to use Eclipse to modify and run the program, spend some time making the robot draw a picture of a house. Be sure to stop at least 20 minutes before the end of the session, even if you aren’t completely done! You can come back and work on it more after class if you’d like.
6. “Pushing” your work
You should frequently “commit and push” work, which saves work to the cloud. This process is also used to allow us to see your final work. Be sure you back up your work like this regularly. (Often the backups are vital if someones loses their work due to a computer problem. They can just restore the saved copy to a new computer)
Since you should be regularly “saving” work to GitHub, we never accept the excuse “X happened to my computer and I lost my work”!!
-
Right-click on the Project Folder, Select
Teamand then selectCommit:
- The commit tab will open (you may want to stretch out the pane to see all of it). The
Staged Changespane lists the files that have changed and will be committed (i.e., saved). Normally it will already include any files you’ve been working on, but if not, be sure to drag them down from theUnstagedpane.
- Commits need a message describing what is being saved or why. Often this is a description of either what you’re working on or what still needs to be done. Always try to pick something brief, but meaningful. Enter a message and then click on
Commit and Push..(you may now be prompted for your GitHub password). (Do NOT pick just theCommitbutton. That will save a copy on your computer, but not on GitHub. You risk not having a back-up copy of your work and not getting credit on assignments!)
After doing Commit and Push always check your work on GitHub. Go to GitHub.com, select the respository for the assignment, and then review the individual files.
7. Accept an Exercise Repository
We’ll use a separate repository for Exercises, which you should complete as you watch the course videos. Go through the steps given above to: 1) Accept the repository via this Link and 2) Add it to Eclipse.
Many things called “Assignment”, “Studio”, or “Extension Batch” will require new repositories, but this single repository includes all the things required for all “Exercises” this semester.
8. Course Information
Review the course site on Canvas. Make sure you review:
- Course Policies
- Know where to go to find Office Hours, which will be posted by the second week of class.
- Know how to browse the content and prepare for modules.
- Be sure you’re signed up for the course’s Piazza forum.
9. “Demo” your work to a TA!
Sign up to have a TA demo your work (the sign-up processed will be described in class).
To submit your work, contact the instructor or a TA. They will walk you through the submission process. Be prepared to show them the work that you have done and answer their questions about it!
- Show the TA your work
- Show them your final work on GitHub.
- Ask any questions you have about the course.
- After the
- Confirm that your score is recorded in Canvas. Mistakes can happen and you should always confirm credit is recorded before leaving class!