
Select Mesh![]() Edit from the main menu bar to create elements from selected nodes.
Edit from the main menu bar to create elements from selected nodes.
To create elements:
Enter the Mesh module.
From the Object field in the context bar, select Part and select an orphan mesh part from the list of parts. This tool is available only for working on an orphan mesh part.
From the main menu bar, select Mesh![]() Edit.
Edit.
ABAQUS/CAE displays the Edit Mesh dialog box.
Tip:
You can also display the Edit Mesh dialog box using the ![]() tool, located at the bottom of the Part module and Mesh module toolbox.
tool, located at the bottom of the Part module and Mesh module toolbox.
In the dialog box, do the following:
In the Category field, select Element.
From the Method list, select Create.
Click OK.
ABAQUS/CAE displays the existing nodes. In hidden and shaded mode only the visible nodes are displayed.
In the prompt area, click the arrow next to the Element shape field, and select the element shape of your choice from the list that appears.
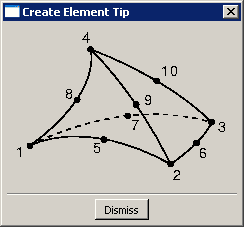
In the viewport, select the nodes that will define the element. You must select the required number of nodes for the element shape specified in the previous step. In addition, you must select the nodes in a specific order. From the right of the prompt area, click Tip to see a figure of the element shape and connectivity. For example, ABAQUS/CAE displays the following figure when you are creating a 10-node tetrahedral element:
Once you have selected the required number of nodes, ABAQUS/CAE creates the new element.
Tip: If you make a mistake while creating an element, click Undo in the Edit Mesh dialog box to remove the most recently created element.
Repeat the previous steps as often as necessary to create additional elements. If you change the element shape, click the Tip button again to update the element shape and connectivity figure.
When you have finished creating elements, click mouse button 2 or the cancel button ![]() in the prompt area to exit the procedure.
in the prompt area to exit the procedure.
