When you print viewports on the canvas directly to a Windows printer, you can use the Page Setup dialog box to customize the resulting printed image. You can configure the following:
Orientation
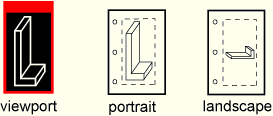
You can choose either Portrait or Landscape orientation. Portrait and landscape orientations are illustrated in the following figure:

Units
You can choose either Inch or Millimeter units. Your selection determines the units used for the Image Size and Margins settings that also appear in this dialog box.
Quality
You can select from three levels of quality. Each setting limits the maximum file size that is sent to the printer:
Coarse limits the file to 2 megabytes,
Medium limits the file to 10 megabytes, and
Fine limits the file to 50 megabytes.
Note: Click Properties in the Print dialog box to access the printer settings.
Date and logo
By default, ABAQUS/CAE includes the date and time and the ABAQUS/CAE logo across the top of an image sent directly to a Windows printer. You can choose to remove the date and time or the logo from your output.
Image Size
You can choose one of three methods to determine the size of the printed image:
Fit to page fits the selected image within the current page size and margins.
Use size on screen prints the image as it appears on the screen. Parts of the image that do not fit within the current page size and margins are cut off in the printed output.
Use settings below allows you to enter a width or height; ABAQUS/CAE adjusts whichever dimension you do not edit to preserve the current aspect ratio.
Margins
You can provide the Top, Bottom, Left, and Right margins. ABAQUS/CAE computes the maximum image size as the page size minus the margins. You can specify zero-width margins; however, printers cannot print to the edge of the paper and typically have margins of at least 0.25 inches (6 mm). The page size is set in the printer settings.
Note: Click Properties in the Print dialog box to access the printer settings.
You can also use the Print dialog box to set the number of copies to print and to access specific settings for the selected printer. Click the Properties button to open the printer name Document Properties dialog box. The available printer settings are determined by the installed printer driver and configuration, not by ABAQUS/CAE.
For more information, see “Windows and PostScript image layout,” Section 8.1.2, and “Hardcopy image quality,” Section 8.1.5.
To customize the image sent to a Windows printer:
From the main menu bar, select File Print.
Tip:
You can also click ![]() in the toolbar.
in the toolbar.
The Print dialog box appears.
From the Destination radio buttons, choose Printer.
From the Printer list, select the name of the printer that you want to use.
Click the arrows to the right of the Copies text field to increase or decrease the number of copies to print or type the number directly in the text field. You can print 1 to 100 copies.
From the lower-right corner of the Print dialog box, click Page Setup.
The Page Setup dialog box appears.
From the Orientation field, choose the paper orientation.
From the Units field, choose the units to use for the image size and margins.
From the Quality field, click the arrow and select Coarse, Medium, or Fine image quality.
If desired, toggle off Print date to remove the date and time from your output.
If desired, toggle off Print ABAQUS logo to remove the logo from your output.
From the Image Size field, choose the size for your printed image.
From the Margins field, type the Top, Bottom, Left, and Right margins (in the units that you selected previously).
Click OK to save your customization settings and to close the Page Setup dialog box.
If desired, click Properties in the Print dialog box to open the Document Properties dialog box to access options specific to your printer.
Note: The Document Properties dialog box is a Windows dialog box, not part of ABAQUS/CAE. If you have questions regarding the information in this dialog box, you should address them to your system administrator or consult the documentation for your printer or printer driver.
When you have finished with the Print dialog box, click OK to generate the desired output.
ABAQUS/CAE generates the output and closes the Print dialog box. Your settings in the Print dialog box are saved for the duration of the session.
