Websockets
Contents
Overview
This tutorial explains how to create a basic websocket, opening communication between a server on a raspberry pi and a client, and control LEDs on the pi using the web client.
Materials/Prerequisites
- Raspberry Pi
- 2 LEDs
- Female-Male Wires
- Breadboard
- Resistors
- An AWS account
Process
Preparation
Set up a Lightsail or EC2 instance. For the sake of this tutorial, we'll assume that you've set up a Linux AMI EC2 Instance.
Turn on your pi. If you haven't already followed the tutorial for SSH'ing into your pi, you can view it here. If you've set this up, you can SSH into your pi. Otherwise, you can use a monitor setup with an hdmi and external keyboard and mouse to access the terminal from the pi directly.
SSH into your pi and your AWS instance.
Install LAMP
This tutorial explains what we're doing in more depth, but basically you're setting up a website to be hosted on your AWS instance. Run the following commands in your AWS instance (client side).
#update your instance so that it can install LAMP (Linux Apache, MySQL, PHP)
sudo yum update -y

#install LAMP
sudo yum install -y httpd24 php70 mysql56-server php70-mysqlnd

#start the server
sudo service httpd start

#make it so that the server starts on boot
sudo chkconfig httpd on
After you have run these commands, the server should start when you start the instance. However, you're going to want to add a security rule to the instance. You should already have a TCP port 22 rule (for SSH), but now you need to add an HTTP TCP port 80 rule with custom range.
After you've added this rule, test the page by typing in the instance's PUBLIC IP address into the address bar. There should be a test page for the linux AMI instance showing. Please troubleshoot using the tutorial link provided at the beginning of this section.
The root of your server is at /var/www/html. To create a webpage, you're going to need user access. Run the following command:
#add your own username to the apache group
sudo usermod -a -G apache <YOUR USERNAME>
Now, exit your instance and reconnect to allow the changes to happen. After you SSH back into your instance, you can check that you've been added to the group.
#see what groups you're a part of
groups

#give ownership to your user
sudo chown -R <YOUR USERNAME>:apache /var/www

#allow your group to edit the html files
sudo chmod 2775 /var/www
find /var/www -type d -exec sudo chmod 2775 {} \;
find /var/www -type f -exec sudo chmod 0664 {} \;
Creating the Websockets: Client Side (AWS Instance)
Now that you have an up and running page, you'll want to create the actual index of your page. Run the following commands in your instance terminal:
#navigate to your server root
cd /var/www/html

#create your root page
sudo touch index.php

#edit your root page
sudo nano index.php
You're currently editing the index page of your website, the main thing that people will see when they first come to your site. Copy the following code into your php file:
//The reason we're making this a php file and not a html file is for more flexibility in the long term, but if you would rather make an html file, just remove the echo and quotes.
echo"
<html>
	<head>
		<title> Art1 - Leds </title>
	</head>
	<body>
		<div>
	          	<h2>Play with LED's</h2>
		        <p>Here you can turn on/off LED's connected to the Raspberry PI. </p>
	                Green:
                        <p>
                           <input type=\"button\" id=\"green_on\" value=\"ON\">
                           <input type=\"button\" id=\"green_off\" value=\"OFF\">
                        </p>
	                Red:
                        <p>
                           <input type=\"button\" id=\"red_on\" value=\"ON\">
	                   <input type=\"button\" id=\"red_off\" value=\"OFF\">
                        </p>
                 </div>
                 <hr> Websocket status: <br>
                 <div id=\"ws-status\"> Waiting... </div>

                 <script src=\"//ajax.googleapis.com/ajax/libs/jquery/1.8.3/jquery.min.js\"></script>
                 <script src=\"static/ws-client.js\"></script>
         </body>
</html>
";
To save and exit, hit ctrl-o, enter, ctrl-x. You should now be back in your server root.
If you've noticed, you're including a script that is in the server but that you haven't created yet. Run these commands in your terminal:
#make the static directory that you're referencing
sudo mkdir static

#navigate into this new directory
cd static

#create the js file you're referencing
sudo touch ws-client.js

#edit this new js file
sudo nano ws-client.js
Copy the following code into your client javascript file.
$(document).ready(function(){

        var WEBSOCKET_ROUTE = ":8888/ws";
        var piIP = "<INSERT PI IP ADDRESS HERE>";

        if(window.location.protocol == "http:"){
            //localhost
            var ws = new WebSocket("ws://" + piIP + WEBSOCKET_ROUTE);
	    console.log("http case");
            }
        else if(window.location.protocol == "https:"){
            //Dataplicity
	    console.log("in the https state");
            var ws = new WebSocket("wss://" + piIP + WEBSOCKET_ROUTE);
            }

        ws.onopen = function(evt) {
            $("#ws-status").html("Connected");
            };

        ws.onmessage = function(evt) {
            };

        ws.onclose = function(evt) {
            $("#ws-status").html("Disconnected");
            };

        $("#green_on").click(function(){
            ws.send("on_g");
            });

        $("#green_off").click(function(){
            ws.send("off_g");
            });

        $("#red_on").click(function(){
            ws.send("on_r");
            });

        $("#red_off").click(function(){
            ws.send("off_r");
            });

      });
Where it says <INSERT PI IP HERE>, enter your pi's IP address.
Creating the Websockets: Server Side (Raspberry Pi)
You're SSH'ed into your pi. You're going to want to run your server on this pi. Assuming you're in your user's home directory, run the following commands:
NOTE: IF YOU ARE NOT USING THE DEFAULT Pi USER, YOU MAY NOT BE A SUPER USER. SUDO ON YOUR PI REQUIRES YOU TO BE USING A SUPER USER ACCOUNT.
#download tornado
sudo pip install Tornado
#create your server script
sudo touch server.py
#open your server script
sudo nano server.py
Copy the following code into your server script:
#! /usr/bin/python
import os.path
import tornado.httpserver
import tornado.websocket
import tornado.ioloop
import tornado.web
import RPi.GPIO as GPIO

#Initialize Raspberry PI GPIO
GPIO.setmode(GPIO.BOARD)
GPIO.setup(16, GPIO.OUT)
GPIO.setup(18, GPIO.OUT)
#Tornado Folder Paths
settings = dict(
	template_path = os.path.join(os.path.dirname(__file__), "templates"),
	static_path = os.path.join(os.path.dirname(__file__), "static")
	)
#Tonado server port
PORT = 8888
class MainHandler(tornado.web.RequestHandler):
  def get(self):
     print "[HTTP](MainHandler) User Connected."
     self.render("index.html")

class WSHandler(tornado.websocket.WebSocketHandler):
  def check_origin(self, origin):
    return True

  def open(self):
    print '[WS] Connection was opened.'

  def on_message(self, message):
    print '[WS] Incoming message:', message
    if message == "on_g":
      GPIO.output(16, True)
    if message == "off_g":
      GPIO.output(16, False)
    if message == "on_r":
      GPIO.output(18, True)
    if message == "off_r":
      GPIO.output(18, False)
  def on_close(self):
    print '[WS] Connection was closed.'

application = tornado.web.Application([
  (r'/', MainHandler),
  (r'/ws', WSHandler),
  ])
if __name__ == "__main__":
    try:
        http_server = tornado.httpserver.HTTPServer(application)
        http_server.listen(PORT)
        main_loop = tornado.ioloop.IOLoop.instance()
        print "Tornado Server started"
        main_loop.start()
    except:
        print "Exception triggered - Tornado Server stopped."
        GPIO.cleanup()
#End of Program
To run the server, use the command:
sudo python server.py
When your server is running, you can open the webpage at your AWS instance's public IP, and you should see two LED's with buttons for on and off, and the websocket status at the bottom of the page should say "connected".
Wiring Your Pi

IO Pins on the Raspberry Pi

The code that you put onto your server script indicates that you are using IO pins 16 and 18 for your green and red LEDs, respectively. Wire your Pi so that you have the following circuits:
Pi IO pin 16 - long end of LED - short end of LED - resistor - ground (Pi IO pin 6)
Pi IO pin 18 - long end of LED - short end of LED - resistor - ground (Pi IO pin 6)
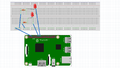
LED Configuration

OPTIONAL: Having the Server Script Run on Boot
While SSH'd into your pi as a super user, run the following command:
#create a new script
sudo touch /etc/server_start.sh

#open the script to edit
sudo nano /etc/server_start.sh
Copy the following lines of code into the script:
#!bin/bash
#wait for boot
sleep 60
#start the server
python /home/<YOUR USERNAME>/server.py
Because you'll be editing the super user's crontab file, you don't need to worry about using sudo in the script commands.
sudo crontab -e
At the bottom of the opened script, insert the following line:
@reboot /etc/server_start.sh
To test this, restart your pi with
sudo reboot
On reboot after about 60 seconds, open your AWS instance's public IP in a browser, and the websocket status should be "connected".
Authors
Amanda Hua, Tricia Brown, TA: Keith Kamons Spring 2019
Group Link
Our Project Page
Our Weekly Log