Breadboard prototype to Perfboard prototype
The purpose of this tutorial is to provide a guideline for planning so that one does not have to rearrange their perfboard after soldering
| Exterior | Interior |
|---|---|
|
Step 1: List all connections made on your breadboard like so: |
|
|
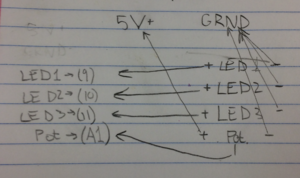
Step 2: Separate your source of power and ground from applications (like LEDs, Potentiometers, etc.). Determine how each application is to be powered, grounded, and connected to Arduino. Finally draw arrows on your diagram to show connections. |
|
|
Step 3: Create a map of your perfboard on Excel by highlighting each hole on the perboard in yellow cells. |
|
|
Step 4: Time to think about resistors. In this example, resistors will be used in the connection between LEDs and the Arduino connection. You can manually plug a resistor into your perfboard to test, but generally you need the space of 5 holes to insert a resistor comfortably into the board. |
|
|
Step 5: Lets start filling in our perfboard blueprint on Excel. First, line up two rows to serve as power and ground strips and color code them like so: |
|
|
Step 6: Next, fill in a column for Arduino connections. Remember, you want to make your perfboard as space efficient as possible. It is a good idea to color code and place that column tightly below the power and ground grows: |
|
|
Step 7: Finally, account for the space of resistors and fill in the rest of your schematic using the sketches made earlier: |
|
|
Step 8: Great! Now you are ready to solder. Remember to mark off each connection made on the board as you go. Also, as you may have noticed, as we proceeded in these steps, we used less and less of the perfboard. This was absolutely the goal: to be as space efficient as possible. So once your done soldering, you can cut off unused parts of the perfboard. |


